Dry out the cellar yourself – infrared heating is used
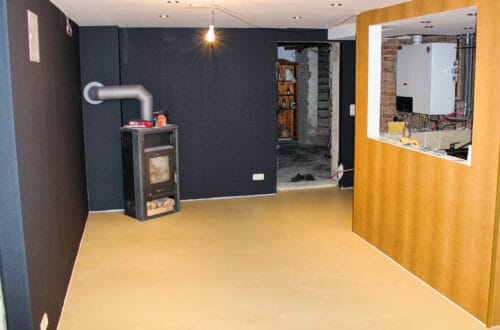
In order to make the basement rooms of our over 100-year-old city villa usable, I first have to dry them out. The house is partially built into the slope. On the east side the basement floor is at ground level and on the west side about 200 cm below ground level.
I have already used various methods for draining. I am currently creating a new watertight horizontal barrier in the masonry using chemical agents such as injection liquid, injection sticks and injection cream.
I have already drained the eastern part of the cellar. Now it is the turn of the western part of the building. This time I let my camera run along to shoot short video footage for my“Drying out the basement” playlist.
But also here in the construction diary I would like to document the individual steps.
Workshop in damp basement
Over the winter I dedicate myself to the development of the basement rooms so that they become usable. A room of about 36sqm is to be converted into a workshop as my current workshop is simply too small.
Unfortunately, the basement is very damp and clammy and I fear that my tools and building materials would sooner or later suffer enormous damage. Therefore, it is only logical that I also completely dry this cellar first.
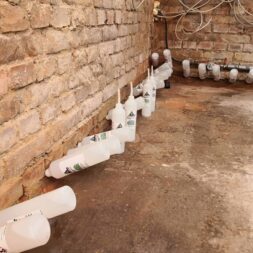
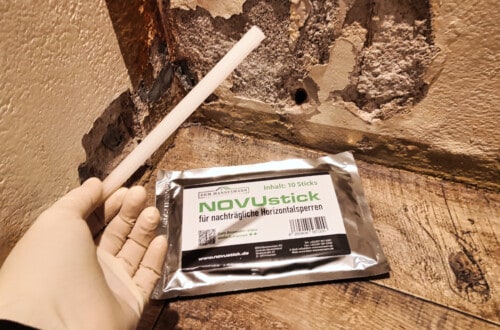
Here, as in other basement rooms, I relied on the injection method. In this process, a liquid is introduced into the walls so that they no longer absorb moisture.
You can also find the other parts of my project series via the search and via the “Similar amounts” section at the end of this entry.
Drying basement – #1 test drilling for the injection bottles.
Basement Drying #2 Intermediate Status after 1 Week | Injection Solution
Drying basement with injection – #3 intermediate status after 2 weeks
Drying basement with injection #4 – Week 3 Infrared heating comes into play

- SCHUTZ VOR FEUCHTIGKEIT - Novusan schützt Ihren Keller vor aufsteigender Feuchtigkeit & Nässe. Fehlt Ihrem Haus die Mauersperrbahn, schaffen Sie mit der Injektion nachträglich eine Abdichtung.
- WAND TROCKENLEGEN - Neben der Feuchtigkeits-Abwehr eignet sich die Injektionsflüssigkeit, um bereits vollständig durchfeuchtete Wände dauerhaft auszutrocknen. (5 Flaschen = 1m trockene Wand)
- FÜR JEDE FEUCHTE WAND - Die Horizontal-Sperre eignet sich für Lagerfügen in allen mineralischen Wänden (auch in Hohlwänden) - z.B. für Ziegel, Gitterstein, Sandstein, Hohlkammerstein uvm.
- EINFACHES ANBRINGEN - Das Einsetzen der Mauerwerkssperre ist auch Laien möglich - ohne schweres Gerät & Ausschachten: Löcher bohren, Flaschen einstecken, warten & die Wand verschließen!
- NOVUSAN by BKM.MANNESMANN - Für ein trockenes Zuhause! In unserem Sortiment finden Sie verschiedenste Produkte, um Ihr Zuhause von Feuchtigkeit zu befreien & nachhaltig zu schützen.
Video: Cellar drying with infrared heating
Also for the 4th part of my project series, there is a suitable video in my Youtube – playlist“Drying the basement“. Here you can directly convince yourself of the results of the drainage after 3 weeks.
If you want to see more of me and my projects, feel free to check out my YouTube channel.
Zuletzt aktualisiert am 21. February 2026 um 21:47 . Ich weise darauf hin, dass sich hier angezeigte Preise inzwischen geändert haben können. Alle Angaben ohne Gewähr. (*) Bei den verwendeten Produktlinks handelt es sich um Affiliate Links. Ich bin nicht der Verkäufer des Produktes. Als Amazon-Partner verdiene ich an qualifizierten Verkäufen. Dein Preis ändert sich jedoch nicht.
Draining the cellar – interim result after three weeks
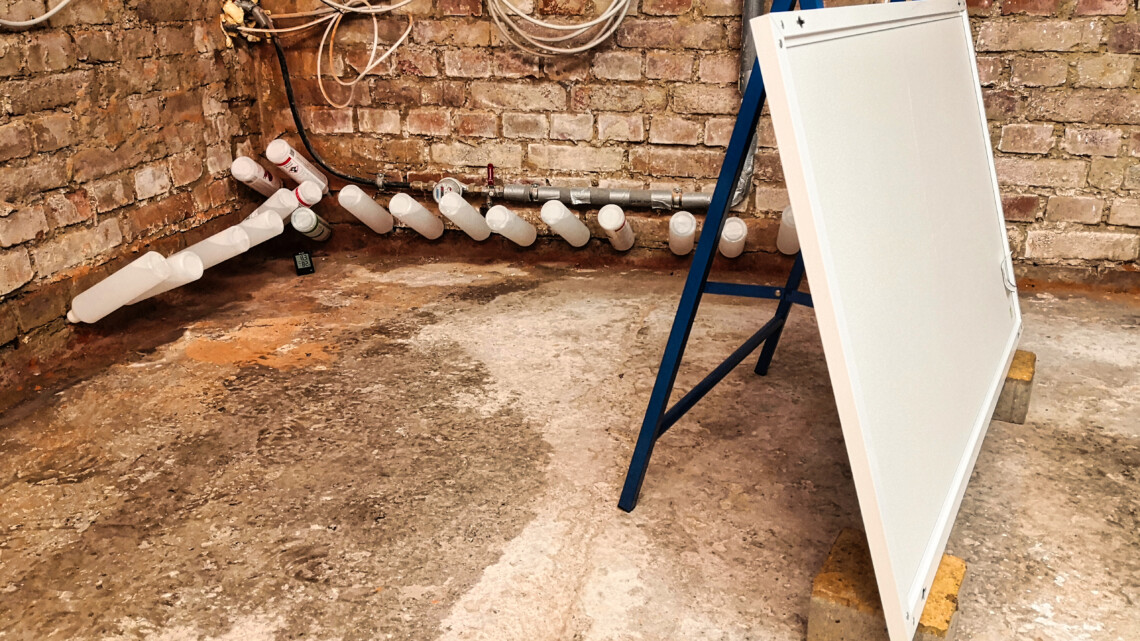
For 3 weeks, the injection fluid for masonry drying has been flowing into the walls. The bottles were now completely refilled with the injection solution a total of between 4 and 5 times.
As I wrote in the last post, I have now switched to not refilling the bottles daily. Instead, I just fill up the empty bottles. This way I can better monitor the saturation of the masonry.
In the meantime, there are also the first results. My measuring instruments are already showing the first changes. The humidity is slightly lower and the moisture in the bricks has also subsided.
Certainly, the results are highly dependent on room temperature and ventilation behavior, but a trend is emerging.

- Zerstörungsfreie Feuchtemessung: Sphärischer induktiver Feuchtigkeitsmesser, zerstörungsfreie Messung der Holzfeuchte. Keine Notwendigkeit, die Sonde in das Messmaterial einzuführen. Messtiefe 5-40MM, Sondenlänge 58MM, Messbereich 0-100%.
- Schnelle und einfache Messung: Dreifarbige Anzeige: Drei farbige Analogstreifen erleichtern die Identifizierung der Messwerte. Eingebaute Taschenlampe: Zusätzliche Taschenlampe ermöglicht es Ihnen, schnell und einfach zu erkennen, die Oberflächenfeuchtigkeit der dunklen Arbeitsplatz.
- Breite Messung: 3 Haupttypen von Messbereich, Gips / zementartigen Substrat / Holz und anderen Materialien, Papier / Pappe / Fliesen / Gipskarton. Einsatzszenario: DIY Holz während der Konstruktion oder Dekoration.
- Haltefunktion: Mit der "Hold"-Taste kann der aktuelle Messwert aufgezeichnet werden. Außerdem wird der maximale und minimale Feuchtigkeitswert angezeigt.
- Einstellungsparameter: 3 Arten von Wassergehalt Ebene. Die Wand Hygrometer kommt mit einstellbaren Feuchtigkeit Alarmwerte nach Ihren Bedürfnissen.
How does an infrared heater work?
An infrared heater works by emitting infrared radiation, which heats objects and people in the room directly instead of heating the air first.
Technically speaking, the heater converts electrical energy into infrared rays which, like sunlight, release heat when they hit surfaces.
This results in a direct and efficient heat source without unnecessarily circulating and swirling up the air.
The advantages of infrared heating are the rapid heat build-up and efficient room heating. As there is no air movement, less dust is stirred up, which is particularly beneficial for allergy sufferers.
In addition, infrared heaters are low-maintenance and easy to install. They are ideal as additional heating or in rooms that are not used continuously.
However, there are also disadvantages.
Infrared heaters can be more expensive to purchase and are less efficient in large or poorly insulated rooms as they do not heat the air directly. High ceilings or open rooms can thus become a challenge.
The efficiency of infrared heating can be increased by combining it with good room insulation and targeted use in smaller, well-defined areas. This helps to minimize operating costs and maximize the efficiency of the heating system.
With regard to wall moisture: using infrared heating can actually help to reduce moisture in walls.
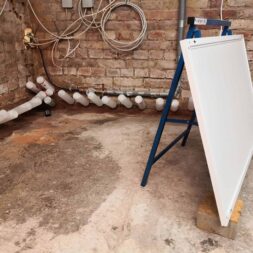
In my case, I used the infrared heating in the cellar to dry damp walls by pointing the heating directly at the wet wall.
The heat from the infrared rays penetrates the wall and increases the local temperature, which promotes the evaporation of moisture.
This can be an effective method, especially in poorly ventilated or cooler basements, to regulate wall moisture and prevent mold growth and structural moisture damage in the long term.

- ✔️ UNSER LEISTUNGSKRACHER - Dank unserer langjährigen Erfahrung im Bereich Infrarot können wir hohe Heizwerte garantieren. Watt | Heizfläche: 130 W | 1-3 m²; 300 W | 3-8 m²; 450W | 5-12 m²; 600 W | 8-16 m²; 800 W | 11-21 m²; 1000 W | 14-26 m²; 1200 W | 18-29 m²
- ✔️ GARANTIERT LANGLEBIG - Könighaus Infrarotheizungen sind wartungsfrei und haben eine Herstellergarantie von 5 Jahren und eine 30 Tage Zufriedenheitsgarantie. Mit dem Könighaus Thermostat haben Sie die volle Kontrolle über Ihre Heizung – für ein komfortables Heizen.
- ✔️ SCHLANKE FORM - Unsere Infrarotheizung hat dank dem hochwertig pulverbeschichteten Aluminium Rahmen ein schlichtes und unauffälliges Design.
- ✔️ GRÜNES HEIZEN - Infrarot Wandheizungen bieten eine gesunde Heizlösung. Dank der effizienten Direktwärme entsteht keine Luftzirkulation und somit kein CO2-Ausstoß. Unsere Infrarot-Elektroheizung ist nicht nur geräuschlos, sondern auch ideal für Hausstauballergiker und keine trockene Luft in Räumen.
- ✔️ LIEFERUMFANG - Inkl. Montagematerial, Thermostat & 1,80 m Kabel - Dieses Produkt ist nur für gut isolierte Räume oder für den gelegentlichen Gebrauch geeignet. Für eine optimale Nutzung empfehlen wir die Verwendung eines Thermostats
Use infrared heat for masonry drying?
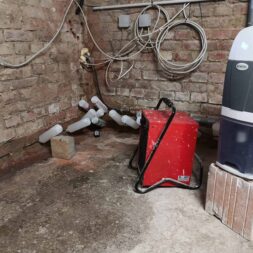
At the beginning of the drying process, I had used my dryer and also my fan heater to assist. I had placed both devices directly in the direction of the particularly damp corner of the house.
In my opinion, the dry and warm air definitely favored the absorption of the liquid through the walls. The bottles emptied much faster at warm room temperatures than at cold temperatures.
However, this method has one major drawback: the electricity meter!
While the dryer makes do with just under 500 watts per hour, the fan heater uses between 1,600 and 3,200 watts per hour. In continuous operation, costs of 15 euros per day or even 450 euros per month quickly add up.
So, despite PV system, it was not a solution.
So I put an infrared heater on the wall. The model I use requires only 600 watts per hour. In 24-hour continuous operation, this would cost a good 4 euros, or 120 euros per month.
That was still a lot of money, but definitely less than the 450 euros with the fan heater and dryer.
But would this solution be of any use? – In a nutshell – No, it’s no use!

- Bohrlochinjektion SILITROCKEN - Innen und außen anwendbar.
- Horizontalsperre Komplett System mit Injektionstrichter, Mittel für Keller austrocknen lassen.
- Stoppt aufsteigende Feuchtigkeit im Mauerwerk - nachträgliche Horizontal Sperre, Bohrloch Injektion für dauerhaft Trockene Wände.
- Selber machen - einfache und leichte Verarbeitung, über 15 Jahren am Markt mit vielen zufriedener Kunden in Deutschland und Ausland.
- Verbrauch: ca. 6 L/lfm (bei 35 cm Wandstärke) - größere Hohlräume in Mauerwerk müssen vorher verfüllt werden, sonnst ist der Verbrauch höher.
- Bohrloch Injektion für dauerhaft Trockene Wände
- Horizontalsperre Verkieselung Trockene Wand Kellerabdichtung
Why infrared heating failed
Unlike a classic heater, the infrared heater does not work with convection heat. Thus, it does not radiate heat in the actual sense as does a stove or a normal radiator.
Infrared heating, as the name suggests, emits radiation in the infrared range. This radiation itself has no “heat”. But the irradiated materials are excited by the radiation and slowly heat up.
In this way, the illuminated wall or the illuminated door itself becomes a heater which then emits convection heat. Decisive here is certainly also the thermal capability of the illuminated object.
Obviously, the amount of energy from the infrared radiation was not enough to heat the walls. The water content in the masonry was probably simply (still) too high.
Or in other words, the performance of the infrared heater was simply too weak.
Next steps to dry the basement
I am writing this post a good year after the actual test with infrared heating. So I can draw a conclusion quite well in the meantime.
I have since refrained from taking any additional measures. The cellar room was simply well ventilated and the bottles refilled until they no longer gave off any liquid on a weekly basis.
The values have since improved significantly and leveled off at values of 70% relative humidity. The value on my test stone has gone down to 0.8. The whole thing has remained at these values for a few weeks now.
My visitors/guests who follow the project have confirmed a strong improvement. Since I’m in the basement practically every day, I don’t notice it myself as much as my sporadic guests.
I have since removed the false ceiling to the basement. In the article“Renovate basement ceiling – replace steel beams” you will find some details and of course the matching video.
Furthermore I installed a pump sump in the basement and also made a video for my playlist Playlist for the drainage recorded.
So I am confident that the drainage will also work in this basement.

- SCHUTZ VOR FEUCHTIGKEIT - Novusticks schützen Ihren Keller vor aufsteigender Feuchtigkeit & Nässe. Fehlt Ihrem Haus die Mauersperrbahn, schaffen Sie mit den Stäbchen nachträglich eine Abdichtung.
- WAND TROCKENLEGEN - Neben der Feuchtigkeits-Abwehr eignen sich die Sticks, um bereits feuchte oder nasse Wände mit bis zu 95% Mauerwerksfeuchtigkeit auszutrocknen.
- FÜR JEDE WAND - Die Horizontal-Sperre eignet sich für alle mineralischen Wände mit Lagerfuge (auch Hohlwände) - für Ziegel, Gitterstein, Sandstein, Hohlkammerstein uvm.
- EINFACHES ANBRINGEN - Das Einsetzen der Mauerwerkssperre ist auch Laien möglich - ohne schweres Gerät & Ausschachten: Löcher bohren, Sticks einlegen & die Wand verschließen!
- BKM.MANNESMANN - Für ein trockenes Zuhause! In unserem Sortiment finden Sie verschiedenste Produkte, um Ihr Zuhause von Feuchtigkeit zu befreien & nachhaltig zu schützen.
Summary and conclusion
I continued the drainage of our over 100-year-old cellar in the town villa by installing an effective waterproof horizontal barrier using the injection method.
This technique was crucial in eliminating the persistent damp in the walls.
The eastern part of the cellar had already been successfully drained and I started to treat the western part.
The draining was successful overall and made it possible to use the cellar as a workshop later on without moisture damaging tools or materials.
I also experimented with infrared heating, but this did not make a significant contribution to draining the floor.
The infrared heating that I used in the basement drying process worked by emitting infrared radiation, which heated the wall surfaces directly.
This technology differs from conventional heating systems, which primarily heat the air and distribute heat via convection.
Infrared heaters heat objects and surfaces directly by radiation, which can be a direct and often more efficient source of heat.
In the specific context of basement dehumidification, the use of infrared heating was aimed at accelerating the evaporation of moisture by directly heating the damp walls.
The heat from the infrared rays penetrates the surface of the wall, increases the temperature locally and thus promotes the evaporation of water from the masonry.
Despite these theoretical advantages, infrared heating turned out to be less effective in practice.
The main reason for this was the inadequate performance of the heating system in terms of the energy required to heat the massive, damp basement walls sufficiently.
The infrared heating could not heat the walls to the extent that significant evaporation of moisture was achieved.
This was especially problematic in a large, poorly insulated space like my basement, where heat loss is high and moisture control challenges are greater.
In addition, the energy consumption of infrared heating, although lower than that of conventional fan heaters, was still considerable, which called the cost-benefit ratio into question.
Infrared heating therefore proved to be a costly option that ultimately did not produce the desired results in draining the cellar.
The combination of targeted injections and regular ventilation ultimately proved to be the more effective strategy for permanently solving the moisture problems in the basement.

- Bohrlochinjektion SILITROCKEN - Innen und außen anwendbar.
- Horizontalsperre Komplett System mit Injektionstrichter, Mittel für Keller austrocknen lassen.
- Stoppt aufsteigende Feuchtigkeit im Mauerwerk - nachträgliche Horizontal Sperre, Bohrloch Injektion für dauerhaft Trockene Wände.
- Selber machen - einfache und leichte Verarbeitung, über 15 Jahren am Markt mit vielen zufriedener Kunden in Deutschland und Ausland.
- Verbrauch: ca. 6 L/lfm (bei 35 cm Wandstärke) - größere Hohlräume in Mauerwerk müssen vorher verfüllt werden, sonnst ist der Verbrauch höher.
- Bohrloch Injektion für dauerhaft Trockene Wände
- Horizontalsperre Verkieselung Trockene Wand Kellerabdichtung
FAQ on draining the cellar
1. why does the cellar need to be drained?
The basement of our 100-year-old villa is very damp, which makes it difficult to use as a workshop. The high humidity could damage tools and materials. Drainage is therefore necessary to make the cellar usable.
2. which method is used for draining the cellar?
Drainage is mainly carried out using the injection method. An injection fluid is injected into the masonry to create a watertight horizontal barrier that prevents moisture from penetrating.
3. what is an injection fluid and how does it work?
An injection fluid is a chemical agent that is injected into the masonry to seal it and protect it from moisture. The liquid fills the pores of the masonry and thus prevents water from rising.
4 Why was infrared heating used for drainage?
The infrared heating was used to heat the damp walls directly and thus promote the evaporation of moisture. Infrared heaters generate heat through radiation that heats surfaces directly instead of heating the air.
5. has the infrared heating improved the drainage of the cellar?
Unfortunately not. The infrared heating could not heat the solid, damp cellar walls sufficiently to achieve significant evaporation of the moisture. The output of the heating system was too low for this task and the energy consumption was relatively high.
6. what other measures were taken to drain the cellar?
In addition to the injection process and infrared heating, regular ventilation and the use of a fan heater and dryer were also tested. Ultimately, the combination of injections and ventilation proved to be the most effective method.
7. what progress has been made in draining?
After three weeks, initial successes could be measured, including a slight drop in humidity and a reduction in moisture in the masonry. The values have stabilized at 70 % relative humidity, which is a significant improvement.
8. is the cellar now completely dry?
The cellar is not yet completely dry, but the moisture has been significantly reduced. Further measures, such as the removal of the cellar ceiling and the installation of a sump pump, were taken to continue the drainage process.
9 Why did the infrared heater fail?
The infrared heating generates radiant heat, which was not enough to eliminate the massive dampness in the walls. In large, poorly insulated rooms such as the cellar, the heating output of the infrared heater was too low to achieve the desired effect.
10. what are the next steps for draining the cellar?
Drainage is continued by regular ventilation and, if necessary, further injections. Further structural measures, such as the replacement of the basement ceiling and the use of additional drainage solutions, are intended to accelerate progress.
Dieser Beitrag ist auch verfügbar auf:
English
Deutsch


