Build your own garden kitchen – brick and glue walls with aerated concrete
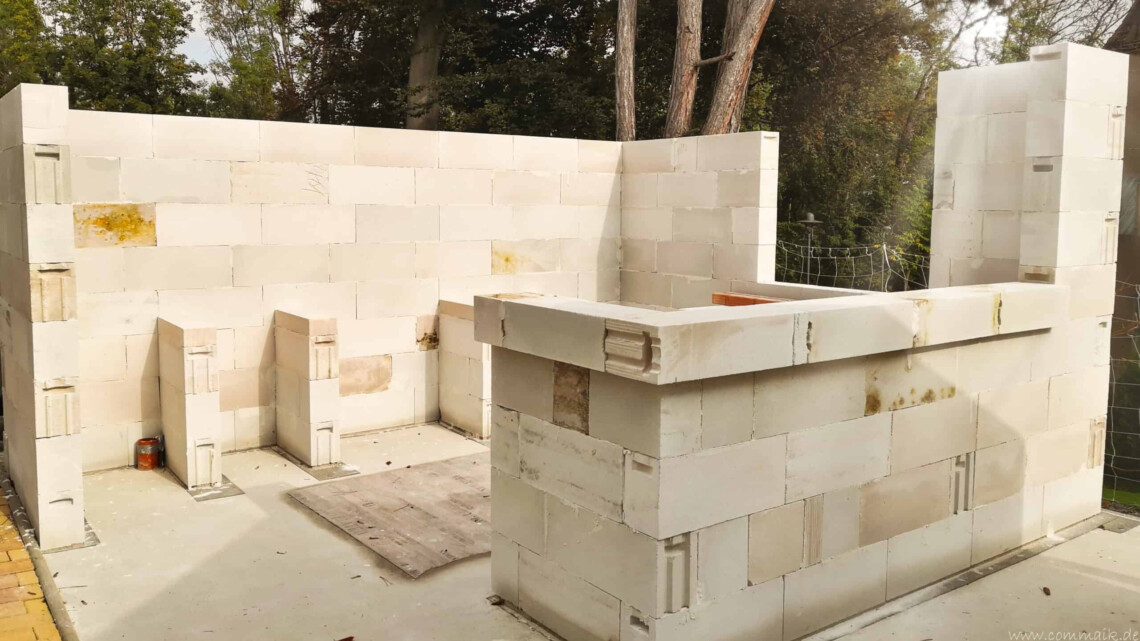
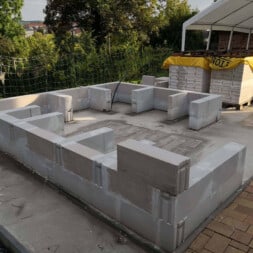
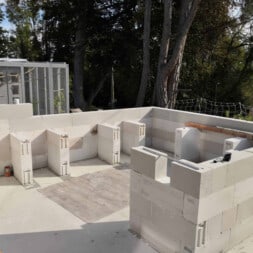
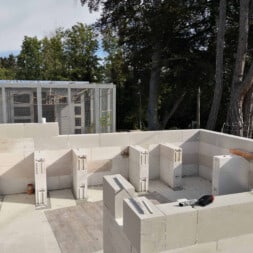
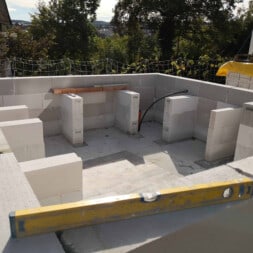
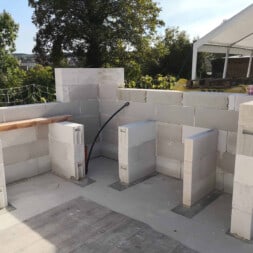
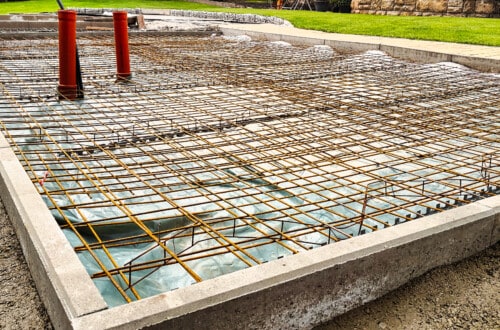
After the base of the new garden kitchen was set and aligned with the gas concrete blocks, I could now start building the walls with the Ytong blocks. A special feature here should become the bar counter of the pool bar, in addition to the window on the south side.
Building garden kitchen with gas concrete – basic form
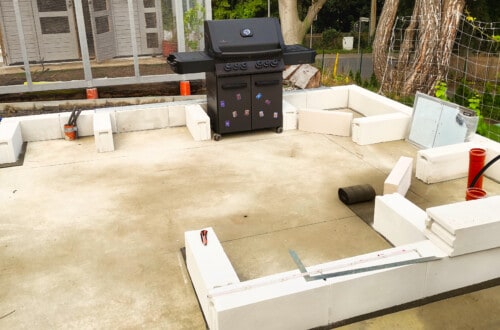
I was planning to give my garden kitchen the shape of a U. The rear, which faces east, was to be completely closed off so that my Napoleon Phantom P500 gas barbecue could be integrated there later.
I planned to build a bar on the opposite west side.
The bar counter should not only serve as a spatial divider, but also provide sufficient storage space. To make use of as much sunlight as possible in the outdoor kitchen, a large window opening was planned for the south side.
Various built-in cupboards should provide sufficient storage space under the all-round work surface.
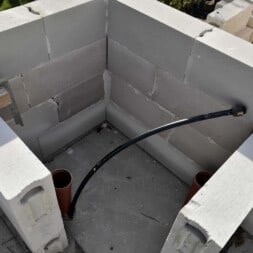
A refrigerator was also planned. For this purpose, I had already planned niches in the plinth area, which were to be bricked up to the final height of the worktop.
But everything in turn…
Ytong aerated concrete outdoors – What needs to be considered?
For the construction of my garden kitchen, I decided to use gas concrete blocks, also known as Ytong blocks.
I made this decision based on their technical specifications and the requirements of my project. Ytong blocks are known for their light weight and ease of processing, which makes them ideal for individual building projects.
The processing of the aerated concrete blocks was straightforward.
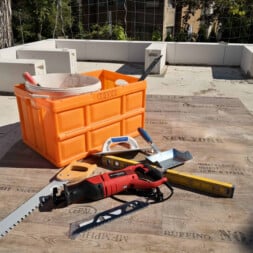
The tools required were a special gas concrete saw for precise cuts and a notched trowel for applying the thin-bed mortar that binds the stones together.
Their easy workability allowed me to cut and fit the stones precisely for the construction of my garden kitchen.
Ytong blocks offer several advantages in outdoor areas. Their structure is strong enough for load-bearing constructions, and they are light enough to make work easier.
They are also non-flammable, making them a safe option for areas where cooking takes place.
However, there are also disadvantages to using Ytong bricks outdoors. Their porosity can lead to moisture absorption without suitable surface treatment.
To counteract this disadvantage, I placed the stones on a waterproof barrier strip and later treated the surface of the stones with a water-repellent plaster.

- Kann problemlos über Eck verlegt werden auch bei niedrigen Temperaturen entstehen keine Risse
Aerated concrete – bonding or masonry
When building my garden kitchen wall from aerated concrete blocks, I chose the thin-bed mortar method instead of traditional bricklaying with a thick mortar bed.
This process differs significantly as the mortar or adhesive is only applied in a thin layer.
I used special thin-bed mortar for bonding the gas concrete blocks, which ensures a uniformly thin joint and strong adhesion.
The tools needed included a spirit level to align the stones precisely, a rubber mallet to tap the stones lightly into their final position, a saw to cut the stones to size and, of course, the notched trowel to apply the mortar.
The thin-bed mortar method offers many advantages: It saves on materials, as less mortar is required, and it enables faster processing, as the thin layer of mortar hardens more quickly.
In addition, a very precise and clean finish is achieved, which is particularly important for exposed brickwork.
However, the process also has disadvantages, including the need for precise preparatory work and the risk of the mortar drying out too quickly before the bricks are correctly positioned.
To avoid these disadvantages, I measured the areas to be bonded precisely and prepared the stones so that they could be laid quickly and without long waiting times.
I also made sure to keep the mortar fresh and not to prepare it in too large quantities.

Ytong – Building a wall with offset
After I had carefully set the first row of gas concrete blocks, i.e. the plinth, in mortar, I chose the thin-bed mortar method for laying the other rows of blocks.
With this method, I only applied a thin layer of mortar or adhesive over the entire surface of the stone.
The mortar was applied using a notched trowel and a special adhesive trowel for aerated concrete, which ensured even distribution and the desired thin layer thickness.
Once the mortar was applied, I placed the next stone on top, aligned it carefully and pressed it down gently to ensure a firm bond.
The resulting bed joint was very thin and visually almost invisible, while the special adhesive created an extremely strong bond between the bricks.
To further increase the stability, I glued the individual Ytong bricks in an offset pattern. The formula stone height times 0.4 resulted in a minimum offset. With my 25 cm high stones, the offset therefore had to be at least 10 cm.
Minimum offset = block height x 0.4
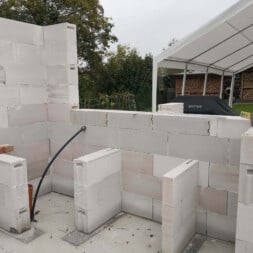
I paid particular attention to the corners by placing the overhang of the stones alternately on the other side of the wall. In the base, the stone of the short wall thus bordered the side of the long wall and vice versa in the row above.
This approach ensured a stable offset and significantly increased the overall stability of the construction.
I used the same technique at the joints between the niche walls and the kitchen walls behind them.
Here, the niche wall in the bottom row abutted the long edge of the outer wall, while in the second row the stone rested flush on the outer edge of the outer wall. Of course, the overhang was missing on the inside, which I compensated for by adding half a stone.
I started at one corner by filling the first brick of the base with Ytong adhesive and inserting a masonry connector before placing and aligning the next brick.
The thin-bed method meant that it was practically impossible to subsequently adjust the level of the stone. Fortunately, my plinth was almost perfect, so that the following rows of stones also fitted well.
I inserted the masonry connectors, perforated metal strips about 30 cm long, at the corners and transitions to the niches to reinforce the connection between the bricks.
The gluing of the stones progressed quickly, as I only applied the adhesive to the next stone at a time to prevent it from drying too quickly.


Building corners with aerated concrete
The challenge came at the corners, where I worked with alternating overhang. So I only set the row of stones up to the penultimate stone and then inserted the corner stone of the other wall.
The gap between the penultimate brick of the first wall and the cross brick of the second wall should actually be exactly the length of a whole brick. However, the glue between the stones meant that the dimensions were not exactly right.
I therefore measured the gap for the last stone precisely each time and sawed the stone to size accordingly. To ensure an optimal adhesive surface for the glue, I always cut off the side with the nose or spring.
I then applied the adhesive to the top of the lower stone as well as to the faces of the adjacent stones. I then placed the cut stone in the gap and aligned it carefully.
A little tip from me: Before applying the adhesive, I recommend laying the stone dry in its intended position to ensure that it really fits.

- Mit 750 Watt bringt die Universalsäge genügend Leistung auf das Blatt, um 150 mm in Holz und 10 mm in Stahl zu schneiden.
- Handlich in der Handhabung und flexibel im Einsatz ist die Universalsäge durch ihre ergonomische, schlanke Bauform.
- Zum material- und anwendungsgerechtem Arbeiten ist die Universalsäge mit einer Hubzahl-Elektronik ausgestattet, die gewissenhafte Voreinstellungen auf den zu bearbeitenden Werkstoffen erlaubt.
- Der werkzeuglos verstellbarer Sägeschuh ist für die optimale Sägeblattnutzung ausgelegt.
- Der werkzeuglose Sägeblattwechsel geht schnell und einfach von Hand, ganz ohne weiteres Werkzeug zur Montage.
- Ein großer Softgrip-Bereich gewährt einen sicheren und festen Halt zum komfortablen Arbeiten auch bei langwierigen Arbeitseinsätzen.
- In die Lieferung inbegriffen ist ein Sägeblatt für Holz.
Video: Masonry and bonding gas concrete
While building my outdoor kitchen, I kept my camera running. I then published the individual stages in various films on my Youtube channel in a separate playlist for the construction of my garden kitchen.
If you want to see more of me and my projects, feel free to check out my YouTube channel.
Zuletzt aktualisiert am 4. November 2025 um 16:30 . Ich weise darauf hin, dass sich hier angezeigte Preise inzwischen geändert haben können. Alle Angaben ohne Gewähr. (*) Bei den verwendeten Produktlinks handelt es sich um Affiliate Links. Ich bin nicht der Verkäufer des Produktes. Als Amazon-Partner verdiene ich an qualifizierten Verkäufen. Dein Preis ändert sich jedoch nicht.
Tools for working Ytong aerated concrete blocks
I used various tools to process the Ytong and aerated concrete blocks, as the blocks had to be both shortened and ground.
To start with, I cut the stones with a special foxtail saw for gas concrete. This saw has robust cutting teeth and is durable, but requires a great deal of effort.
This was unproblematic with a few stones, but with the large quantity of over 20 stones, manual sawing proved to be very strenuous and time-consuming.
I therefore decided to buy an electric reciprocating saw and a special saw blade for stones. Working with the electric saw was much faster and less strenuous.
However, there were problems at the beginning because the saw blade got stuck in the middle of the Ytong block when it was a little damp. The sawdust collected in the recesses of the saw blade and clumped there.
To solve this problem, I made sure to either saw dry stones or to continuously remove the abrasion from the saw gap by moving the saw back and forth a lot.
I used a gas concrete planer to remove the lugs or the feathers from the stones. This sanding board with a sharp-edged underside enabled me to sand down the stones quickly and effectively.
This allowed me not only to remove the noses, but also to even out any protrusions on the edges of the walls.
Zuletzt aktualisiert am 4. November 2025 um 16:18 . Ich weise darauf hin, dass sich hier angezeigte Preise inzwischen geändert haben können. Alle Angaben ohne Gewähr. (*) Bei den verwendeten Produktlinks handelt es sich um Affiliate Links. Ich bin nicht der Verkäufer des Produktes. Als Amazon-Partner verdiene ich an qualifizierten Verkäufen. Dein Preis ändert sich jedoch nicht.
Tools for laying Ytong aerated concrete blocks
I first needed a bucket and a powerful stirrer to mix the adhesive for the bricklaying or gluing of the bricks. I already had this equipment ready.
My trowel, notched trowel and new adhesive trowel were also a must. This trowel, a combination of a ladle and notched trowel, enabled me to apply the adhesive directly and effectively to the stone.
Although I needed a bit of practice at first, I found that I got on much better with my old notched trowel.
My selection of tools was completed by a spirit level and a rubber mallet, which were essential for aligning the stones. To do this, I used a guide line, which I attached directly to the stone with special clamping blocks and aligned.
This approach proved to be extremely useful in ensuring precise and straight rows of stones.
Zuletzt aktualisiert am 4. November 2025 um 16:51 . Ich weise darauf hin, dass sich hier angezeigte Preise inzwischen geändert haben können. Alle Angaben ohne Gewähr. (*) Bei den verwendeten Produktlinks handelt es sich um Affiliate Links. Ich bin nicht der Verkäufer des Produktes. Als Amazon-Partner verdiene ich an qualifizierten Verkäufen. Dein Preis ändert sich jedoch nicht.
Bar counter masonry with Ytong gas concrete
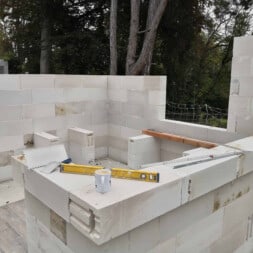
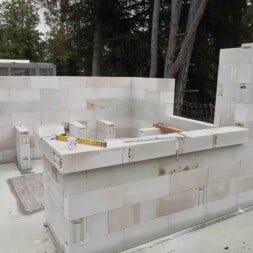
The bar counter in my garden kitchen should also serve as a pool bar. It was important to me that the storage surface protrudes beyond the wall so that you can sit or stand comfortably at the bar later.
In addition, everything had to be stable enough to support superstructures or a person leaning on the counter.
I found the solution both simple and effective: I decided to install the 17.5 cm wide and 25 cm high stones lengthwise, i.e. lying on their side.
The overhang of the stones was now 7.5 cm and provided a stable base for the final worktop.
I glued the stones to the sides in the same way as the usual gluing. Only at the corner of the bar it became a little more complicated.
To achieve the desired overhang of 7.5 cm on both sides of the bar, I had to shorten the long side accordingly so that the adjacent stone on the short side also protruded by 7.5 cm.
To do this, I laid out the stones on the short side and took the measurement to the next stone on the long side.

- ✅ Das DEWEPRO WDVS und Porenbeton Schleifbrett - Raspelbrett mit verzinktem Stahlblech-Raspelbelag - 270x130mm - Egalisierungsbrett - Schleifer ist ein vielseitiges und leistungsfähiges Werkzeug, das speziell für professionelle Anwendungen im Bereich des Wärmedämmverbundsystems (WDVS) und Porenbetons entwickelt wurde. Mit herausragenden Eigenschaften bietet dieses Schleifbrett eine optimale Lösung für verschiedene Schleifarbeiten.
- ✅ VIELSEITIGE ANWENDUNGEN IM WDVS: Unser DEWEPRO WDVS-Schleifbrett wurde konzipiert, um eine Vielzahl von Anwendungen im Bereich des Wärmedämmverbundsystems zu unterstützen. Perfekt geeignet für das präzise Beischleifen von unebenen Stellen im WDVS, ermöglicht es beispielsweise das exakte Bearbeiten von überstehenden Dämmplatten an den Gebäudekanten nach dem Zuschneiden.
- ✅ UNIVERSELLE EINSATZMÖGLICHKEITEN: Dieses Schleifbrett ist nicht nur für Polystyrol-Dämmplatten geeignet, sondern eignet sich ebenso hervorragend für das Egalisieren und Nivellieren von Gasbeton und Porenbeton.
- ✅ EFFIZIENTE SCHLEIFLEISTUNG: Mit einem verzinkten Stahlblech-Raspelbelag gewährleistet das Schleifbrett eine effiziente Schleifleistung. Das offene Trägerbrett sorgt dafür, dass Abrieb und Schleifstaub durch die Öffnungen problemlos entweichen können, was eine saubere Arbeitsumgebung und eine längere Lebensdauer des Werkzeugs ermöglicht.
- ✅ KOMFORTABLE HANDHABUNG: Der 2-Komponenten-Griff des Schleifbretts ist handlich und ergonomisch geformt. Dies gewährleistet eine komfortable und effiziente Nutzung auf Baustellen, selbst bei längeren Arbeitsphasen.
- ✅ ROBUSTE BAUWEISE: Mit einer Abmessung von 270x130mm bietet das DEWEPRO WDVS-Schleifbrett eine großzügige Arbeitsfläche für präzises und effizientes Schleifen. Die robuste Bauweise und hochwertigen Materialien garantieren eine lange Lebensdauer und erstklassige Ergebnisse bei jeder Anwendung.
- ✅ DEWEPRO – Ihr fairer Partner für das Handwerk und die Industrie. Profitieren Sie von langlebigen, hochwertigen Werkzeugen, die professionelle Ergebnisse ermöglichen.
Video: Building bar counters and windows with Ytong aerated concrete
I also had my camera running during this construction phase. I then published all the individual stages in various films on my Youtube channel in a separate playlist for the construction of my garden kitchen.
If you want to see more of me and my projects, feel free to check out my YouTube channel.

- Hochwertiger und leistungsstarker Farb-Mörtelrührer für das professionelle Aufrühren und Anmischen flüssiger und pulverförmiger Bauwerkstoffe mit langlebigem Aluminium-Getriebegehäuse
- Softstart und präzise wählbare Drehzahlregelelektronik während des Betriebs
- Ergonomischer Griffbügel und schlankes Gehäuse für die komfortable Bedienbarkeit
- Rühreraufnahme für Rührwerkzeuge mit M14 Gewinde
- Inklusive Mörtelrührer mit 133 mm
Building windows with Ytong aerated concrete
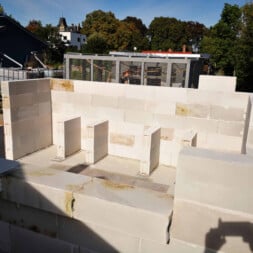
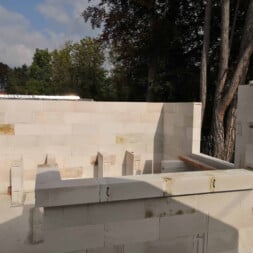
The window on the south side of the wall was relatively easy to implement. The top of the window opening should be bridged with a 150 cm lintel. Such a lintel requires a lateral support of at least 12 cm. The clear dimension of the opening was thus limited to max. 126 cm limited.
I first drew the depth of the two side countertops on the wall and then determined the center between the countertops. From there I drew 63 cm left and right the mark for the beginning of the support surface.
Now I only had to let the stones which I put on the left and on the right end at exactly these markings. The second row was then set with a half stone offset from the window opening to the outer sides. With the third row, a whole stone was installed again and so on.
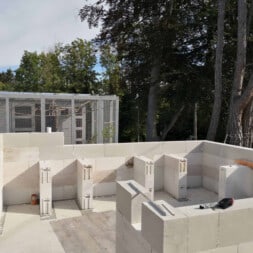
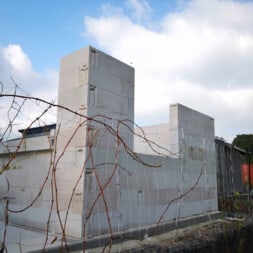
I was thus able to complete the shell of the garden kitchen in a few days. Once I got the hang of the saw, the build went very quickly. In total, I used a good 140 kg of Ytong adhesive and about 80 wall connectors.
I have already measured the roof and the material is ordered. But before the wood is delivered, some time may pass. So in the meantime, I will prepare the electrical system in the new garden kitchen.

- Bausäge für Porenbetonsteine und -fertigbauteile
- 750 mm Blattlänge
- extra große Schubzahnung (16 mm) mit gehärteten Zahnspitzen
- sehr stabile Ausführung
- Holzgriff
Summary and conclusion
I used Ytong aerated concrete blocks and glued them together to build my garden kitchen.
Once the plinth was completed, I built the walls, with a particular focus on the pool bar counter and a large window opening on the south side to capture plenty of sunlight.
I chose Ytong bricks because of their light weight and easy workability, which allowed me to cut the bricks precisely for the construction of my garden kitchen.
When bonding the stones, I used thin-bed mortar, which ensures strong adhesion and an even, thin joint, which saves material and enables clean processing.
Careful planning and execution when setting the stones, especially at corners and transitions, helped to create a stable and visually appealing garden kitchen.
I made sure to treat the surfaces correctly to make the structure weatherproof and durable.

- Brand: BEHA
- BEHA 50 Mauerverbinder, Flachanker, Anschlussanker, Wandanker 300mm, Edelstahl V4A
- Product Type: HARDWARE_HINGE
FAQ about the garden kitchen with Ytong aerated concrete blocks
1. can Ytong aerated concrete be used outdoors?
Yes, Ytong aerated concrete blocks can be used outdoors, but a suitable surface treatment is required to reduce the porosity of the blocks and protect them from moisture. This includes the use of a waterproof barrier membrane and water-repellent plaster.
2. how stable are Ytong aerated concrete blocks for a garden kitchen?
Ytong aerated concrete blocks are stable enough for the construction of garden kitchens and offer sufficient load-bearing capacity for work surfaces and fixtures. For particularly stable constructions, it is important to bond the bricks in an offset pattern and to use masonry connectors at corners.
3. is it better to glue or brick Ytong blocks?
Bonding with thin-bed mortar is often the better choice for Ytong aerated concrete blocks, as it saves material and is faster. The adhesive is applied in a thin layer, which enables clean processing. In addition, the thin mortar layer hardens faster than a thick mortar bed.
4. how should you plan a garden kitchen made of Ytong aerated concrete blocks?
When planning, you should consider the shape of the kitchen, the placement of work surfaces, built-in cupboards, grill and bar. Window openings for sufficient light and waterproof surface treatments should also be planned to make the construction durable.
5. what tools are needed for building with Ytong bricks?
The most important tools include a foxtail saw or sabre saw for precise cuts, a notched trowel for the thin-bed mortar, a spirit level for alignment, a rubber mallet and an agitator for mixing the adhesive.
6. how to protect Ytong bricks from moisture outdoors?
Ytong blocks should be placed on a waterproof barrier strip to prevent rising damp. In addition, the surface should be treated with a water-repellent plaster or other suitable sealant to minimize water penetration.
7 How does the thin-bed mortar process work with Ytong aerated concrete?
With the thin-bed mortar method, the mortar is applied thinly and evenly to the stone surface using a notched trowel before the stones are placed on top of each other and lightly pressed down. This results in a stable and precise joint with a minimum joint width.
8. what challenges are there when building corners with Ytong bricks?
When building corners with Ytong blocks, it is important to plan a sufficient offset of the blocks to ensure stability. The last stone often has to be cut to achieve the right fit. The use of masonry connectors further increases stability.
9. how do you build a stable bar counter from Ytong aerated concrete?
For a stable bar counter, the Ytong blocks should be installed lengthwise so that they provide a larger support surface. The overhang can be supplemented with a robust structure to create a stable base for the worktop. Wall connectors and steel beams can also be used for reinforcement.
10. is it possible to retrofit a garden kitchen made of Ytong bricks to make it weatherproof?
Yes, an existing garden kitchen made of Ytong bricks can be made weatherproof by subsequent plastering or sealing. Water-repellent plasters, paints or special sealants that protect the surface from moisture are suitable for this purpose.

- Mit 750 Watt bringt die Universalsäge genügend Leistung auf das Blatt, um 150 mm in Holz und 10 mm in Stahl zu schneiden.
- Handlich in der Handhabung und flexibel im Einsatz ist die Universalsäge durch ihre ergonomische, schlanke Bauform.
- Zum material- und anwendungsgerechtem Arbeiten ist die Universalsäge mit einer Hubzahl-Elektronik ausgestattet, die gewissenhafte Voreinstellungen auf den zu bearbeitenden Werkstoffen erlaubt.
- Der werkzeuglos verstellbarer Sägeschuh ist für die optimale Sägeblattnutzung ausgelegt.
- Der werkzeuglose Sägeblattwechsel geht schnell und einfach von Hand, ganz ohne weiteres Werkzeug zur Montage.
- Ein großer Softgrip-Bereich gewährt einen sicheren und festen Halt zum komfortablen Arbeiten auch bei langwierigen Arbeitseinsätzen.
- In die Lieferung inbegriffen ist ein Sägeblatt für Holz.
Dieser Beitrag ist auch verfügbar auf:
English
Deutsch









12 Comments
Martin
Hallo Maik,
wahnsinns Tagebuch, wow!!
Sehr interessante und vor allem hilfreiche Beiträge!
Ich bin nämlich auch gerade dabei eine Outdoorküche zu bauen und bin hin und her gerissen zwischen Porenbetonsteine und Beton Schalsteine.
Ich wollte dich fragen, mit was du deine Ytonsteine wasserdicht bekommst bzw. mit was du die Steine verputzt.
Wäre super wenn du mir hier eine kurze Rückmeldung geben könntest!
Danke schon mal und Gruß Martín
Maik
Hallo Martin,
danke für das tolle Feedback. Ich stand ursprünglich vor der Wahl zwischen Gasbeton/ Porenbeton und Kalksandstein. Betonschalsteine hatt ich kurz zuvor in großer Stückzahl an unserem neuem Pool verbaut -> https://commaik.de/2021/08/pool-umbauen-waende-mauern-bewehrung-einbauen-schalsteine-setzen/
Die Betonschalsteine sind einfach zu verbauen und wenn du das nötige Werkzeug hast auch gut zu bearbeiten. Du kannst Wasserrohre und Elektroleerrohe gleich in der Wand mit verlegen. Leider ist das Ausfüllen mit Beton dann ein riesen Akt. Bei meiner Mauerhöhe von über 2 Meter wollte ich mir das dann nicht mehr antun die Betonkübel dort hoch zu schaffen und die Wände zu verfüllen.
Der Gasbeton steht auf einem wasserundurchlässigen Sockel -> https://commaik.de/2021/09/gartenkueche-bauen-2-sockel-und-waende-mit-gasbeton-mauern/ und ist somit von unten dauerhaft gegen aufsteigende Feuchtigkeit geschützt. Oben kommt ein Dach mit ausreichendem Überstand drauf welches die Steine vor dem Regen schützt.
Ich werde auf die Wände ein Vlies spachteln und dann mit Fassadenputz außen verputzen. Innen werde ich einen Fliesenspiegel kleben und darüber ebenfalls verputzen.
In meiner anderen Gartenküche habe ich damit bereits sehr gute Erfahrungen gemacht – obwohl dort die Vorraussetzungen nicht so gut waren -> https://commaik.de/2014/01/unsere-gartenkueche-entsteht/
PS: Viele meine Bauprojekte habe ich in Filmen festgehalten. Ich würde mich über ein Abo oder das eine oder andere Like zu meinen Videos sehr freuen 🙂 -> https://youtube.com/commaik
Viele Grüße
und falls du noch Fragen hast, schreibe mir einfach
Maik
alex
Hallo Maik,
Tolles Tagebuch, unglaublich hilfreich, DANKE!
hier eine eher aesthetische Frage, da ich eine Kunstinstallaiton aus Porenbeton baue. Kannst du mir vllt erklaeren woher die grossen Farbunterschiede in den einzelnen Steinen stammen?
ich bedanke mich schonmal 🙂
Alex
Maik
Hallo Alex,
danke für dein Feedback 🙂
Die Farbunterschiede stammen aus dem Feuchtigkeitsgehalt der Steine. Einige Steine lagen auf der Palette oben und haben (trotz der Schutzfolie) das Regenwasser aufgesogen. Dadurch ist die Farbe dunkler und die Steine lassen sich schlechter verarbeiten. Die Steine welche weiter unten auf der Palette lagen waren absolut trocken und somit sehr hell.
Ich hoffe das hilft dir?
Welche Art von Kunstinstallation machst du denn??
LG
Dennis
Hallo Maik,
absoluter Wahnsinn was du da gebaut und vor allem in Schrift und Video verpackt hast.
Wir sind auch gerade mitten in der Planung unsere Outdoor Küchenzeile.
Dein Input hilft mir dabei ungemein, da ich davon so gar keinen Plan habe. Hast du für die Außenwände und die Nischenwände die selben Steine verwendet oder die Nischenwände schmaler ausgeführt.
Danke und Gruß
Dennis
Maik
Hallo Dennis,
danke für das tolle Feedback 😁
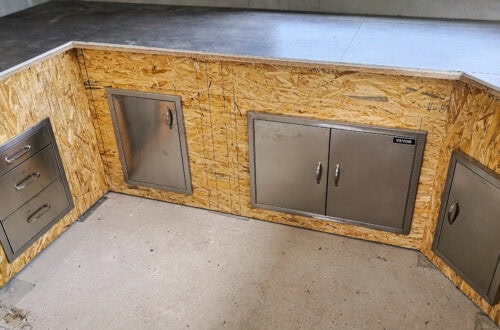
Ich habe für Mauer und Nischen jeweils die gleichen Steine verwendet. Grundsätzlich würden auch schmalere Steine funktionieren, allerdings habe ich mir die Ytong Steine als Palettenware geholt. Das ist um einiges günstiger. Die Nischen müssen in meinem Fall nur die Last von oben tragen da ich die Küche von Vorn mit Trockenbau, OSB und BBQ Möbeln verplankt habe.
Mittlweile gibt es 11 Teile zu meinem Projekt. Die gesamte Liste findest du hier https://www.youtube.com/watch?v=chtrmU2xlag&list=PLPz3dSjkl_ungcMpwPb6cXyOhvG8JlBjj&pp=gAQBiAQB
Wie weit bist du mit deinem Projekt?
Ich wünsche dir viel Erfolg bei der Umsetzung! 👍
Dennis
Hi Maik,
ich bin aktuell dabei das Material zu besorgen.
Da es bei mir nicht so schön groß werden kann wie bei dir, werde ich mit 7,5cm breiten Porenbetonsteinen bauen. Da ich diese Jahr noch keine Überdachung realisieren werden kann, werde ich diese dann mit Dichtschlämme versiegeln und dann entweder verputzen oder streichen. Ich werde auch die vordere Reihe mit Porenbetonsteinen realisieren und ebenfalls BBQ Möbel integrieren, also zumindest einen 3-Fach Auszug und 2 Türen. Mehr bekomme ich auf meinen 3m nicht unter. Derzeit bin ich noch am recherchieren wie dick das Fundament sein muss.
Dennis
Hallo Maik,
nachdem ich lange einfach keine Zeit hatte, habe ich am Wochenende endlich meine “Bodenplatte” gefertigt. An Material habe ich endlich alles zusammen. Kommt ganz schön was zusammen. Bin jetzt doch auf 11,5er Steine gegangen. Ich habe noch eine Frage zur ersten Reihe in Mörtel. Hast du da die Stirnkanten auch mit Mörtel aneinander gereiht oder nur als Verbindung zur Bodenplatte?
Gruß Dennis
Maik
Hallo Dennis,
schön zu lesen das es bei dir weiter geht 😃
Ja, ich habe die Stirnkanten auch mit dem Ytong Kleber/ Mörtel untereinander verbunden.
Unten satt in Mörtel gesetzt um die Steine auszurichten und seitlich dann eine dünne Schicht um die Steine untereinander zu verkleben. Das dann auch in allen Reihen.
LG und weiterhin frohes Schaffen
Dennis
Also die unterste Reihe die Stirnseiten auch mit etwas Mörtel, alles klar.
Wie hast du das bei Regen eigentlich gemacht, du konntest deine große Fläche nicht immer abdecken. Habe heute begonnen die unterste Reihe trocken zu positionieren und zuzuschneiden. Bis auf einen Stein ist auch alles geschnitten, allerdings regnet es schon wieder.
Gruß
Dennis
Maik
Der Regen schadet den Steinen nicht. Kritisch wird es erst wenn sie dauerhaft im Wasser stehen oder Frost herrscht. Deswegen auch die Bitumenbahn unter der ersten Reihe.
Allerdings solltest du deine Steine trocken lagern weil die sich im nassen Zustand nur sehr schlecht verarbeiten (sägen) lassen.
Ich verstehe deinen Frust. Bei dem Wetter macht es keinen Spaß und das Mauern kannst du vergessen. Der Regen schwemmt dir den Mörtel weg. Ich drück dir die Daumen das es am WE etwas besser wird. Zumindest bei uns hier, in Ostthüringen, hat es gegen Mittag aufgehört zu regnen.
LG und gutes Wetter 👍
Dennis
So endlich konnte ich beginnen, auch nur mit Hilfe eines Pavillons, aber egal. Der Rohbau ist fast fertig. Nächste Woche die restlichen Steine und dann wird alle mit Dichtschlämme wasserfest gemacht. Danach bissel Elektroinstallation für Licht und Steckdosen. Dann gehts weiter mit der Arbeitsplatte. Diese werde ich aus Fermacellplatten und Fliesen konstruieren.
Ein Foto kann ja leider nicht beifügen, sonst hätte ich dir mal eins vom aktuellen Stand geschickt.
Danke für eine Inspiration dieses Projekt anzugehen.