Build your own garden kitchen – solid half-timbered roof with OSB and welded sheeting for the outdoor kitchen
When building my garden kitchen, the next priority was to construct a robust wooden roof to create a sheltered area for the gas barbecue and work surfaces. The roof was to consist of solid wooden beams which I wanted to screw directly onto the walls made of glued aerated concrete blocks. The covering should be made with sheet piling and OSB boards.
My plan also included fitting the guttering, the end plates and gluing the welding membrane to make the roof weatherproof.
In this entry I will show you step by step how I carried out the individual installations and what I had to pay particular attention to. Of course, there are also some tips that you are welcome to adopt.
What you can expect in this article:
- Insight into the half-timbered construction: description of the structure and aesthetic features of the half-timbered roof in my garden kitchen.
- Use of sheet piling: Explanation of the selection and installation of sheet piling, its properties and advantages in terms of stability and appearance.
- Reinforcement with OSB boards: Reasons for the additional reinforcement of the roof with OSB boards, particularly with regard to the installation of a photovoltaic system.
- Precise installation instructions: Step-by-step instructions for installing Rauspund and OSB boards, including important tips for alignment and fastening.
- Finishing work and fine adjustment: Methods for precise sawing off the protruding edges to ensure a clean and professional finish.
- Combining aesthetics and functionality: how the roof meets not only visual but also functional requirements, ideal for lovers of country house style with a need for modern energy efficiency and well-planned exterior fittings.
What material for the roof of the outdoor kitchen?
When building my garden kitchen, I set myself the ambitious goal of building a roof that would defy snow and rain so that neither barbecuing nor cooking would ever be affected by bad weather again.
It was also particularly important to me that the bar is partially covered so that I can enjoy my morning coffee outdoors, regardless of the weather.
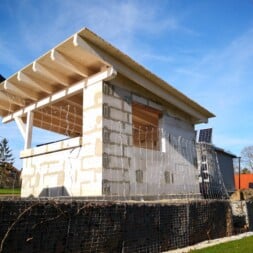
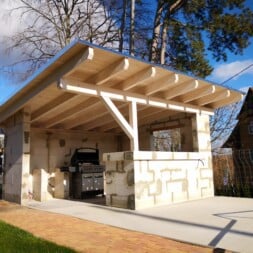
I therefore planned a roof with an overhang of one meter to the front, while the side overhang was to be smaller to protect only the walls from precipitation. After all, I didn’t want to create any additional recreation areas here.
With the desire to later equip the roof with several photovoltaic modules, it had to offer a high load-bearing capacity and a stable surface for secure installation.
Materials such as trapezoidal sheets, corrugated sheets or twin-wall sheets from the DIY store did not meet my requirements, as they would not withstand the wind loads of the PV modules.
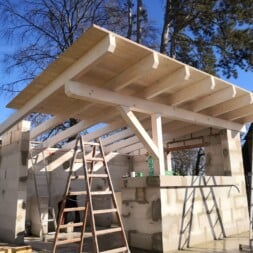
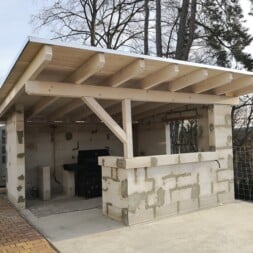
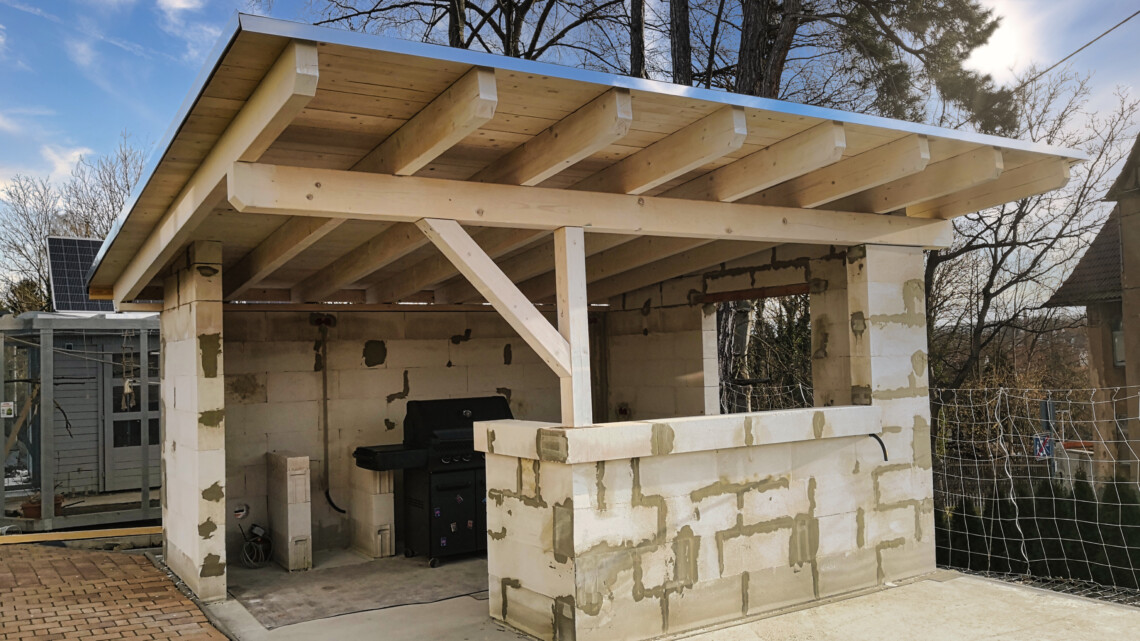
Instead, I opted for a robust half-timbered substructure made of solid wooden beams. The roof itself was to be made of strong OSB boards, which I then wanted to waterproof with a slated welded membrane.
To make the OSB boards invisible from below, I integrated an additional layer of sheet piling into my plans.
To turn my plans into reality, I called in my trusted carpenter. Together we discussed the technical and design aspects of the project.
After a detailed calculation of the statics, the wooden beams were cut to size, stripped and prepared for assembly.
As I was planning to build the majority of my outdoor kitchen myself, I painted the beams myself again. In addition to the financial savings, I was able to ensure that every detail matched my vision.
Zuletzt aktualisiert am 9. September 2025 um 12:46 . Ich weise darauf hin, dass sich hier angezeigte Preise inzwischen geändert haben können. Alle Angaben ohne Gewähr. (*) Bei den verwendeten Produktlinks handelt es sich um Affiliate Links. Ich bin nicht der Verkäufer des Produktes. Als Amazon-Partner verdiene ich an qualifizierten Verkäufen. Dein Preis ändert sich jedoch nicht.
Parts list and dimensions of the wooden beams, boards and OSB panels
Timber framework KVH Nordic spruce (untreated)
- 500 x 25 x 12 Crossbar front
- 500 x 20 x 10 Crossbar rear
- 500 x 20 x 8 counter beams (7 pieces)
- 300 x 12 x 12 Post and support front
Planking for 21 m² Nordic spruce (dried and planed)
- 500 x 14.5 x 2.8 with tongue and groove profile
OSB panels
- 250 x 62.5 x 1.8 with tongue and groove profile
The dimensions are in centimeters.

- ⭐ Hochwertige Holzschutzfarbe für Innen- und Außenbereich: Verleihe Holzoberflächen mit dieser hochwertigen Holzschutzfarbe eine attraktive und langlebige Optik im Innen- und Außenbereich.
- ⭐ Gute Haftung, hohe Deckkraft, einfache Verarbeitung: Diese Holzschutzfarbe bietet eine ausgezeichnete Haftung auf verschiedenen Holzoberflächen. Sie zeichnet sich durch eine hohe Deckkraft aus, sodass eine effektive Abdeckung mit weniger Anstrichen erreicht werden kann. Die Farbe lässt sich leicht verarbeiten, sei es mit einem Pinsel, einer Rolle oder einem (luftlosen) Sprühgerät.
- ⭐ Die Holzfarbe ist seidenglänzend und hat vielseitige Anwendungsmöglichkeiten: Der Holzlack eignet sich für eine Vielzahl von Holzoberflächen, darunter Holztüren, Holzfenster, Holzzäune, Holzschränke, Holztische, Holzstühle, Holzfassaden, Holzbalken, Gartenmöbel und mehr. Verleihe jedem Projekt ein professionelles Finish.
- ⭐ Umweltfreundlich: Der Holzlack ist wasserbasiert und enthält keine schädlichen Lösungsmittel, was ihn umweltfreundlich und sicher in der Anwendung macht.
- ⭐ Schnelle Trocknungszeit: Die Holzfarbe trocknet schnell, sodass Sie das Ergebnis in kürzester Zeit bewundern können. Innerhalb weniger Stunden ist die Oberfläche trocken und einsatzbereit.
- ⭐ Deutsche Qualität: Der Holzlack wird in Deutschland hergestellt und erfüllt höchste Qualitätsstandards. Hergestellt mit Liebe zum Detail und Präzision.
- ⭐ Ideal für Renovierung oder Neuanstrich: Diese Holzschutzfarbe ist perfekt für Renovierungsprojekte oder den Neuanstrich von Holzoberflächen geeignet. Sie verleiht dem Holz ein frisches Aussehen und bietet gleichzeitig einen effektiven Schutz.
- ⭐ Anwendbar als Deckfarbe, Wetterschutzfarbe oder Holz Decklack: Dieser Holzlack kann als Deckfarbe verwendet werden, um eine gleichmäßige und schützende Oberfläche zu erzeugen. Er eignet sich auch als Wetterschutzfarbe oder als Holz Decklack, um die Haltbarkeit und den Schutz des Holzes zu verbessern.
- ⭐ Große Farbauswahl: Verfügbar in einer breiten Palette von attraktiven Farben, um Ihren individuellen Stil und Geschmack zu treffen. Wählen Sie aus verschiedenen Farbtönen, um das gewünschte Aussehen Ihrer Holzoberfläche zu erzielen.
- ⭐ Einfache Reinigung und Pflege: Die Farboberfläche ist leicht zu reinigen und zu pflegen, um das schöne Aussehen des Holzes langfristig zu erhalten.
Assembly of truss beams for the roof
Once all the beams had been carefully painted, the construction of the load-bearing truss structure began, an essential step in giving my garden kitchen a solid and durable roof.
Assembly began with the attachment of the large 500 x 20 x 10 centimeter crossbar to the rear wall.
This beam, which was carefully laid on the aerated concrete blocks and fastened with 30-centimeter-long wood screws at 50-centimeter intervals, would later form the basis for the counter beams.
The flat support of the beam on the entire wall surface ensured optimum load distribution, which did not impair the statics of the Ytong blocks.
To install the rafters running lengthwise, I still had to attach the front cross beam measuring 500 x 25 x 12 cm.
As the bar was designed as an open corner, this beam was placed on a short, approximately 50-centimeter-long section of wall next to the bar counter.
The installation of a support post above the bar was essential, with particular attention being paid to the structural requirements, as the post had to bear a considerable part of the roof load and transferred this directly to the corner of the bar, which was made of aerated concrete blocks.
To minimize the risk of breakage and distribute the load more effectively, I inserted a 5 mm thick, 20 x 20 cm checker plate made of aluminum between the 12 x 12 cm load-bearing post and the aerated concrete block.
The metal plate distributed the weight over a larger area and thus provided additional stability. The post was secured with a metal threaded rod that reached through the checker plate into the aerated concrete block and provided a firm anchorage.
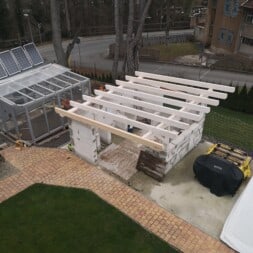
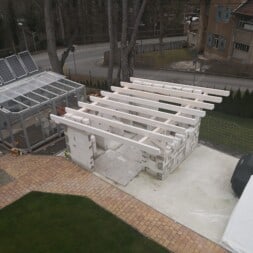
Once the two cross beams were installed, the next step was to align and attach the rafters, starting with the outer beams to ensure even spacing.
The planned overhang to the front and rear was taken into account during assembly before the rafters were firmly screwed to the frame timbers.


Install the gas concrete blocks of the garden kitchen flush with the roof
Before I could start installing the sheet piling for the roof of my garden kitchen, I had to do some preparatory work.
One of these was the final preparation for the installation of the lighting, which required careful planning of the cable routing.
The empty conduits, which ended under the load-bearing crossbar in the rear wall, naturally needed a passage through the crossbar so that I could later connect the power cables to the lamps. I describe further details on installing the sockets and switches in the article Build your own garden kitchen – planning and installing the electrics.
Given the limited space under the roof, it was clear that this work had to be completed before the roof layer was installed.
I marked the positions of the empty conduits on the beam and then used a Forstner bit to drill a 32-millimeter hole that led directly to the respective empty conduit. This preparation enabled me to pull the electrical cables through later without any problems.
Another detail that required my attention was the finishing of the side walls.
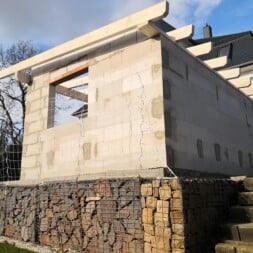
My aim was to have these flush with the roof in order to achieve a final roof line. After the rafters were installed, I now had the opportunity to transfer the angle and the exact height of the roof to the Ytong bricks.
I made matching wedges, which I carefully positioned and glued to the side walls.
To check the precision of my work, I drew a straightedge across the rafters. This method ensured that the walls were perfectly flush with the roof. Once again, the value of proper and precise preparatory work was demonstrated. I have written down further information on creating walls from YTONG aerated concrete blocks in the article Building your own garden kitchen – Masonry and gluing walls with aerated concrete.

- Mit 750 Watt bringt die Universalsäge genügend Leistung auf das Blatt, um 150 mm in Holz und 10 mm in Stahl zu schneiden.
- Handlich in der Handhabung und flexibel im Einsatz ist die Universalsäge durch ihre ergonomische, schlanke Bauform.
- Zum material- und anwendungsgerechtem Arbeiten ist die Universalsäge mit einer Hubzahl-Elektronik ausgestattet, die gewissenhafte Voreinstellungen auf den zu bearbeitenden Werkstoffen erlaubt.
- Der werkzeuglos verstellbarer Sägeschuh ist für die optimale Sägeblattnutzung ausgelegt.
- Der werkzeuglose Sägeblattwechsel geht schnell und einfach von Hand, ganz ohne weiteres Werkzeug zur Montage.
- Ein großer Softgrip-Bereich gewährt einen sicheren und festen Halt zum komfortablen Arbeiten auch bei langwierigen Arbeitseinsätzen.
- In die Lieferung inbegriffen ist ein Sägeblatt für Holz.
Sheet piling and OSB boards as the roof of the outdoor kitchen
The beams of the timber frame already presented a very attractive picture. To maintain the charming country-style design, I decided to clad the area between the rafters with appropriately selected wood.
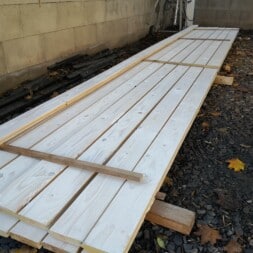
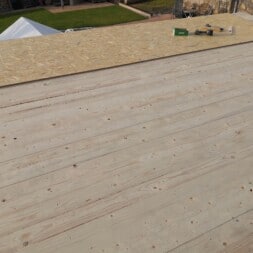
For this, I chose the Rauspund, whose boards with a thickness of 2.8 centimeters and a tongue and groove system have a high degree of stability. The installation also created an attractive pattern on the surface.
If I hadn’t planned to install a photovoltaic system on the roof at a later date, the sheet piling would have sufficed as the final layer. However, I reinforced the whole thing with an additional layer of OSB boards.
I mounted the first board with the tongue facing forward, i.e. away from the roof, flush with the front edge of the rafters and centered it.
This precision in the assembly of the first board was crucial, similar to the formwork stone wall that supports the slope behind our carport, because all other boards or formwork stones were based on it.
I then inserted the second board into the groove of the first board, aligned it and carefully knocked it against the first board with a mallet. I then fastened this and all the other boards with two wood screws per rafter.
Minor dimensional deviations on the sides were not a problem at this stage. Once the OSB boards were also installed, I planned to cut the sides cleanly and flush with the outer rafters using a hand-held circular saw.
Although the work was not particularly difficult or complex, it was quite time-consuming due to the large number of screws. With the right tools and the competent support of my father, the installation of the baffle boards was completed after a few hours.
Viewed from below, the roof now looked finished, but from above, the OSB boards were still missing in addition to the welded membrane, the installation of which was next on the agenda.
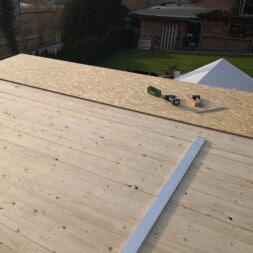
The panels, measuring 250 x 62.5 centimeters and 1.8 centimeters thick, were heavy but could be easily positioned after being lifted onto the roof.
The assembly was carried out in a similar way to that of the baffle. I positioned the first panel at the front left so that the springs were facing the outer sides.
The OSB panel was aligned starting from the rafters and screwed to the sheet piling, whereby I used shorter screws for the direct screw connection to the rafters. I marked the correct position of the screws with a long straightedge.
After attaching the first panel, I positioned the second panel to the right of it and drove the tongue of the panel into the groove of the first panel with a tapping block so that the two merged seamlessly before I also screwed the second panel in place.
I cut the third panel to the required size and used the remaining piece as the starting piece for the second row. In this way, I installed the entire surface in a bond, which further increased the stability.
The OSB panels were installed much more quickly and only took one morning.
Finally, I just had to saw the sides flush. To do this, I marked a point at the front and back, starting from the rafter underneath, and stretched a string with colored chalk.
When snipping, this left a clean and straight line along which I was able to saw off the OSB boards and the sheet piling underneath at the same time.

- Lieferumfang Handkreissäge 2 x Akku Ladegerät Makpac
Video: Build your own half-timbered roof on the outdoor garden kitchen
While building my outdoor kitchen, I kept my camera running. I then published the individual work steps in individual films in my playlist for building my garden kitchen on my YouTube channel. Another overview of my videos on building my outdoor kitchen can be found in the blog category Garden kitchen.
I have also summarized the construction of the half-timbered roof in an exciting and informative video.
If you want to see more of me and my projects, feel free to check out my YouTube channel.

- Schlagwerk abschaltbar
- Bürstenloser Motor für mehr Ausdauer, längere Lebensdauer und kompaktere Bauweise
- Mit leuchtstarker LED
- Feinfühlig regelbare Drehzahl
- 2-Gang-Vollmetall-Planetengetriebe
Install end plates and rain gutter yourself
I had now covered the roof of my garden kitchen with tongue and groove boards and an additional layer of OSB boards. With a total thickness of just under 5 centimeters, the roofing was stable enough to later safely support the elevation of the photovoltaic modules.
However, the roof was not yet watertight at this point. As a final layer, I planned to bond a slated welded membrane to prevent water from penetrating.
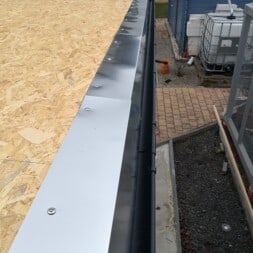
To keep the water out at the edges, the side in-situ sheets had to be installed first. An eaves plate was to protect the wood from water at the front and provide an aesthetic finish, while a rain gutter was to collect the water at the back and channel it into a cistern.
This meant that the rainwater could later be used to water the garden.
It was also necessary to install a gutter inlet to direct the water into the gutter. The eaves flashing, in-situ flashing and gutter flashing had to be fitted to the sides of the roof in such a way that there was an overlap and the water could always drain away to the rear.
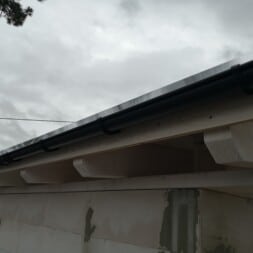
I therefore started the assembly on the rear part of the roof. First, I placed gutter bars 50 centimeters apart, into which the rain gutter would later be hung.
I opted for a complete system with height-adjustable brackets, which allowed me to easily adjust the slope of the gutter at a later date.
After I had placed the gutter in the gutter bars as a test, I positioned the gutter slope so that the water could drain away optimally, making sure that there was an overlap of 10 centimeters. I then attached the metal sheets to the OSB board using sheet metal screws.
This was followed by the installation of the side in-situ panels. At the bottom, I positioned the in-situ sheets with an overlap on the gutter slope.
As the sheets were only 2 meters long, I had to push the sheets into each other to achieve the required total length. I put the sheets together so that the front sheet was 10 centimeters above the rear sheet.
Finally, I screwed on the front eaves panels. They lay sideways over the in-situ sheets, and here too I made sure there was an overlap of about 10 centimeters.


Glueing the welding membrane to the roof of the outdoor kitchen yourself
Now all that was missing was the welding membrane that would permanently protect the roof from rain and snow. I opted for a slated S5 welded sheet.
The S5 welded membrane, especially in its coated version, is a high-quality waterproofing material that is widely used in the construction industry. This material is characterized by its multi-layered structure.
The base is formed by a carrier layer, which is typically made of glass fleece or polyester and gives the membrane its stability. A layer of bitumen is applied on top, which has impressive elastic and waterproof properties.
The surface of the slated S5 welding membrane is coated with fine slate granules, which not only provide an attractive appearance, but also significantly improve the UV and weather resistance of the welding membrane.
One of the biggest advantages of the slated S5 welded membrane is its durability and reliability in roof waterproofing.
The combination of a stable carrier layer and elastic bitumen layer ensures high tear resistance and flexibility, which makes the welded membrane particularly effective in the event of temperature-related expansion or contraction of the roof.
The slated surface also provides additional protection against mechanical damage, thereby extending the service life of the roof.
Another advantage is the quick and easy installation of the welded membrane. The welding process, in which the bitumen layer is liquefied by heat and fused to the substrate, creates a seamless and extremely tight bond that effectively keeps out water and moisture.
This makes the slated S5 waterproofing membrane an ideal solution for waterproofing flat roofs, balconies and terraces, where reliable watertightness is essential.
When installing the welded membrane on the roof of my garden shed, I deliberately decided against using a separating layer of roofing felt.
Normally, this should be placed under the welding sheet to protect the wood from the flames of the welding torch. However, my previous experience with this method was not convincing.
For example, a strong storm hit the welded sheeting on a neighbor’s garden shed and blew it off the roof along with the roofing felt, which was only nailed down – a clear sign of a lack of stability.
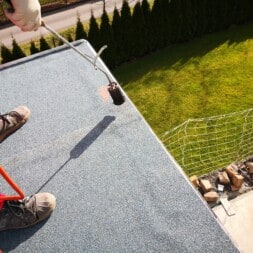
For this reason, I preferred to lay it directly on the wood and secured the welding work by keeping a water hose ready.
I rolled out the first welded sheet and positioned it at the outer edge so that it overlapped the side in-situ sheets, the front eaves sheet and the gutter overhang.
I then rolled it up again slightly without changing its position, so that the start of the track came to rest about one meter below the front edge of the roof.
I then used the welding torch to slowly heat the bitumen of the welding membrane, unrolled the membrane piece by piece upwards and bonded it to the substrate.
After a short cooling phase, the bonded area was firm enough to be walked on and the lower part of the welded sheet was welded in the same way.
The second welded sheet was then rolled out and placed on the roof with the necessary overlap to the first sheet before this was also welded.
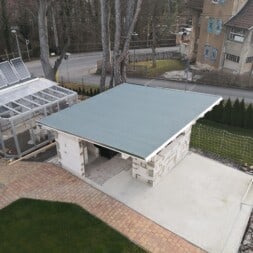
In this way, I secured the entire roof with the welding membrane.
In combination with the water baffles, this created an absolutely watertight surface that reliably protected the wood underneath from the effects of the weather.

- ANWÄRMBRENNER-SET: 1x Hochleistungsbrenner – Stahl verzinkt & randverstärkt; 1x Propangasschlauch – 5,0 m, G 2 x 3/8“ L; 1x Propan-Konstantregler; 1x Griffstück mit Dreiwegeventil und fixierter Pilotflamme; 1x 60 cm Brennerrohr mit Brennerstütze
- ANWENDUNGSVORTEILE: Der Hochleistungsbrenner für Abflamm- und Heißklebearbeiten in Economy Ausführung, Niedriger Gasverbrauch durch exakte Brennereinstellung
- ANWENDUNGSGEBIETE: Flämmen von Bitumenbahnen; Aufwärmen; Abflammen; Verschweißen von Folien; Teerarbeiten; Dachisolierungen; Beton- und Mauerwerkstrocknung; Biologische Unkrautvertilgung und Moosbeseitigung; Auch optimal zum Auftauen/ Enteisen geeignet; Europalettenveredelung & Möbelveredelung im Vintage-Style zum Selbermachen
- ANWENDUNGSGEBIET UNKRAUTVERNICHTUNG: Das Gerät wenige Sek in einem Abstand von ca. 3 cm über das Unkraut führen. Die Flamme erreicht 1.000⁰C und bringt die Zellflüssigkeit der Wurzeln zum Gerinnen wodurch diese innerhalb weniger Tage vertrocknen, ein Verbrennen ist nicht nötig. Der umweltschonende Unkrautentferner kommt komplett ohne chemische Stoffe wie Glyphosat & Co aus
- TECHNISCHE DATEN: Flammentemperatur: bis 1060 °C; Gasdruck: max. 4 bar, 8 kg/h; Brennerbiegung mit 60 cm, ca. 35° gebogen; Brenner: Ø 57 mm
Building permits for garden kitchens
When building a garden kitchen, different building regulations must be observed depending on the federal state. In Thuringia, planning permission is often not required for garden kitchens as long as they are erected as temporary, non-permanent structures without fixed foundations. This regulation applies to small construction projects such as garden sheds or garden kitchens whose surface area and volume do not exceed certain dimensions.
For my garden kitchen, I made sure to design the structure in such a way that it falls under the category of permit-free buildings. This means that it was built within the permitted size limits to avoid the need for planning permission. The garden kitchen has no bedrooms, no toilet and is open on 2 of the 4 sides.
In all cases, it is advisable to find out about the current situation and possible changes to the building regulations before starting construction work in order to avoid surprises and possible fines later on. It must also be noted that the specifications for the inner and outer areas of the municipality differ.
In Thuringia, specific regulations apply to building projects that do not require approval, which are set out in Section 60 of the Thuringian Building Code (ThürBO). These regulations are particularly relevant for the construction of a garden kitchen, as they define the circumstances under which planning permission is not required.
I didn’t get a definitive answer to my inquiry at the building authority because my garden kitchen is open, similar to a patio roof. As it is free-standing, i.e. not attached to an existing building structure, the specifications for the construction of carports come closest to the construction of my garden kitchen.
Concrete specifications according to § 60 ThürBO:
- Covered area: Building projects such as garden kitchens are not subject to approval in Thuringia if the covered area does not exceed 40 square meters. This makes it easier to build smaller structures without the bureaucracy of planning permission.
- Further requirements: In addition to the size restriction, buildings that do not require a permit must also meet other criteria, such as compliance with distances from neighboring properties and adherence to local development plans.
Recommendation:
It is advisable for building owners to keep an eye on these specific requirements and to check whether the planned construction project falls under the category of construction projects that do not require a procedure before starting construction. It is always advisable to contact the responsible building authority directly in the event of uncertainties or special building projects in order to ensure legally compliant implementation.
Summary and conclusion
When building my garden kitchen, I initially concentrated on constructing a robust and durable roof.
This consisted of a solid half-timbered substructure made of massive wooden beams, which were screwed directly onto the walls made of bonded aerated concrete blocks.
For the roof cladding, I chose sheet piling and OSB boards to create a stable surface for the later installation of photovoltaic modules.
I also made sure that the roof had an overhang to both partially cover the bar and protect the walls from precipitation.
The installation of the rain gutter, flashings and the bonding of the slated S5 welding membrane ensured that the roof was weatherproof.
Now that the roof has been completed, the interior fittings and the installation of the electrical systems are on the agenda.
This includes the installation of lamps, sockets and switches that will create a functional and cozy atmosphere in the garden kitchen.
Inside, I can now start installing the stainless steel furniture. The complete integration of my Napoleon Phantom P500 into the work surface will of course also be a highlight.

- Bitumen-Schweißbahn - Die Dachbahn ist modifiziert mit SBS-Elastomeren. Die Matrix ist ein Polyester-Vliesstoff mit hohem Flächengewicht, hoher Elastizität und sehr hoher Reißfestigkeit
- Hochwertige Abdichtungsbahn - Die Außenfläche der Dachpappe ist mit groben Mineralstreuseln bedeckt, die Unterseite ist mit einer leicht schmelzbaren Kunststofffolie befestigt. Entlang einer Kante der Schweißbahn gibt es eine Überlappung, die mit Kunststofffolie befestigt ist
- Professionelle Dachabdichtung - Ideal als Deckschicht von mehrlagigen wasserdichten Dacheindeckungen im Neubau und bei Renovierung alter Bitumendacheindeckungen
- Lieferumfang - Enthalten ist eine Rolle Schweißbahn PYE PV 200 S5 beschiefert in grau mit den Maßen 1 x 5 m² (EN 13707:2004+A2:200; EN 13707+A2:2012; EN 13501-5+A1:2010)
- Qualität von Isolbau - Alle Isolbau Produkte werden unter höchsten Qualitätsstandards entwickelt und hergestellt und haben sich über Jahre in der Baubranche ausgezeichnet und bewährt
FAQ: Outdoor kitchen – Installing a solid wood roof
1 Why was a half-timbered substructure chosen for the roof?
A truss substructure made of solid wooden beams was chosen to ensure a high load-bearing capacity and stability. The roof had to be robust enough to support future photovoltaic modules and withstand heavy wind and snow loads.
2. what materials were used for the roof covering?
The roof covering consists of sheet piling and OSB boards. The sheet piling boards serve as a visually appealing base, while the OSB boards provide additional stability and a smooth base for the waterproofing.
3. how was the roof made weatherproof?
The roof was made watertight by bonding a slated S5 welded membrane. In addition, end plates such as in-situ and eaves plates were installed to protect the edges and direct water into the gutter.
4 Why was a separating layer of roofing felt omitted?
A separating layer was not used, as previous experience has shown that this method is not stable enough in strong storms. Instead, the welding membrane was laid directly onto the wood to ensure a stronger and more stable connection.
5. what steps must be taken when installing the rain gutter?
The rain gutter was installed with height-adjustable gutter bars to ensure an optimum slope. The gutter slope was positioned so that the water can drain efficiently into the rain gutter. In-situ and eaves flashings were installed overlapping to control the water flow.
6. what protective measures were taken when bonding the welding membrane?
During welding, a water hose was kept ready to solve any heat problems immediately. The welded membrane was laid in sections, with the bitumen layer being heated and the membrane gradually bonded.
7 Why were OSB boards used as an additional layer?
The OSB boards increase the stability of the roof and provide a solid base for sealing with the welded membrane. They also serve as a substrate for the future installation of photovoltaic modules.
8. what challenges did you face when installing the wooden beams?
Special attention was required to ensure that the beams were properly aligned and secured. The front crossbeam and the support had to be particularly stable in order to distribute the loads optimally.
9. how was the lighting integrated into the planning of the roof?
Empty conduits for the power cables were laid before the roof layer was installed to allow easy installation of the lighting. The cables were fed through holes in the wooden beams so that they could later be connected to the lamps.
10 What are the next steps after the roof construction?
Once the roof has been completed, the interior fittings and electrical installations will continue. This includes the installation of lights, sockets and switches as well as the integration of the Napoleon Phantom P500 gas grill and the sink into the worktop.

- KOMPLETT-LÖSUNG: Regenrinnen Set aus Kunststoff inkl. aller notwendigen Einzelteile wie Ablaufstutzen, Fallrohre oder Rinnenverbinder. Alle Teile sind einzeln nachbestellbar
- ANWENDUNG: Fachgerechte Dachentwässerung für eine Dachseite (z.B. Pultdach) an deinem Carport, Gartenhaus oder deiner Terrasse mit einer Dachfläche bis ca. 50 m²
- HOCHWERTIGER KUNSTSTOFF: Qualitativ hochwertiger PVC-U Kunststoff, welcher witterungs- und UV-beständig ist und zudem eine hohe Schlagfestigkeit und Formstabilität aufweist
- EINFACHE MONTAGE: Das passgenaue Stecksystem von INEFA ermöglicht eine einfache und fachgerechte Montage in wenigen Schritten. Flexible Größenanpassung der Dachrinne möglich
- MADE IN GERMANY : Die Premiummarke INEFA bietet Europas größtes Sortiment an Dachentwässerung. Zubehör wie z. B. Laubschutzgitter in unserem Sortiment erhältlich
Dieser Beitrag ist auch verfügbar auf:
English
Deutsch


