Designing a smart and efficient garden kitchen – installing lights, sockets and water connections
The development of my garden kitchen has made significant progress, particularly in the areas of electrics, water installation and the integration of smart technologies for lighting and control.
I’d like to give you an insight into how I overcame these challenges, from carefully planning the lighting to installing smart sockets and light switches that enable flexible and efficient use.
Building a garden kitchen – planning the right lighting
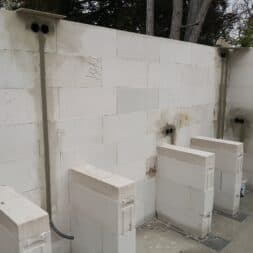
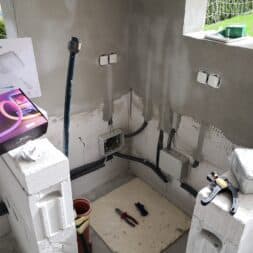
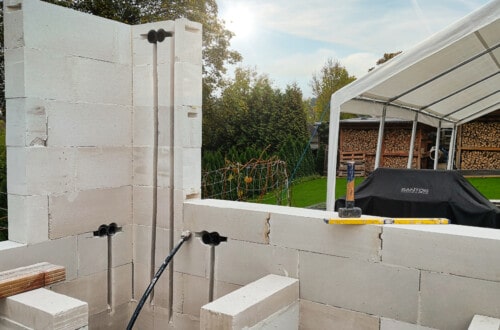
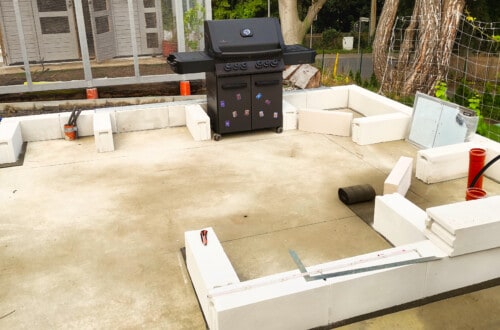
My garden kitchen covers an area of around 4m x 4.5m. With the active support of my father, I laid the base for the worktop and the kitchen fronts a few weeks ago by building the kitchen counter with Ytong bricks.
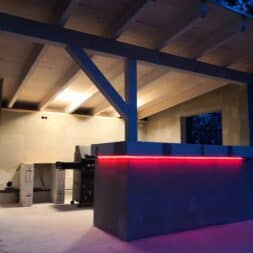
The work area was generously laid out in the shape of a “U” and divided into three main zones: the bar with counter, the wet zone with sink and the barbecue zone, where my modified Napoleon Phantom P500 gas barbecue found its place.
Each area fulfills a specific function, which prompted me to install suitable lighting in each case.
I needed bright and clear lighting above the barbecue area, while the bar area needed to radiate a cozy and inviting ambience.
Last but not least, the outside of the bar and the terrace, which is located between my garden kitchen and the pool, were to be given an extraordinary ambience.
When it came to controlling all the lamps and light sources, it was very important to me that they could be operated both via the light switches in the garden kitchen and smart – using an app on my smartphone.
I had already completed the extensive preparations for connecting the sockets, light switches and individual lamps.
My exact procedure for installing the electrics and how I transformed my garden kitchen into a little lighting miracle is described in detail in the article“DIY garden kitchen – planning and installing the electrics“.
Zuletzt aktualisiert am 5. July 2025 um 20:42 . Ich weise darauf hin, dass sich hier angezeigte Preise inzwischen geändert haben können. Alle Angaben ohne Gewähr. (*) Bei den verwendeten Produktlinks handelt es sich um Affiliate Links. Ich bin nicht der Verkäufer des Produktes. Als Amazon-Partner verdiene ich an qualifizierten Verkäufen. Dein Preis ändert sich jedoch nicht.
Installation of water connection and waste water
Before I started installing the electrics, it was important for me to install the water connection and the drainage system. This allowed me to better maintain the necessary safety distances when positioning the sockets.
My experience of installing lawn irrigation systems stood me in good stead here, particularly the use of PE pipe and Gardena fittings, which I relied on for a reliable fresh water connection.
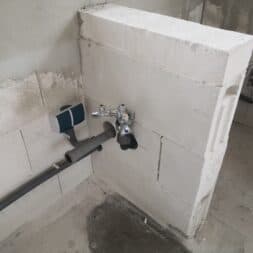
I inserted a Y-distributor in the pedestal at a transition from the PE pipe to a 3/4″ female thread, which provided two further 3/4″ female connections. At this point I installed a conventional wall connection with a 3/8″ thread and an angle valve.
The angle valve was not only fitted with a 3/8″ connection, but also had an additional tap that allowed me to connect a garden hose or fill a larger bucket.
At present, the two water connections of the washbasin tap are connected directly to the 3/8″ connections. Regardless of which position I turn the tap to, cold water always flows directly from the house connection.
But it was precisely this design that opened up the possibility of integrating an instantaneous water heater into the hot water connection at a later date, the power supply for which could be provided by a nearby socket.
I realized the drainage system with 50 mm HT pipe, which I integrated into my 100 mm KG pipe.
Zuletzt aktualisiert am 5. July 2025 um 21:03 . Ich weise darauf hin, dass sich hier angezeigte Preise inzwischen geändert haben können. Alle Angaben ohne Gewähr. (*) Bei den verwendeten Produktlinks handelt es sich um Affiliate Links. Ich bin nicht der Verkäufer des Produktes. Als Amazon-Partner verdiene ich an qualifizierten Verkäufen. Dein Preis ändert sich jedoch nicht.
Light installation in the garden kitchen
The design of the lighting in my garden kitchen played a central role, as it contributed significantly to the atmosphere and functionality of the room.
I opted for a combination of practical and atmospheric lighting to meet both the functional requirements and the desire for an inviting ambience.
Above the grill, I mounted two LED lamps with an IP54 protection rating, whose light color and brightness can be variably adjusted. This targeted lighting guaranteed that the grill surface was always optimally lit as soon as I stood at the grill.
Thanks to a double switch, I was able to control each lamp independently.
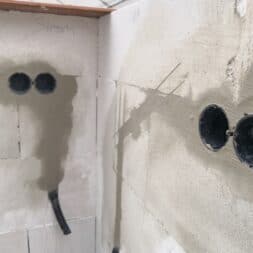
I didn’t install a lamp for the area above the bar at first, I just prepared the supply lines. I pulled a NYM 3 x 1.5 cable through an empty conduit in the wall made of aerated concrete blocks up to the roof.
This gave me the option of connecting a suitable lamp for the counter area later on.
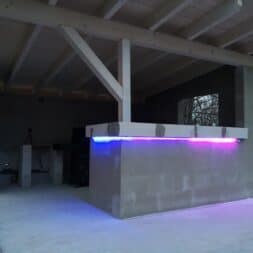
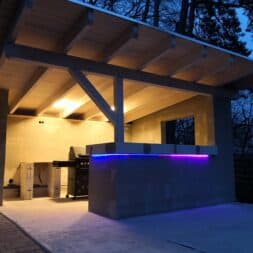
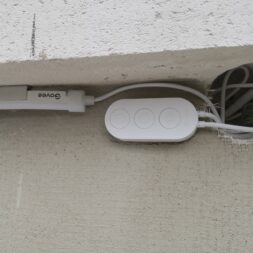
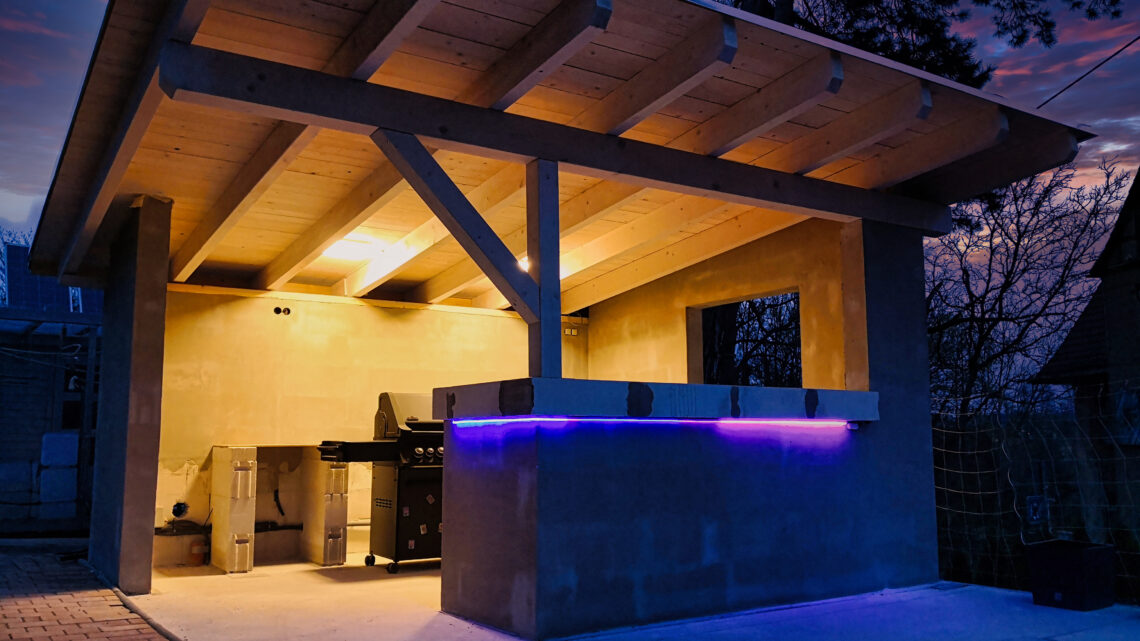
I installed an RGBIC LED light strip from Govee under the small projection of the counter on the outside. The special feature of this strip light was its seamless appearance, as the LEDs themselves were not visible and the light and color transitions were very soft.
The light strip itself was not visible through the paneling of the counter, only the light that gently illuminated the front wall of the pool bar. This made the Govee continuous-row system the ideal source of indirect light, which created an appealing ambience.
I also installed a dual light switch on the inside of the counter, which allowed me to control the main light above the pool bar and the surrounding LED RGBIC light strip separately.
The installation of the lamps and light sources required careful consideration. My aim was to make the installations as unobtrusive as possible and at the same time enable smart control via smartphone, Alexa or Home Assistant.
Zuletzt aktualisiert am 5. July 2025 um 20:31 . Ich weise darauf hin, dass sich hier angezeigte Preise inzwischen geändert haben können. Alle Angaben ohne Gewähr. (*) Bei den verwendeten Produktlinks handelt es sich um Affiliate Links. Ich bin nicht der Verkäufer des Produktes. Als Amazon-Partner verdiene ich an qualifizierten Verkäufen. Dein Preis ändert sich jedoch nicht.
Safety instructions – Working on electrical systems
When installing lamps, switches and sockets in the garden kitchen, the five safety rules of electrical engineering were consistently applied to ensure a high level of safety.
- Unlock
- Secure against restarting
- Determine absence of voltage
- Earthing and short-circuiting
- Cover or cordon off neighboring live parts
First, the system was disconnected in the fuse box of the sub-distribution board by completely cutting off the power supply. To prevent accidental restarting, I have prevented access to the sub-distribution board.
Only insulated tools and materials and installation parts approved for the purpose were used.
The electrical work was carried out exclusively under dry conditions, and particular emphasis was placed on protecting the systems from moisture.
Installing LED damp-proof lamps for the barbecue area
The installation of the lamps not only had to satisfy aesthetic requirements, but also meet practical and safety requirements.
A decisive factor in the selection of lighting for outdoor areas is the IP rating (Ingress Protection), which describes the degree of protection of the luminaires against the ingress of solid foreign bodies and water.
For my garden kitchen, I opted for two LED ceiling lights with an IP rating of IP54. This means that the lights are fully dustproof and protected against splashing water from all directions, making them ideal for use in covered outdoor areas.
LED lights were chosen because they are not only energy-efficient, but also have a long service life and are therefore more sustainable than conventional lighting.
Interestingly, the LED lights I selected do not have a protective earth conductor. The reason for this is their design and the fact that LED lamps often operate at lower voltages and in many cases have a fully insulated construction.
This significantly reduces the risk of electric shock, even if moisture should penetrate.
However, special care must be taken when connecting a lamp without an earth conductor. It is important to ensure that the installation still complies with local electrical standards and is carried out by a qualified electrician.
Especially in outdoor areas, where conditions can vary and humidity is higher, professional installation must be ensured.
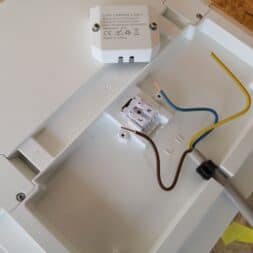
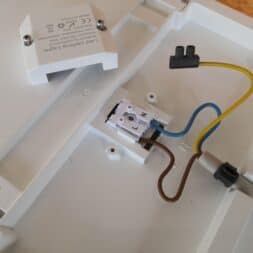
I therefore shielded the protective conductor of the supply line from the light switch with a luster terminal before I connected the phase and the neutral conductor to the terminals of the lamp.
I laid the two 3 x 1.5 NYM cables I used safely and securely to the two lamps in a cable duct, which I screwed directly to the wooden beam.
By using a double switch, I can switch both lamps on and off separately.

- Dimmbare 3 Farbtemperaturen + 13 RGB-HintergrundbeleuchtungMit der superempfindlichen Fernbedienung der Badezimmerbeleuchtung knnen Sie Ihre bevorzugte Farbtemperatur Warmwei 3000K, Neutralwei 4000K, Tageslichtwei 6500K voreinstellen, die Helligkeit einfach und flexibel von 10% bis 100% dimmen und 13 whlbare RGB-Hintergrundbeleuchtungsfarben einfach ndern
- Nachtlicht, Timer & SpeicherfunktionSei dein Partner fr guten Schlaf, 10 % Helligkeit Nachtlichtmodus. 60 Sekunden Timer-Aus-Funktion ist praktischer fr ltere Menschen und Kinder. Die Speicherfunktion behlt automatisch Ihre letzten Einstellungen bei. Tipps: Wandschalter kann nur Licht ein-/ausschalten
- Energieeinsparung 90 % 24 W Deckenleuchte bietet 3200 Lumen, was einer 280 W Glhlampe entspricht, der Beleuchtungsbereich umfasst 10 bis 25 . Kein Flackern, kein blaues Licht. Dank der ultralangen Lebensdauer von 30,000 Stunden knnen Sie sich den Aufwand fr den Austausch komplett sparen
- IP54 Wasserdicht Grce des matriaux srs et de haute qualit, aucun cble de mise la terre n'est ncessaire. Mae 300x300x25 mm, ultradnnes und versiegeltes Design zum Schutz vor Spritzwasser, verhindert gut, dass Staub und fliegende Insekten in die Lampe gelangen. Sie knnen sie bedenkenlos im Badezimmer, auf dem Balkon, im Flur, im Keller, in der Waschkche oder in der Garage verwenden.
- Einfache Installation und staubdichtHervorragende staub- und insektendichte Leistung dank der integrierten versiegelten Struktur, keine Schatten oder dunklen Flecken in der Lampe nach lngerem Gebrauch. Kein Elektriker erforderlich, nur 3 Schritte zur Fertigstellung der Installation. Trennen Sie die Stromversorgung vor der Installation
Illuminating bar counters with RGBIC LED strips
In addition to the functional lighting, I also wanted to create a special atmosphere. I installed a NEON RGBIC LED strip underneath the bar counter for this purpose.
The Govee Neon LED Strip is characterized by its RGBIC technology, which makes it possible to display several colors simultaneously on a single strip. This technology created impressive lighting effects and enabled the lighting concept to be customized.
Another outstanding feature is the flexibility of the LED strip, which can be easily shaped into different forms and thus perfectly integrated into the planned environment.
The decision to use the Govee Neon LED Strip was not only based on its technical specifications. The ease of installation and the ability to control the lighting via an app also played a decisive role.
The app control and the ability to control the LED strip via Home Assistant or Alexa made it possible to adjust the lighting according to time or mood, which significantly increased the comfort and functionality of my garden kitchen.
With its IP67 protection class, the Govee Neon LED Strip is designed for outdoor use and offers excellent resistance to weather influences thanks to its high protection class. However, the power plug and the control unit are not waterproof.
Of course, I had to take this into account during installation.
The LED light strip was powered via a 220V plug with an integrated transformer.
Apart from a switch on the control unit, which was permanently connected to the cables of the LED strip, there was initially no other way to control the LEDs.
As the LED strip from Govee retained its last settings even after the power supply was interrupted, I decided to connect the socket intended for the power supply directly to a light switch.
This socket was installed underneath the bar in the kitchen and an additional empty conduit was routed to the outside.
Below the bar counter, protected by the projection of the shelf, there was enough space to place the cable and control unit. This position proved to be advantageous, as the control unit’s built-in microphone provided good reception for the lighting control.
The light switch I installed, which enabled two separate circuits for the strip light and the lighting above the bar, required a 5 x 1.5 NYM cable to be laid from the distribution box to the switch.
Three cores of the cable were used for the protective conductor, the phase and the neutral conductor to the light switch, while two further cores were intended for switching the socket and the bar lamp.
In a later step, a smart control system was integrated into the system, which made it possible to control both lighting elements independently of each other via an app, regardless of the position of the light switch.

- Shape Mapping DIY Lichtfarben: Dieses Govee Neon Rope Light erzeugt mit Shape Mapping in der Govee Home App personalisierte Lichteffekte. Dabei handelt es sich um eine neue Technologie von Govee, die Muster über die Kamera Ihres Telefons erkennt und dann ganz einfach die gewünschten Lichter in der App erstellt.
- Traumhafte RGBIC-Beleuchtung: 64 voreingestellte Beleuchtungseffekte zur Auswahl, die fortschrittliche Beleuchtungstechnologie für eine gleichmäßige, dynamische Beleuchtung nutzen. Unterstützt Neon LED Strip, um Lichter in alle Richtungen zu schrumpfen oder auszudehnen und so einen brillanteren Lichteffekt zu erzielen.
- Matter-kompatibel und Smart Control: Neon LED Strip sind kompatibel mit Matter, können Sie leicht die Beleuchtung durch Homekit, Alexa oder Google Assistant anpassen, die Schaffung von bequemen Haus Intelligenz für Sie und Ihre Familie.
- Lebendige Musiksync: Neon Rope Light unterstützt 12 Musikmodi, um ein faszinierendes Lichtfest zu schaffen. Über die Govee Dreamview-Funktion können andere Govee Smart Lights synchronisiert werden, um ein interaktives Klang- und Lichterlebnis in Ihren Raum zu bringen.
- Problemlose Einrichtung: Neon Rope Light verwendet ein weicheres, leichteres Silikonmaterial, das interessantere und komplexere Formen ermöglicht. Der mitgelieferte Biegeclip hilft dabei, die Neon LED Strip einfach in die gewünschte Form zu bringen. Hinweis: Enthält 6 Biegeclips und 10 Befestigungsclips.
Why I chose the Shelly PM2
When upgrading my garden kitchen, I decided to use the Shelly PM2, an intelligent relay known for its versatility and performance.
The Shelly PM2 is characterized by its compact size and the ability to control two circuits independently, which made it particularly attractive for projects like mine.
One of the main advantages of the Shelly PM2 is its integration into Wi-Fi networks, which enables direct control via the Shelly app.
This gave me the opportunity to conveniently control the lighting in my garden kitchen from my smartphone, program scenarios or automatically adjust the lighting based on various criteria.
The Shelly PM2 also offers the option of monitoring the energy consumption of the connected appliances, which helped me to log the power consumption in my garden kitchen and optimize it efficiently.
The ability to pair the Shelly PM2 with voice assistants such as Amazon Alexa or Google Assistant expanded the control options to include the convenience of voice control.
This meant I could switch the lights without physical contact, which was particularly handy when I had my hands full or just wanted to quickly change the atmosphere in my garden kitchen.
In summary, the Shelly PM2 provided the perfect solution for my project by enabling flexible, convenient and energy-efficient control of the lighting.
The combination of performance, ease of use and the ability to monitor energy consumption made the Shelly PM2 an indispensable part of my smart garden kitchen.


Goove smart control of LED lighting with the Shelly PM2
The lighting below the bar counter with the RGBIC LED strip became a visual highlight of my garden kitchen and represented the integration of state-of-the-art technology into everyday life.
To make the lighting more flexible and user-friendly, I upgraded the existing double light switch with a Shelly PM2 module. This made it possible for me to control the light independently of the switch position via my smartphone, Home Assistant or Alexa.
The Shelly PM2 was chosen because it can switch two circuits independently of each other, which was ideal for my configuration.
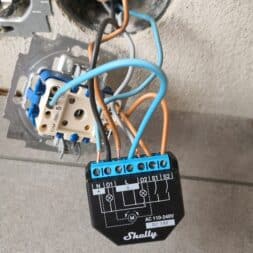
During installation, I first removed the phase from the light switch and connected it to the “L” terminal of the Shelly. I then connected the two switching outputs of the light switch to terminals S1 and S2 on the Shelly PM2.
Outputs 1 and 2 of the Shelly were then used to connect the wires for the power supply to the socket and the lamp.
Although it was possible to control the light both manually via the rocker switch and smartly via app, the limited space in the flush-mounted boxes posed a challenge due to the additional socket next to the light switch.
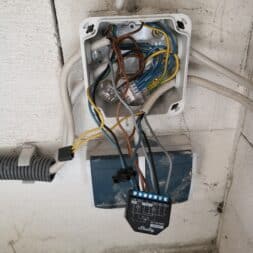
Despite the compact design of the Shelly PM2, I had to squeeze the cables a lot to reinstall the switch in its socket. I therefore later decided to house the Shelly PM2 in a larger distribution box, although the wiring diagram remained essentially the same.
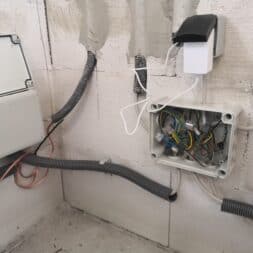
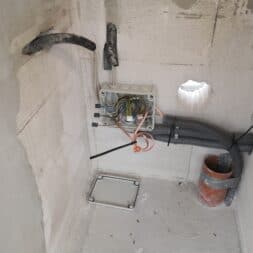
As you can see in the pictures, I laid two cables to the right of the box to the socket/light switch combination.
The upper cable, a 3 x 1.5 NYM cable, was connected directly to the socket, while the lower 5 x 1.5 NYM cable was clamped to the light switch and connected to the Shelly PM2 in the box.
The 5 x 1.5 NYM cable, which was fed into the top left of the box, served as a connection to another distribution box in which the switched socket and the lamp were connected. The power supply for these consumers was also provided in the second box.
In the first, smaller box, only the switching took place. The picture also shows the 3 x 2.5 NYM supply cable, which supplied power to both the socket outlet at the light switch and another surface-mounted socket outlet for the refrigerator.

- Shelly Plus 2PM ist ein über Wlan und Bluetooth betriebenes intelligentes Schaltrelais mit 2 Kanälen, bis zu 16A (18A Spitze) mit Leistungsmessung, das auch als Wlan-Repeater verwendet werden kann; Shelly Plus 2PM kann verwendet werden, um den Verbrauch zu überwachen und die Kontrolle über alle Haushaltsgeräte, Stromkreise und Bürogeräte individuell zu übernehmen
- VERFOLGEN SIE IHREN STROMVERBRAUCH - Sie können jetzt den Energieverbrauch Ihrer automatischen Geräte überwachen und analysieren und Ihren Verbrauch verwalten; Shelly Plus 2PM verfügt über zwei integrierte präzise Stromzähler, mit denen Sie den Verbrauch für jeden Kanal separat überwachen können; Die kostenlos gespeicherten Verbrauchsdaten helfen Ihnen, Ihre Ausgaben zu prognostizieren, und ermöglichen jedem Hausbesitzer, seine Stromkosten zu senken
- STEUERN SIE 2 ELEKTRISCHE GERÄTE MIT EINEM GERÄT - Shelly Plus 2PM ermöglicht es Ihnen, zwei verschiedene Stromkreise zu steuern und deren Verbrauch separat zu überwachen; Auf diese Weise können Sie mit nur einem Gerät zwei verschiedene Leuchten auf der gleichen Phase steuern, was zusätzliche Energie spart; Der Shelly Plus 2PM unterstützt die Abdeckungssteuerung und eignet sich also perfekt für die Automatisierung von Vorhängen, Rollläden, Garagentoren, Markisen, Toren und anderen bidirektionalen Motoren in Deinem Zuhause.
- SHELLY KUNDENSERVICE - Shelly ist eine der am schnellsten wachsenden Smart Home Marken der Welt mit Geräten, die Lösungen für die Automatisierung von Privathäusern, Gebäuden und Unternehmen bieten
- Mit der SHELLY SMART CONTROL APP können Sie Ihre Shelly-Geräte aus der Ferne steuern und werden über alle automatisierten Ereignisse in Ihrem Haus benachrichtigt; Sie können die Geräte ganz einfach konfigurieren und ihre Einstellungen einzeln verwalten, oder Sie können personalisierte Szenen erstellen, indem Sie Shelly-Geräte kombinieren, um bestimmte Aktionen in Ihrer Hausautomation auszulösen
Integrate Shelly PM2 into the smart home
After installing the Shelly PM2, I turned my attention to integrating it into my smart home system. Integration into the Home Assistant proved to be straightforward thanks to Shelly integration.
After I had integrated the PM2 into my WLAN using the Shelly app, it was immediately recognized by the Home Assistant, making all functions available.
This integration not only enabled me to control the lighting directly via PC, app or voice commands, but also to incorporate it into scenarios and automations.
To make operation even more intuitive, I also linked the lighting control to Alexa.
Thanks to the specific Amazon Alexa skill for Shelly products, I was able to spontaneously change the atmosphere in my garden kitchen using simple voice commands such as “Alexa, turn on the bar counter light” or “Alexa, change the color of the bar counter light to blue” without having to rely on my smartphone.
One highlight of the smart technology was the automatic lighting routines.
I programmed routines in both the Alexa app and the Home Assistant that switched the lights on at sunset, for example, or changed the color at certain times to always create the right mood for the evening.
Over time, however, I had to focus on one control system, as coordinating the various routines and processes of my smart home devices across two separate systems became increasingly complex.
Trying to use both systems in parallel eventually led to a point where I lost track of things and routines in one system contradicted those in the other.
Electrics in the garden kitchen – installing sockets
To maximize the functionality of my garden kitchen, I placed great importance on the strategic placement of power sockets. All sockets are connected via 2.5mm² cable and are adequately fused.
By using sockets with protective covers, I was also able to guarantee a high level of protection against moisture. Although the garden kitchen is generously covered, additional protection against rainwater is essential.
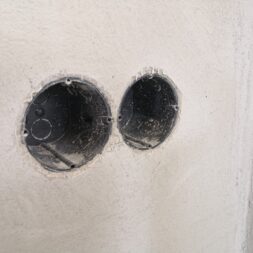
I laid the two 3 x 2.5 NYM cables in a ring underneath the worktop in an empty conduit. At the outlets to the sockets, I placed moisture-protected distribution boxes in which I divided the power cables using WAGO terminals.
Thanks to the distribution box and the use of empty conduits, I also have the option of laying or replacing additional cables, such as the CAT7 network cables or the audio cables, within the garden kitchen at a later date.

- IP66 Halogenfrei Ohne Klemmen
- Sie bestehen aus einem thermoplastischem Kunststoff Polypropylen mit Einsteckdichtungen aus Ethylenvinylacetat EVA
- Somit können Leitungen durch die 7x M25 + 5x M32 Dichtungen installiert werden oder die Dichtungen werden mit einem Messer an der vorgesehenen Stellen eingeschnitten, um eine Einführungsöffnung für Leitungen oder Rohre herzustellen
- Alternativ können Kabelverschraubungen anstelle der Dichtungen durch die Öffnungen gesteckt und von innen mit einer Gegenmutter gekontert werden
- Die Kabelabzweigkästen können mit Blechschrauben 3, 5 x 9, 5 in Öffnungen am Boden auf Montageblechen montiert werden
- BETTERMANN
- BETTERMANN
Smart control of the socket for the refrigerator
In my garden kitchen, I have not only installed smart lighting, but also intelligently designed the fridge socket.
This modernization enabled me to optimize energy consumption and only run the refrigerator when it was really necessary.
I chose a smart socket from Tapo for this project. These sockets could be easily integrated into my home WLAN and, in addition to monitoring power consumption, also offered the option of switching the power supply on and off remotely.
I was also able to create routines using the Tapo app.
As I mentioned earlier, at some point it was necessary to focus on a central system when using the smart controls. As the Home Assistant supports the integration of Tapo products, I chose it as the central control unit.
It also made sense to me because it allowed me to integrate the monitoring of energy efficiency and power consumption into the Home Assistant’s Energy Dashboard.
Despite the centralization on the Home Assistant, I still had the option of using the Tapo app and voice control via Alexa, which gave me additional flexibility in control.

- Energieverbrauchskontrolle - Analysieren Sie den Echtzeit- und den historischen Stromverbrauch des angeschlossenen Geräts
- Einfache Einrichtung und Verwendung - Schnelle und einfache tägliche Einrichtung und Verwaltung über kostenlose App (kostenfrei für IOs und Android)
- Sprachsteuerung - Aktivieren Sie Ihre smarte Steckdose mit Sprachbefehlen über Amazon Alexa oder den Google Assistant
- Zugriff auch von unterwegs - Steuern Sie alle Geräte bequem über das Smartphone, überall und zu jeder Zeit
- Erstellen von Zeitplänen - Schalten Sie Ihre Geräte automatisch zu verschiedenen Zeiten an und aus
- Abwesenheitsmodus - Schalten Sie Ihre Lichter zu unterschiedlichsten Zeiten an und aus um die Anwesenheit einer Person zu simulieren
- Lieferumfang: Tapo P110 (nur auf 2.4GHz), Schnellinstallationsanleitung
- Die Größe des Produkts ist mit Stecker: 72 mm * 51 mm * 77 mm ohne Stecker 72 mm * 51 mm * 40 mm.
- Timer - Erstellen Sie zeitliche Pläne für angeschlossene Elektronik
Video: DIY garden kitchen 7 – Installing sockets, lights and switches
While building my outdoor kitchen, I kept my camera running. I then published the individual stages in various films on my Youtube channel in a separate playlist for the construction of my garden kitchen.
I also filmed the installation of the light switches, sockets, lamps and LED light strips and published them in my video.
If you want to see more of me and my projects, feel free to check out my YouTube channel.

- KOMFORTABEL & SCHNELL: Kompakte WAGO Dosenklemme mit 5 Klemmstellen, transparentem Gehäuse und fünf Prüföffnungen. Zeitersparnis durch einfache Anwendung - schnelle und einfache Installation
- EINFACHE HANDHABUNG: Komfortabler Leiteranschluss von bis zu 8 abisolierten, eindrätigen Leitern mit einem Querschnittsbereich von 0,5 bis 2,5 mm² - Querschnitte individuell mischbar
- NORMGERECHT: Die WAGO-Klemmen für normgerechte und schnelle Elektro-Installation, geeignet bei Anwendungen mit einer Umgebungstemperaturen bis 60°C, verfügen über eine weltweit anerkannte Zulassungen
- QUALITÄT SEIT 1951: WAGO ist Erfinder und Patenthalter der Hebel- & Feder-Klemme und seit über 70 Jahren als führendes deutsches Unternehmen auf schraubenlose Kabelverbinder und Klemmen spezialisiert
- LIEFERUMFANG: 100 x WAGO COMPACT Verbindungsklemme 2273-205 | 5-Leiter, WAGO Schnellanschlussklemmen der Serie 221 sind als 2-, 3- und 5-Leiter Variante erhältlich, transparent, Gewicht: 1,6 g
What happens now?
Once the electrical installations have been completed, the next step will be to build the pedestal, install the worktop and fit the kitchen furniture in the outdoor garden kitchen.
The worktop is installed after careful selection to meet both functional requirements and aesthetic preferences.
Kitchen furniture selected for outdoor use must be weather-resistant and durable in order to last.
Once the worktop has been completed, the installation of the washbasin is planned.
This is selected so that it meets the requirements of an outdoor kitchen in terms of material properties and design and at the same time supports daily tasks such as food preparation and cleaning.
The final highlight of the project is the integration of my Napoleon PHANTOM P500 gas grill, which is permanently installed in the kitchen structure.

- Busch Jäger Komplettset 1 x Lichtschalter (Tastschalter als Wippe) inkl. 1 x Steckdose
- Wipptaster (2020 US)
- 1 x Steckdose mit Kinderschutz (=erhöhter Berührungsschutz)
- Inklusive 2 fach Rahmen
- Komplett einbaufertig in Cremeweiß - Duro 2000
Summary and conclusion
I have made significant progress in the realization of my outdoor kitchen, which covers an area of around 4m x 4.5m, particularly with the installation of the electrics and water connections.
With the help of my father, we built the kitchen temple out of Ytong bricks and divided the work area into three main zones: a bar with a counter, a wet zone with a sink and a barbecue zone for my Napoleon Phantom P500 gas barbecue.
Each area was given adapted lighting to optimize functionality and atmosphere. I have also integrated smart control options for lights and sockets to increase the convenience and efficiency of the garden kitchen.
The lighting below the bar counter with an RGBIC LED strip from Govee and the use of smart sockets, for example from Tapo, allow for a flexible and energy-efficient design.
The five safety rules of electrical engineering were strictly observed for the safe installation of electrical systems. The selection of LED lamps with an IP54 protection rating for the barbecue area took into account the need for weatherproof and long-lasting light sources.
The decision to use the Shelly PM2 for smart lighting control was based on its ability to control two circuits independently and monitor energy consumption.
The integration into my smart home system, in particular the Home Assistant, enabled central control and the creation of routines to make everyday life in the garden kitchen even easier.
The next steps include the further expansion of the garden kitchen, including the completion of the worktop and the installation of the kitchen furniture and sink. Finally, the Napoleon Phantom P500 gas barbecue is permanently installed.

- LANGLEBIGE EINZIEHSPIRALE: Unser Einziehband bzw. Zugdraht fr Leerrohre hat ein spiralfrmiges Profil (4mm ), welches aus PET besteht. Im Gegensatz zu Fiberglas/Glasfaser ist diese Einzugsfeder deutlich robuster, flexibel und hlt grerer Zugkraft stand
- MIT DRALLAUSGLEICH: Die Einziehhilfe hat am vorderen Ende einen Drall-Ausgleich. Das bedeutet, dass sich die Adapter um die eigene Achse drehen. Das Einzugsband hat innerhalb von einem Leerrohr somit keine Probleme beim Einziehen. Diese Kabelziehhilfe ist also eine echte Verlegehilfe
- INKLUSIVE 5 ADPATER: Dazu zhlen 1x Basic Kabelziehstrumpf, 1x Premium Kabelstrumpf, 1x Zugse, 1x Fhrungskopf und 1x Haken. Die Einzugsfeder 30m ist dabei in einem Kunststoffgehuse verpackt. Diese dient als Kabelabroller und ist eine enorme Hilfe um einen Kabelsalat zu vermeiden
- GEEIGNET FR: Kabel Einzugshilfe, Kabel Durchziehhilfe, Kabel verlegen, Leerrohre fr Kabel, Einziehhilfe fr Kabel, Kabel Einziehen, Industrielle Handwerkzeuge, Leerrohr mit Zugdraht, Einziehfeder 30m, Leerrohr Zugdraht, Kabel ziehen Hilfe und begrenzungsdraht Verlegehilfe
- FAIRMO VERSPRECHEN: Ohne Wenn und Aber! Wie wre es unsere Kabeleinziehhilfe 30m zu testen, ohne dabei irgendein Risiko einzugehen? Das kannst du mit unserer "30 Tage Geld zurck Aktion" tun. Solltest du nicht zufrieden sein, erhltst du dein Geld zurck.
Dieser Beitrag ist auch verfügbar auf:
English
Deutsch


