Build your own garden kitchen – plan and install the electrics
When building my garden kitchen, the electrics were one of the biggest challenges. In addition to the right cables for the power supply and the perfect positioning of the sockets, proper fuse protection was of course also necessary.
It should also be possible to use a TV and a sound system in the garden kitchen at a later date. So I also had to plan for network and audio cables and install them in the garden kitchen.
What power supply do I need in the garden kitchen?
The design of my garden kitchen followed a U-shaped layout with a seamless worktop, which brought both style and functionality to the outdoor area.
The Napoleon Phantom P500 gas barbecue with rotisserie was to be the centerpiece of the equipment, supplemented by an indispensable refrigerator, which made careful planning of the electrics and connections essential.
Flexible socket solutions above the worktop for kitchen appliances such as ice machines, coffee machines or electric hot plates were also important.
I also wanted to integrate sockets for everyday kitchen utensils and planned to install a camera rack with lighting in the upper wall area above the gas grill for higher-quality shots of my cooking channel later on.
The connections for the entertainment system should then be installed above the bar.
Last but not least, I still needed lamps and the corresponding light switches. In addition to a well-lit area at the grill and on the worktop, the bar counter should have cozy atmospheric lighting.
LED light strips with color-changing functions under the bar counter should then be the highlight of the lighting.
Zuletzt aktualisiert am 26. July 2024 um 07:45 . Ich weise darauf hin, dass sich hier angezeigte Preise inzwischen geändert haben können. Alle Angaben ohne Gewähr. (*) Bei den verwendeten Produktlinks handelt es sich um Affiliate Links. Ich bin nicht der Verkäufer des Produktes. Als Amazon-Partner verdiene ich an qualifizierten Verkäufen. Dein Preis ändert sich jedoch nicht.
Electrics: Occupational safety concerns everyone!
Occupational health and safety when working on electrical systems is essential, especially for DIY projects such as building a garden kitchen.
The installation of electrical systems, from the laying of cables to the installation of sockets and lighting, involves risks that can be minimized through careful planning and compliance with safety regulations.
Whether it’s converting the electrical components of my Napoleon Phantom P500 gas barbecue with rotisserie, installing the sockets or the switching devices for the LED light strips, safety should always come first.
Short list of important safety measures
- Switch off the power: Before starting work, always ensure that the circuit on which you are working is completely switched off.
- Use the correct tools: Insulated tools protect against electric shocks.
- Wear personal protective equipment (PPE): Safety goggles, gloves and, if necessary, insulating shoes can protect against injuries.
- Refresh your knowledge: Regular training on the risks and safe handling of electricity is essential.
- Check before use: Before commissioning, the electrical installation should be checked by a qualified specialist.
When building my garden kitchen, I placed particular emphasis on occupational health and safety to ensure both my personal well-being and that of my future guests.
Please note that work on the electrical installations should only be carried out by specialists!

- NYY-J Starkstrom- Erdkabel. Nennspannung 600/1000 Volt
- Zur festen Verlegung in Innenräumen, im Freien, in Beton, Erde und im Wasser, jedoch nicht dort, wo die Gefahr der Einwirkung von Lösungsmitteln, Treibstoffen oder einer mechanischen Beschädigung besteht oder erwarten ist.
- Farbe: Schwarz
- Entspricht VDE-Norm
- Hersteller können sich unterscheiden.
Electrical supply and fuse protection for the garden kitchen
Ideally, the power supply for the garden kitchen should be provided via the sub-distribution board in the basement. Fortunately, the distribution cabinet had a free top-hat rail that was perfect for this project.
In addition to the RCD, there was enough space for five circuit breakers and my Shelly devices for smart home automation.
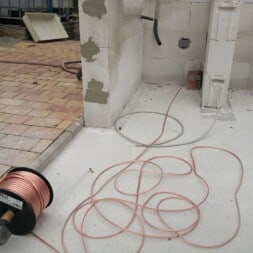
So I first laid 2 NYY-J 3 x 2.5 mm² underground cables and a CAT7 network cable in my garden kitchen.
The necessary empty conduits, some of them large KG pipes, were already installed as a precautionary measure when the lawn area and the concrete base slab were laid. Thanks to the threading aids, pulling in the cables was quite straightforward.
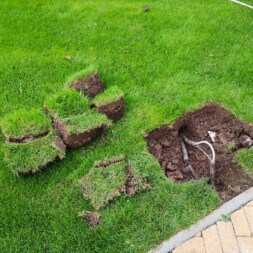
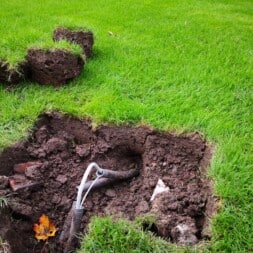
The only thing that required more effort was laying the audio cable from my amplifier in the workshop to the loudspeakers in the garden kitchen. The electrical conduits under the lawn were unfortunately damaged when I installed the control cable for my robot lawnmower.
So I first had to find the damaged area and repair it before I could successfully lay this cable in the garden kitchen.

- LANGLEBIGE EINZIEHSPIRALE: Unser Einziehband bzw. Zugdraht fr Leerrohre hat ein spiralfrmiges Profil (4mm ), welches aus PET besteht. Im Gegensatz zu Fiberglas/Glasfaser ist diese Einzugsfeder deutlich robuster, flexibel und hlt grerer Zugkraft stand
- MIT DRALLAUSGLEICH: Die Einziehhilfe hat am vorderen Ende einen Drall-Ausgleich. Das bedeutet, dass sich die Adapter um die eigene Achse drehen. Das Einzugsband hat innerhalb von einem Leerrohr somit keine Probleme beim Einziehen. Diese Kabelziehhilfe ist also eine echte Verlegehilfe
- INKLUSIVE 5 ADPATER: Dazu zhlen 1x Basic Kabelziehstrumpf, 1x Premium Kabelstrumpf, 1x Zugse, 1x Fhrungskopf und 1x Haken. Die Einzugsfeder 30m ist dabei in einem Kunststoffgehuse verpackt. Diese dient als Kabelabroller und ist eine enorme Hilfe um einen Kabelsalat zu vermeiden
- GEEIGNET FR: Kabel Einzugshilfe, Kabel Durchziehhilfe, Kabel verlegen, Leerrohre fr Kabel, Einziehhilfe fr Kabel, Kabel Einziehen, Industrielle Handwerkzeuge, Leerrohr mit Zugdraht, Einziehfeder 30m, Leerrohr Zugdraht, Kabel ziehen Hilfe und begrenzungsdraht Verlegehilfe
- FAIRMO VERSPRECHEN: Ohne Wenn und Aber! Wie wre es unsere Kabeleinziehhilfe 30m zu testen, ohne dabei irgendein Risiko einzugehen? Das kannst du mit unserer "30 Tage Geld zurck Aktion" tun. Solltest du nicht zufrieden sein, erhltst du dein Geld zurck.
Slitting cable ducts and installing flush-mounted boxes
Having already invested a lot of time, energy and money in the construction of my garden kitchen, it was important to me that the electrical installation was also of high quality and therefore “invisible”.
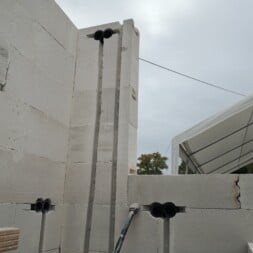
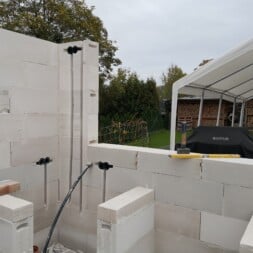
When installing the electrical components, I placed particular emphasis on keeping sockets and light switches out of sight by using flush-mounted boxes.
The cables therefore had to be laid inside the empty conduits under the plaster. Only the power cables to the two ceiling lights should be visible later – at least the cable ducts.
My aim was to use the two NYY-J 3 x 2.5 mm² underground cables to lay two circuits for the garden kitchen. Below the worktop, I decided on a surface-mounted installation in empty electrical conduits.
However, all cables and empty conduits in the visible area of the garden kitchen had to be laid invisibly in the walls.
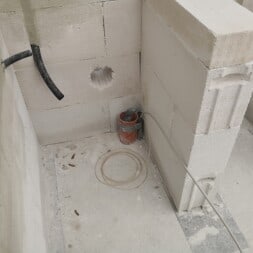
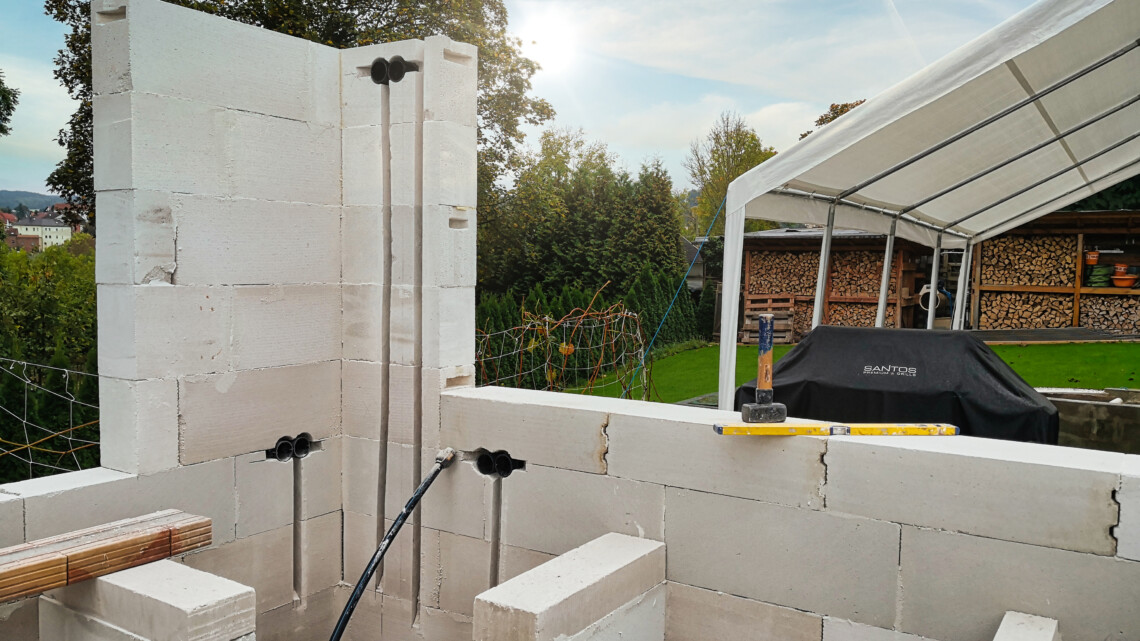
I first installed a large power distribution box at each corner of the garden kitchen. These boxes are waterproof to IP67 and offer enough space inside to connect the cables securely using WAGO clamps.
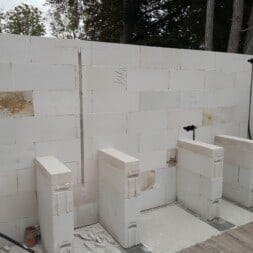
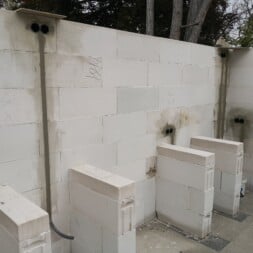
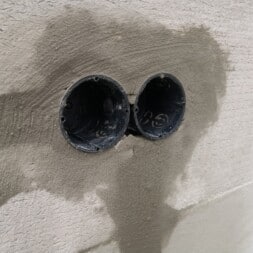
I then marked the positions of the flush-mounted boxes and drilled the holes required for installation into the aerated concrete blocks using a core drill.
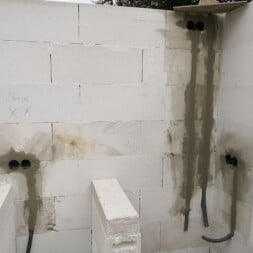
To continue the electrical installation of my garden kitchen, I installed large M32 cable ducts between the distribution boxes about 20 centimeters above the floor below the work surfaces.
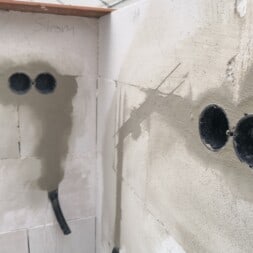
I pulled the two NYY-J 3 x 2.5 mm² underground cables through these ducts to the boxes and installed the cables from box to box. Above the boxes, I then milled the cable slots to the holes for the sockets and light switches.
The flush-mounted boxes were then aligned in the holes with electrician’s plaster and firmly glued in place.
All that was missing now were the sockets, switches and, of course, the power cables to complete the electrical installation in my garden kitchen.

- FÜR ANSPRUCHSVOLLE ARBEITEN - Die POWERPLUS Schlitzfräse ist ein echtes Profi Tool und eignet sich ideal zum Ausfräsen von Nuten in Beton und Wänden. Ein starkes und robustes Werkzeug für jede Maue- Fräsarbeit auf jeder Baustelle!
- LEISTUNGSSTARKE FRÄSE - Mit einer Leistung von 1800 Watt und einer Leerlaufdrehzahl von 5000 U/min bringt Ihnen diese Mauernutfräse die Power, die Sie zum Nuten und Fräsen in widerstandsfähige Materialien wie Beton oder Estrich benötigen!
- FÜR SCHMALES & BREITES AUSFRÄSEN - Mit dem hochwertigen Mauerschlitzer haben Sie die Flexibilität, eine Nuttiefe von 0 - 45 mm und Nutbreiten von 14, 24, 34 und 44 mm auszufräsen. Damit ist das Fräsen von schmalen und breiten Nuten kein Problem!
- KOMPAKT UND HANDLICH - Die praktische und leistungsstarke Säge ist mit ihren angenehmen 5,8 Kg ein Leichtgewicht unter den Fräsen und erleichtert Ihnen dadurch die anstrengende Fräsarbeit. Mit gutem Werkzeug haben Sie auch ein perfektes Ergebnis!
- LIEFERUMFANG - Diese professionelle Wandfräse erhalten Sie inklusive einem Staubsaugadapter, einem Überlastschutz und 2 Diamantscheiben (150 x 22,2 x 2 mm). Ein echtes Profi Set und das ideale Geschenk für jeden Handwerker!
Practical tips and tricks from my experience
When planning and implementing the electrical installation in my garden kitchen, I placed particular emphasis on safety, aesthetics and functionality and gained a wealth of experience in the process:
- Detailed planning for a functional design: I drew up a comprehensive plan of my garden kitchen in advance. The aim was to achieve precise positioning of sockets and light sources so that they are available exactly where they are needed for cooking and socializing.
- Selection of weatherproof materials for durability: I decided to use materials designed exclusively for outdoor use. These included waterproof power distribution boxes and cables that were specially developed for outdoor use to withstand the weather in the long term.
- Installation of an RCD to increase safety: To maximize safety when handling electricity near water, the installation of a residual current device (RCD) was essential. This step minimizes the risk of electric shocks.
- Flush-mounted installations for an attractive appearance: I integrate sockets and switches in flush-mounted boxes to achieve a harmonious and unobtrusive appearance. Laying the cables in empty conduits under the plaster ensured that they remained completely invisible.
- Protection of flush-mounted boxes during the plastering process: Attaching cover caps to the flush-mounted boxes during the plastering process not only made it easier to find them later, but also ensured that the boxes were protected from damage.
- Strategic positioning of the sockets: I deliberately positioned the sockets above the worktop and at other strategic points. This positioning guaranteed optimum accessibility for the use of light sources and electronic devices. The height of the sockets was precisely adapted to the final height of the worktop and to tile protrusions.
- Careful laying of cables in empty conduits: I attached particular importance to running all electrical cables in empty conduits. This method not only offered protection against potential damage, especially for cables laid underground, but also allowed flexible adaptation to future requirements. This meant I could easily extend or modify the electrical installation if necessary.
- Targeted lighting planning for atmosphere and functionality: The correct arrangement of the lighting, especially above the grill and work surfaces, proved to be essential. Sophisticated lighting not only improves functionality when preparing food, but also creates an inviting atmosphere.
- Consultation of experts for standard-compliant implementation: To ensure professional and standard-compliant implementation, I consulted experts for certain parts of the electrical installation. This measure guaranteed that all work complied with current safety standards.
- Use of flexible cable ducts for difficult areas: In areas where it was difficult to lay the cables and lines conventionally, I resorted to flexible cable ducts. These proved to be extremely useful for keeping the cables protected and tidy.
By taking these aspects into account, I was able to ensure that the electrical installation in my garden kitchen not only met my aesthetic requirements, but was also functional and safe.
Video: Garden kitchen – electrics and network supply
While building my outdoor kitchen, I kept my camera running. I then published the individual stages in various films on my Youtube channel in a separate playlist for the construction of my garden kitchen.
I also recorded the preparations and installation of the electrics, network and smart home components in an exciting and informative video.
If you want to see more of me and my projects, feel free to check out my YouTube channel.
Installing lamps and switches in the garden kitchen
In the next stage of my garden kitchen project, I’m focusing on installing the sockets, light switches and lighting, including smart control using Shelly products.
The sockets and light switches are installed near the barbecue and bar counter to illuminate these areas efficiently. In addition, RGB LED lighting elements under the bar counter will provide atmospheric lighting that can be adjusted to suit the mood.
The integration of Shelly products enables convenient control of all electrical elements, which promises not only convenience but also energy efficiency.
Look forward to the next blog entry, in which I will go into detail about the technical aspects and implementation of these installations.


Summary and conclusion
Installing the electrics played a key role in the construction of my garden kitchen. The challenge lay not only in selecting the right cables and the ideal positioning of the sockets, but also in ensuring proper fuse protection.
It was important to me to ensure a reliable power supply for kitchen appliances and future extensions such as a TV and sound system. This also included the consideration of network and audio cables.
The U-shaped layout of my garden kitchen with a seamless worktop required careful planning of the electrics, especially for the Napoleon Phantom P500 gas barbecue, the fridge and flexible socket solutions for kitchen gadgets.
I also planned special connections for an entertainment system and atmospheric lighting, including LED strip lighting under the bar counter.
Health and safety was a top priority throughout the installation process. I observed important safety measures such as switching off the power before starting work, using insulated tools and wearing personal protective equipment.
The electrical supply was fed via a sub-distribution board in the basement, for which I laid 2 NYY-J 3 x 2.5 mm² underground cables and a CAT7 network cable. Despite a damaged conduit under the lawn, I was able to install all the cables successfully.
The electrical installation included the slotting of cable ducts and the installation of flush-mounted boxes. I wanted the installation to be “invisible” and integrated sockets and switches accordingly.

- HOHE DRUCK- & SCHLAGFESTIGKEIT: Das Schutzrohr weist eine hohe Schlagfestigkeit von 2kg/10cm und eine hohe Druckbeständigkeit von 750N/5cm auf und bietet dadurch eine hervorragende Stabilität und Trittfestigkeit.
- UNIVERSELL EINSETZBAR: Das Wellrohr eignet sich für die Verlegung auf und unter Putz, in Beton, in Estrichen, in Hohlwänden und Zwischendecken sowie auf Holz als auch für die Verlegung im Erdreich und Außenbereich.
- HOHE TEMPERATURBESTÄNDIGKEIT: Unser Elektroinstallationsrohr verfügt über eine hohe Temperaturbeständigkeit (dauernd) von -25°C bis hin zu +120°C und kann dadurch in vielen Bereichen Einsatz finden.
- FLEXIBEL & HOHE BIEGEFESTIGKEIT: Neben hoher Druck- und Schlagfestigkeit sind unsere Leerrohre flexibel und leicht zu verarbeiten. Sie besitzen eine hohe Biegefestigkeit und sind durch diese Eigenschaften leicht zu handhaben.
- HOCHWERTIGES MATERIAL & UV-BESTÄNDIG: Das Leerrohr besteht aus einem flammwidrigen Polyethylen mit hoher Dichte (PE-HD). PE-HD ist gegen nahezu alle Medien wie z.B. Alkohole, Fette, Mineralöle oder Kraftstoffe beständig. Dank dem zugesetzten UV-Stabilisator erreicht das Wellrohr eine UV-Beständigkeit von bis zu 120kLy und damit auch eine erhöhte Beständigkeit im Außenbereich.
- INTEGRIERTER ZUGDRAHT: Das Leerrohr ist mit einem integriertem Zugdraht ausgestattet, mit dem sich auch nach der bereits abgeschlossenen Installation Kabel leichter und unkompliziert einziehen lassen.
Dieser Beitrag ist auch verfügbar auf:
English
Deutsch


