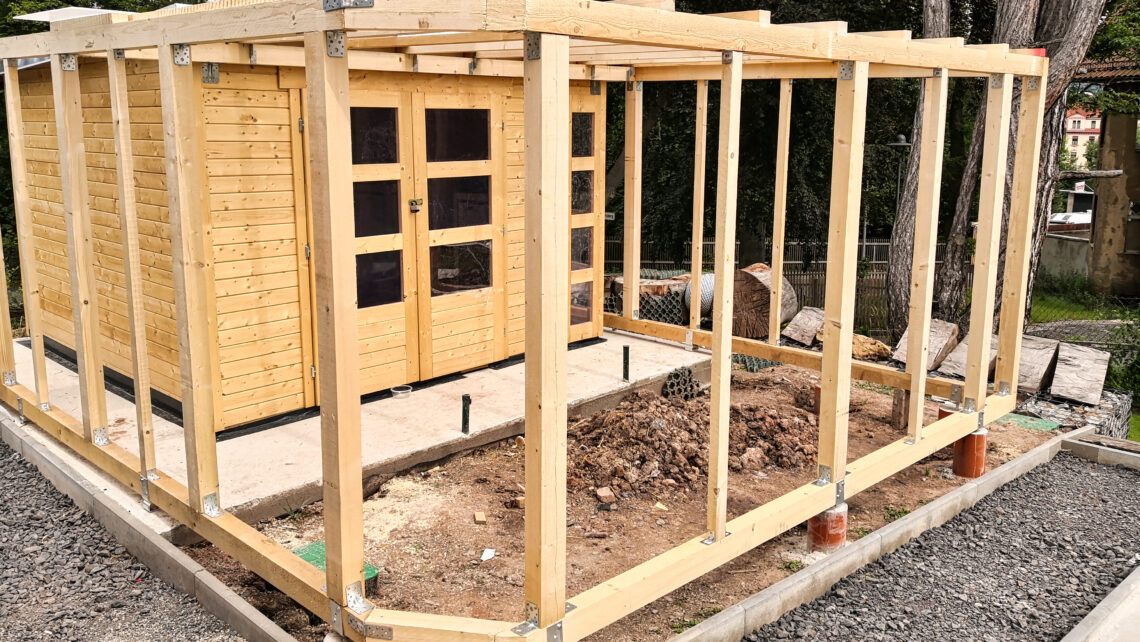
Build your own bird aviary – outdoor enclosure for rabbits, birds and guinea pigs
I had already put up the garden house for the bird aviary and small animal aviary. The only thing missing was a suitable outdoor enclosure to protect the rabbits, birds and guinea pigs outside the four walls.
My aim was to give the animals a generous outdoor space without losing sight of the building costs. The outdoor aviary in the garden should also be designed in such a way that it can easily be converted into a garden shed at a later date.
Truss for the bird aviary
My goal was to fence in the area in front of the garden shed up to the sidewalk. For the rabbits and guinea pigs, a small fence 75 cm high would be quite sufficient.
However, this fence would not be an obstacle for the budgies and the cockatiel. So I needed a completely fenced enclosure.
To fix the aviary wire, a special wire mesh for animal housing, I wanted to build a kind of truss frame. Then, to this truss frame should be attached lattice.
The top and bottom could also be fenced in this way.
Material for the aviary
However, during the construction of the outdoor enclosure, as so often this year, many problems arose again. One problem was the lack of building materials. While the roof was still lacking suitable OSB boards, wooden beams and roof battens had also become scarce in the meantime.
In coordination with my building materials dealer, I ordered 80×100 mm beams and 40×60 mm roof battens for the framework.
In addition, there were polycarbonate sheets for the roof, angles for the large beams, angles for the roof battens and various screws. I wanted to fix the beams with post anchors in point foundations made of KG pipes.
The aviary wire should then be attached to the wood with galvanized staples. After the building materials were delivered, the construction of the outdoor enclosure could finally start.

- Material: Stahl, feuerverzinkt
- Abmessungen: Gesamthöhe 150 mm - Tiefe 60 mm - lichte Breite 81 mm - Einstandshöhe 100 mm - Materialstärke 4 mm - Anzahl Löcher 8 / 1 - Loch-Ø 11 / 14 mm
- Ausführung: zum Aufschrauben
- Hochwertiger Pfostenträger in bewährter Qualität von Alberts - Problemlöser in Spitzenqualität, die immer dann helfen, wenn es perfekt werden muss.
- Alberts bietet nicht nur ein umfangreiches Sortiment an hochwertigen Pfostenträgern an. Wir führen auch eine Vielzahl von Profilen - Blechen und Winkeln - attraktive und sichere Fenstergitter sowie praktische und dekorative Zäune.
Outdoor aviary – risks when choosing materials
When building my outdoor aviary for budgerigars, I opted for wood and galvanized aviary wire, although both materials involve certain risks.
The use of galvanized wire was a cost-conscious decision, as stainless steel wire would have been three times as expensive.
However, galvanized wire carries the risk that zinc, especially when corroded by the weather or the birds’ saliva, is released and can lead to zinc poisoning in the birds if they nibble on the wire.
To minimize this risk, I made sure the birds had plenty of places to play and nibble to keep them away from the wire.
As for the wood, I chose a non-toxic wood paint that is especially suitable for animal enclosures to protect the wood from the weather.
It is important to ensure that the paint used does not contain toxic substances such as lead, copper or other toxic heavy metals that could endanger the health of the birds. I let the paint evaporate completely before the birds moved into the aviary.
This careful selection and preparation of materials helped to create a safe and long-lasting environment for my budgies, while controlling costs and protecting the health of my birds.


Video: Build your own outdoor enclosure for a garden aviary
I recorded the construction of the outdoor enclosure in a video. You can find the playlist with all the videos for the “Build your own garden aviary” project on my YouTube channel.
If you want to see more of me and my projects, feel free to check out my YouTube channel.
Zuletzt aktualisiert am 26. July 2024 um 04:46 . Ich weise darauf hin, dass sich hier angezeigte Preise inzwischen geändert haben können. Alle Angaben ohne Gewähr. (*) Bei den verwendeten Produktlinks handelt es sich um Affiliate Links. Ich bin nicht der Verkäufer des Produktes. Als Amazon-Partner verdiene ich an qualifizierten Verkäufen. Dein Preis ändert sich jedoch nicht.
Point foundation with KG pipe for the wooden framework
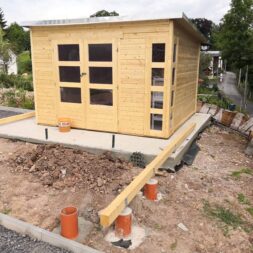
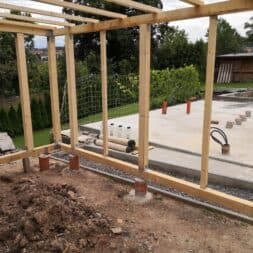
In the outdoor enclosure, the ground had a gradient of around 5 to 10 percent to the sidewalk, which is why I needed a foundation construction that would compensate for a height difference of a good 20 cm and still be stable enough for the wooden framework.
Proven from previous projects, I again decided to use point foundations made of KG pipes.
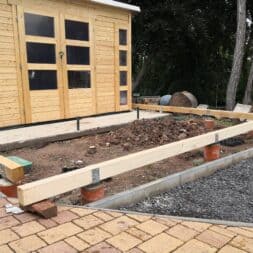
I started with the beam on the north side. This four meter long and 80 x 100 mm thick wooden beam was first aligned on the concrete foundation in a beam shoe.
However, about 1.50 meters of the beam protruded into the outdoor enclosure. I had previously embedded a 160 mm KG pipe in the ground and filled it with concrete from the outside.
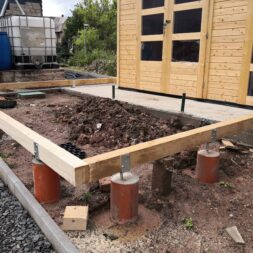
I fitted the post anchor to the wooden beam in the middle above the KG pipe, with the dowel pointing upwards. After I had turned the beam 180°, I aligned the dowel in the center of the KG tube and the beam horizontally.
The dowel was then concreted into the KG pipe with freshly mixed concrete.
On the other side, I attached the beam firmly with the beam shoes. After one day, the concrete was hard and the beam was firmly mounted. I proceeded in the same way with the beam on the south side.
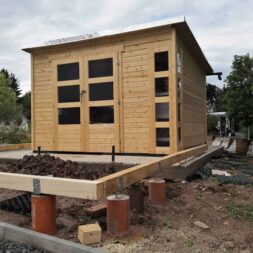
As the beams were now at the same height, I was able to install the beam on the west side at the correct height. To do this, I placed three KG pipes in the ground directly on the path and aligned the wooden beam.
The three post shoes were screwed to the wooden beam directly above the KG pipes. After the beam had been turned, I attached it to the neighboring beam on the south side with a bracket.
On the north side, I aligned the beam horizontally with bricks. The three dowels of the post shoes were finally fixed in the KG pipes with fresh concrete.
One day later, the basic framework was finished and I was able to start building the rest of the trusses.

- Kanalsystem PVC-U
- KG Rohr (i x a) DN 160
- Farbe orange
- Hohe chemische Widerstandsfähigkeit
- Gefertigt vom führenden deutschen Hersteller
Structure wooden framework for the aviary
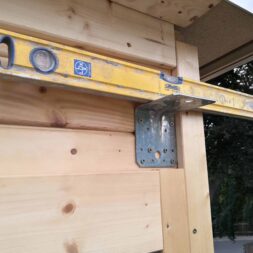
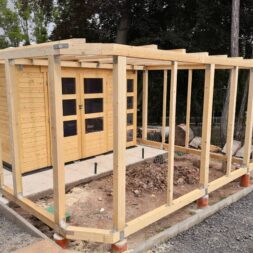
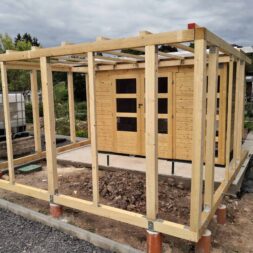
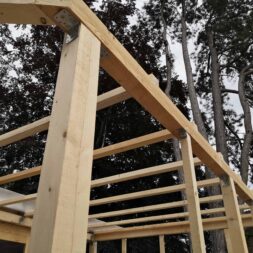
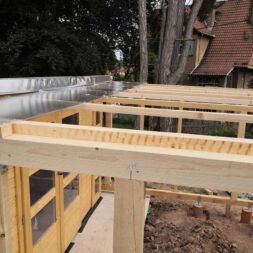
The construction of the wooden framework for the outdoor aviary now progressed more quickly. At the outer edges of the lower beams, I positioned further 80×100 mm beams vertically at intervals of two meters. I attached these beams to the crossbeam with large brackets.
I sawed the length of the beams so that there was a slight slope away from the house to ensure good drainage.
I then mounted cross beams on the vertical upright beams, which had the same dimensions and were attached in the same position as the lower cross beams.
At the front of the house, above the door, I also installed an 80×100 mm beam, which I fixed with brackets and then screwed to the upper crossbeams on the north and south sides.
This created a lower and an upper circumferential frame.
I then placed the 40×60 mm roof battens vertically between the large vertical beams at a distance of one meter and fastened them flush to the outside of the cross beams using smaller brackets.
This completed the entire wooden frame of the outdoor aviary.
I will explain the details of installing the polycarbonate roof and attaching the aviary wire in one of the next posts.

- VIELSEITIG ANWENDBAR: Unser Drahtgitter kann als Vogelgitter, Kleintierzaun für Hasen, Kaninchen, Hühner, etc. eingesetzt werden und bietet zuverlässigen Schutz vor Maulwürfen, Wühlmäusen und anderen Tieren.
- KEINE VERGIFTUNGSGEFAHR: Der Edelstahl-Käfigzaun ist nicht verzinkt, wodurch er absolut stabil, korrosionsgeschützt und rostfrei ist. Somit besteht keine Vergiftungsgefahr durch Zinkübertrag.
- INDIVIDUELL ANPASSBAR: Der Draht kann mit einer Zange o.Ä. kinderleicht an den gewünschten Stellen abgetrennt und so individuell angepasst werden. Nutzen Sie den Zaun somit auch als Maschendrahtzaun um den Garten.
- BESONDERS EDLE OPTIK: Das hochwertige Edelstahl-Material sorgt nicht nur für eine einzigartige Qualität und Materialdichte, sondern auch für eine besonders edle Optik und ist damit für niveauvolle Projekte geeignet.
- HOHE ANGEBOTSVIELFALT: Wir bieten Rollen in 5m, 12m und 25m mit unterschiedlichen Maschengrößen von 10x10, 12x12, 16x16 und 20x20mm, wodurch für eine eine besonders hohe Angebotsvielfalt gesorgt wird.
Summary and conclusion
The outdoor aviary project in my garden has made further progress. Once the garden shed for the bird and small animal aviary had been erected, I turned my attention to building the associated outdoor enclosure.
The aim was to fence the area up to the sidewalk to provide protection for the rabbits, birds and guinea pigs outside. A completely enclosed enclosure was necessary, especially for the safety of the budgies.
For the construction of the enclosure, I chose wood and galvanized aviary wire, despite the risks that this wire can entail, such as the possibility of zinc poisoning in the birds through corrosion.
I decided to use stainless steel wire anyway because it would have been much more expensive. To minimize the risks, I made sure that there were enough opportunities to keep the birds occupied so that they didn’t nibble on the wire.
The construction of the wooden framework for the aviary progressed rapidly. I positioned vertical beams and attached them to the lower cross beams with large angles to ensure a stable construction.
I plan to describe the details of the further construction of the polycarbonate sheet roof and the attachment of the aviary wire in the following posts.

- Material: Stahl, feuerverzinkt
- Abmessungen: Tiefe 60 mm - lichte Breite 91 mm - Höhe 104 mm - Materialstärke 4 mm - Länge Betonanker 200 mm - Material Betonanker Ø16 mm - Anzahl Löcher 6 - Loch-Ø 11 mm
- Ausführung: zum Einbetonieren - Betonanker aus Riffelstahl
- Hochwertiger Pfostenträger in bewährter Qualität von Alberts - Problemlöser in Spitzenqualität, die immer dann helfen, wenn es perfekt werden muss.
- Alberts bietet nicht nur ein umfangreiches Sortiment an hochwertigen Pfostenträgern an. Wir führen auch eine Vielzahl von Profilen - Blechen und Winkeln - attraktive und sichere Fenstergitter sowie praktische und dekorative Zäune.
Dieser Beitrag ist auch verfügbar auf:
English
Deutsch


