Installing the BAYROL Automatic Cl-pH in the Pool and Retrofitting a Temperature Sensor: My Experience
Having crystal-clear pool water shouldn’t depend on whether I have the time or inclination to read test strips and adjust the water levels manually. That’s exactly why I upgraded my pool system with an automatic dosing system and installed the BAYROL Automatic Cl-pH.
The system continuously measures the pH and redox values and can dispense chlorine and pH adjusters as needed. In a second step, I retrofitted a BAYROL temperature sensor. This allows me to check not only the water parameters but also the current water temperature via the display, the web portal, and the app.
In this field report, I document the installation and commissioning of Automatic Cl-pH, explain the technology behind pH and chlorine control, and demonstrate how to install the temperature sensor into the existing pool piping. I’ll also discuss the mistakes I made during the installation and explain who would truly benefit from an automatic pool dosing system.
At a glance
- Why I Wanted to Automate My Pool Maintenance
- How the BAYROL Automatic Cl-pH Controls pH and Disinfection
- What components are included in the package
- Why I Used the Smart&Easy Connector
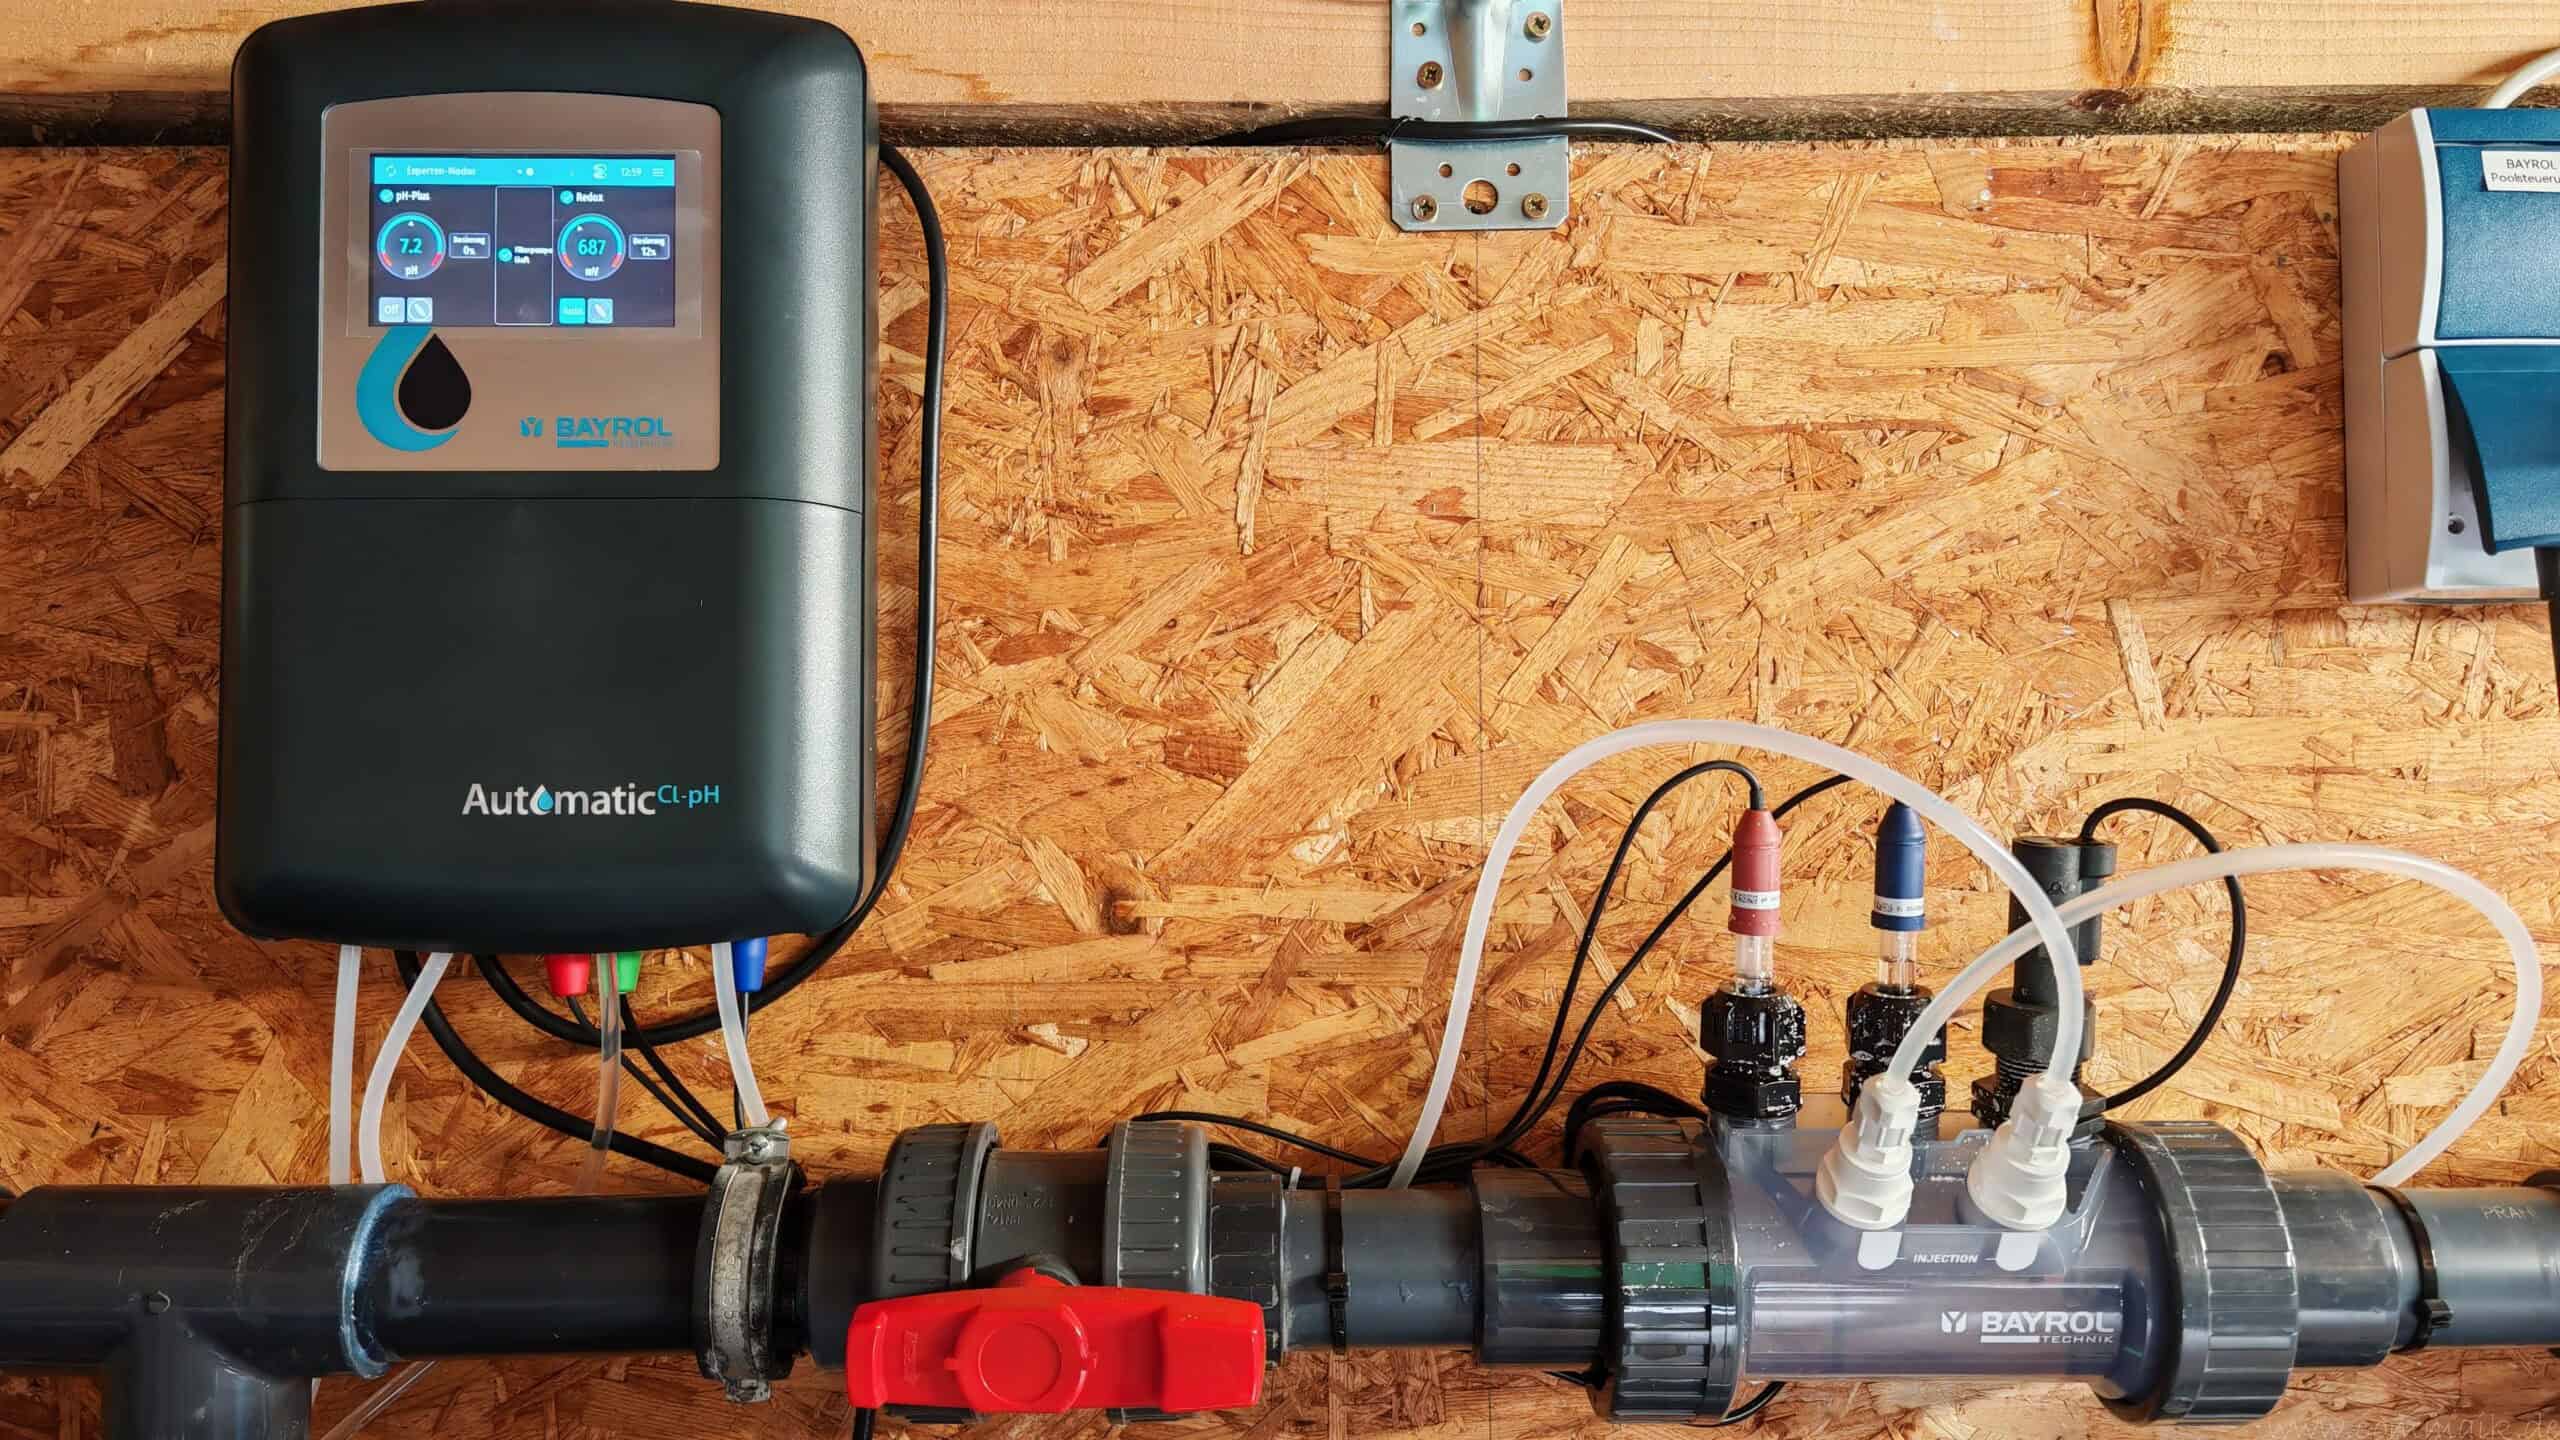
- How I Installed the Pool Dosing System into My Piping
- The Roles of pH Probes, Redox Sensors, and Flow Switches
- Why Liquid Chlorine and pH-Plus Were the Wrong Combination for Me
- How to Retrofit the BAYROL Temperature Sensor
- How Monitoring Works via the App and Web Portal
- What costs, maintenance requirements, and drawbacks should be taken into account
- My experiences so far with the BAYROL dosing system
Why I Wanted to Automate My Pool Maintenance
My pool is disinfected with chlorine. For this disinfection process to work reliably, it is not enough for there to simply be enough chlorine in the water. The pH level must also be correct.
The term “pH” stands for “potential of hydrogen” and describes whether water is acidic, neutral, or alkaline. A properly adjusted pH level is essential for the success of all water maintenance measures. If the water is too acidic or too alkaline, it can affect the effectiveness of the chlorine, the materials, and bathing comfort.
The alkalinity in my pool was within an acceptable range, at about 90 to 100 mg/l. Nevertheless, the pH level regularly dropped to about 6.5 to 6.6 after heavy rain showers. As a result, I had to keep taking measurements and making manual corrections.
Even though I had already installed a pool robot, a UV-C lamp, and a chlorine dosing system, green spots began to form in some corners. The existing technology was unable to compensate for fluctuating water parameters.
Previous testing with the pool tester
Until now, I’ve been using an AquaChek pool tester to take these measurements. The test strip is briefly dipped in water and then analyzed by the device. This allowed me to check the free chlorine, pH, and alkalinity.
It worked in principle, but required regular manual measurements. Afterward, the values still had to be adjusted manually. In the long run, I didn’t have the time or the desire to do that.
My filter pump, lighting, and other pool equipment were already automated using Shelly and Alexa. That’s why it made sense to me to incorporate water treatment into the existing automation system as well.
BAYROL Automatic Cl-pH: How the Dosing System Works
The BAYROL Automatic Cl-pH is a measuring, control, and dosing device for private pools. The system measures the pH and the redox potential and controls two separate dosing pumps.
To put it simply:
- The pH probe measures the current pH value.
- The redox probe measures the oxidation potential of the water.
- A pump delivers the selected pH regulator.
- The second pump delivers Chloriliquide or a suitable liquid chlorine.
- The care products are injected through two separate injection valves.
- A setpoint determines when and for how long the dosage is administered.
The dosing system does not, therefore, directly measure and regulate every conceivable property of the pool water. It focuses on the pH level and disinfection based on the redox potential.
According to the manufacturer, each of the low-noise peristaltic pumps has a maximum flow rate of 2.4 l/h. The measurement range is from pH 0 to 10 and from 0 to 999 mV for the redox value. Additional technical specifications are listed in the official BAYROL data sheet.

- ✅ Produit Haute qualité
- ✅ Satisfait ou rembourser
- ✅ Recommandé pour votre jardin
The redox value is not a direct measure of chlorine levels
Although the term “chlorine sensor” is easy to understand, it is not entirely accurate from a technical standpoint. The second probe does not measure the chlorine concentration in mg/l, but rather the redox potential in millivolts.
Simply put, the redox value describes the water’s oxidation capacity and, consequently, its disinfecting power. It is influenced by, among other things, the pH level, water quality, temperature, and the effective amount of chlorine.
A high measured chlorine level does not, therefore, automatically mean that the disinfection process is working optimally. Conversely, it is not possible to determine the exact chlorine concentration from the redox value.
If the redox value falls below the setpoint, the device automatically adds liquid chlorine. However, the actual amount of liquid chlorine required depends on several factors. These include, for example, pool use, sunlight, organic contaminants, rain, and high temperatures.
Automatic water treatment does not replace all inspections
The term “fully automatic” should not be misunderstood. The BAYROL dosing system can monitor the set values (pH level and chlorine content) and dispense treatment chemicals. Nevertheless, regular visual inspections, comparative measurements, and maintenance work are still necessary.
The correct water balance must also be established before commissioning. An automatic pH dosing system is not designed to restore completely out-of-balance pool water to normal without prior preparation.
Why I Chose the BAYROL Automatic Cl-pH
The Automatic series is available in various models. In addition to the combined Automatic Cl-pH system, there are also solutions that focus exclusively on regulating the pH level.
I deliberately chose this combination because I wanted to automatically control both the pH level and the disinfection process. The purchase is relatively expensive. My goal was to reduce the need for manual testing and dosing over the long term, while at the same time achieving more consistent water parameters.
Technical Specifications of the BAYROL Dosing System
Key features include:
- Continuous measurement of pH and redox
- two separate metering pumps
- Adaptive Proportional Control
- 4.3-inch color touchscreen
- built-in Wi-Fi module
- Remote Access via App and Web Portal
- USB port for updates
- Optional level monitoring
- Optional temperature sensor
- Optional flow monitoring
The system comes standard with a built-in Wi-Fi module. This makes it easy to monitor measurement values and alerts remotely.
Automatic level monitoring, on the other hand, is not included in the standard equipment. This requires the optional suction lances or the appropriate level kit. Without this accessory, the fill level of the canisters must continue to be checked manually.
Smart&Easy Connector for a Compact Installation
In general, the probes and injection valves can be installed into existing pool piping using several individual tapping clamps. In my case, that would have required at least five mounting points:
- pH probe
- Redox Sensor
- Flow Switch
- Injection valve for the pH regulator
- Chlorine Injection Valve
Each additional hole and sleeve requires space and represents a potential source of leakage. That’s why I decided to get the optional Smart&Easy kit.
Design and Operation of the Smart&Easy Connector
BAYROL describes the Smart&Easy Connector as a transparent inline dosing and analysis chamber. It consolidates the testing and vaccination stations into a small area and makes subsequent maintenance work easier.
The Smart&Easy Connector accommodates the following components:
- pH probe
- Redox sensor
- Flow Switch
- Dosing valve for pH-Minus liquid or pH-Plus
- Injection valve for liquid chlorine

- Bayrol KIT Smart&Easy Anschluss Durchfluss
- LEBEN IM FREIEN
- Bayrol
Partition between testing and vaccination sites
Inside the Smart&Easy Connector, a partition runs lengthwise through the tube. This creates two separate chambers through which the flow passes in parallel.
On one side are the pH probe, the redox sensor, and the paddle switch, which functions as a flow switch. The chamber on the opposite side houses the injection valves for the pH regulator and chlorine solution.
Measurement and dosing therefore do not take place sequentially, but rather in parallel in spatially separate areas. The longitudinal partition prevents the freshly injected water-based skincare products—which are still highly concentrated at this point—from coming into direct contact with the probes. As a result, they cannot directly distort the pH and redox readings. At the same time, the sensitive probes are protected from direct contact with concentrated chemicals.
The Smart&Easy Connector thus combines measurement, flow monitoring, and injection into a single compact component, without placing the probes directly in the vicinity of the inoculation sites. For my compact pool system, this neat solution made more sense than using several individual tap-in clamps, despite the comparatively high price. It is important to follow the specified installation orientation and ensure that the connections are correctly assigned.
Prevents direct mixing of water treatment products
The physical separation within the Smart&Easy Connector is also important for safety reasons. In particular, concentrated liquid chlorine must not come into direct contact with acidic pH-Minus. Such a mixture can produce toxic chlorine gas. The two water treatment products must therefore be stored separately, pumped through separate hoses, and dosed at separate injection points.
In the Smart&Easy Connector, the filling valves are located together on one side of the longitudinal partition, but are designed as separate dispensing stations. During normal operation, the flowing pool water absorbs the dispensed amounts and dilutes them immediately. It is only later in the pool piping system that the highly diluted water treatment products are mixed together.
It is therefore essential that the metering pumps operate only when the circulation system is running. If Chloriliquide and pH-Minus were dosed without sufficient water flow, concentrated chemicals could accumulate inside the piping and react with each other.
Paddle Switch for Flow Monitoring
The paddle switch built into the Smart&Easy Connector checks whether water is actually flowing through the analysis chamber. The flow of water moves the paddle, thereby releasing the dose. If there is no flow, the BAYROL Automatic Cl pH shuts off the dosing pumps.
This monitoring system responds to the actual flow rate and not just to the electrical operating status of the filter pump. This is relevant, for example, when the pump is turned on but there is insufficient water flow due to a closed valve, a blocked pipe, or some other problem.
Additional release via the filter pump’s control cable
In addition to the paddle switch, my BAYROL Automatic Cl-pH receives an electrical signal via the control cable from the pump circuit or the filter control system. This signal indicates to the control and metering unit when the filter pump is turned on.
The dosage is thus ensured by two conditions:
- The filter control unit indicates that the pump is running.
- The paddle switch confirms the actual water flow.
Only when both approvals have been granted may the device dispense the water treatment products. The additional control circuit is therefore not an unnecessary duplication. It combines the electrical operating signal from the filter pump with a mechanical check of the actual flow rate.
Although my BAYROL unit has its own permanent power supply, the dosing pumps only operate during the set filter cycle and when water flow is detected. As a result, the display, measurement, and remote access remain available at all times, while the actual dosing is linked to the operation of the recirculation system.
In addition, the BAYROL Automatic Cl-pH controls the two dosing pumps so that only one pump operates at a time. The addition of the pH-regulating agent and the dosing of Chloriliquide are therefore carried out at different times. This prevents the concentrated water treatment products from entering the Smart&Easy Connector simultaneously through their respective injection valves.
The separate dosing lines and injection points, the staggered activation of the dosing pumps, and the continuous water flow all work together to reduce the risk of direct mixing. Only after the previously dosed chemical has been absorbed by the pool water and carried away can the second dosing pump start up. This feature is particularly important when combining acidic pH-Minus with liquid chlorine.
The electrical connection to the pump circuit or the filter control system should be performed by a qualified electrician in accordance with BAYROL’s specifications.
Installing the BAYROL Automatic Cl-pH in my pool plumbing
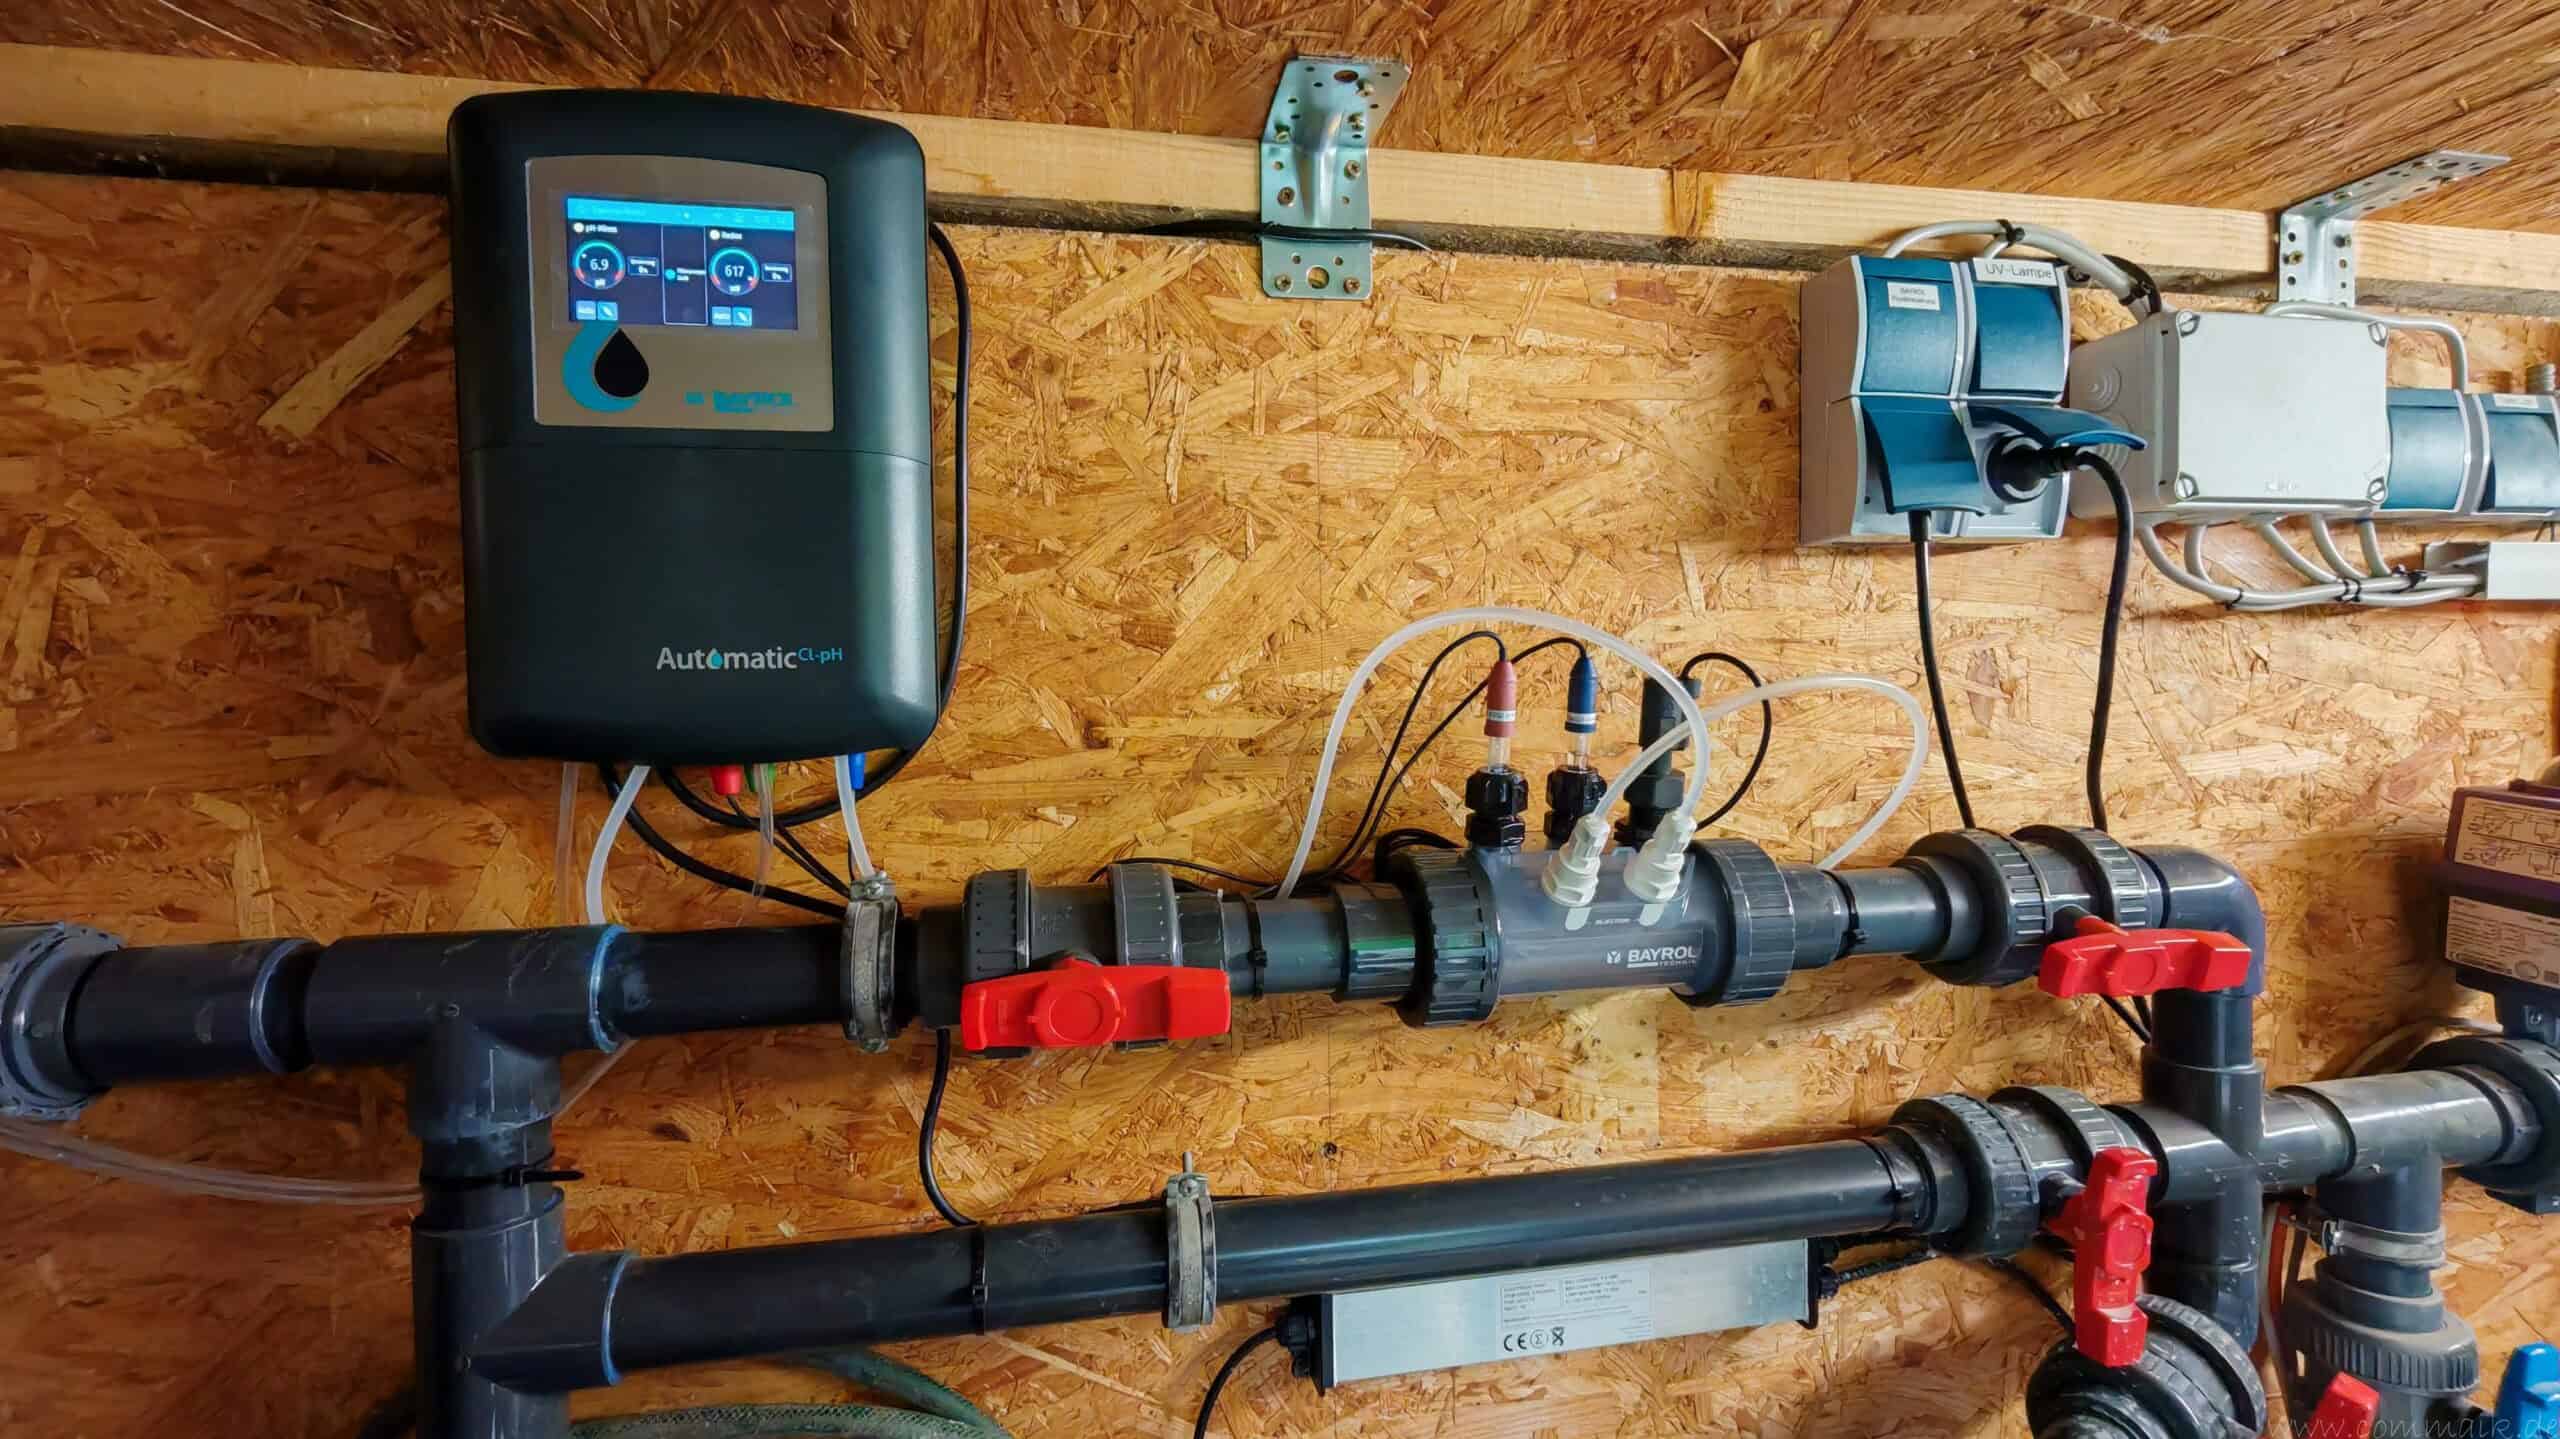
My pool equipment is located in a small equipment shed beneath the pool. Among other things, it houses the sand filtration system with filter glass, the filter pump, the solar control system, a UV-C lamp, and the existing chlorine dosing system.
I kept the UV-C lamp because it has proven itself to me. On the other hand, I removed the old dispenser that used 200-gram chlorine tablets. It was no longer needed for the new automatic chlorine and pH dosing system.
The Correct Position in the Piping System
Originally, I wanted to install the sensors and vaccination stations in a spare piece of pipe. However, there wasn’t enough space there. That’s why I changed my plan and removed the chlorine dispenser I had been using.
Two shut-off valves and detachable screw connections were already in place at this location. In between, I inserted a new, removable section of tubing using the Smart&Easy Connector.
This design has several advantages:
- The pool does not need to be drained for subsequent work.
- The entire dispensing section can be removed.
- Maintenance work becomes much easier.
- If necessary, the old chlorine lock can be put back into use.
- The remaining piping can still be used via the existing bypass.
The injection of pH adjusters and chlorine should be carried out, if possible, as the final step before the water returns to the pool, in accordance with the manufacturer’s instructions. This prevents highly concentrated water treatment products from initially flowing through other sensitive components.
Install the control unit and metering hoses
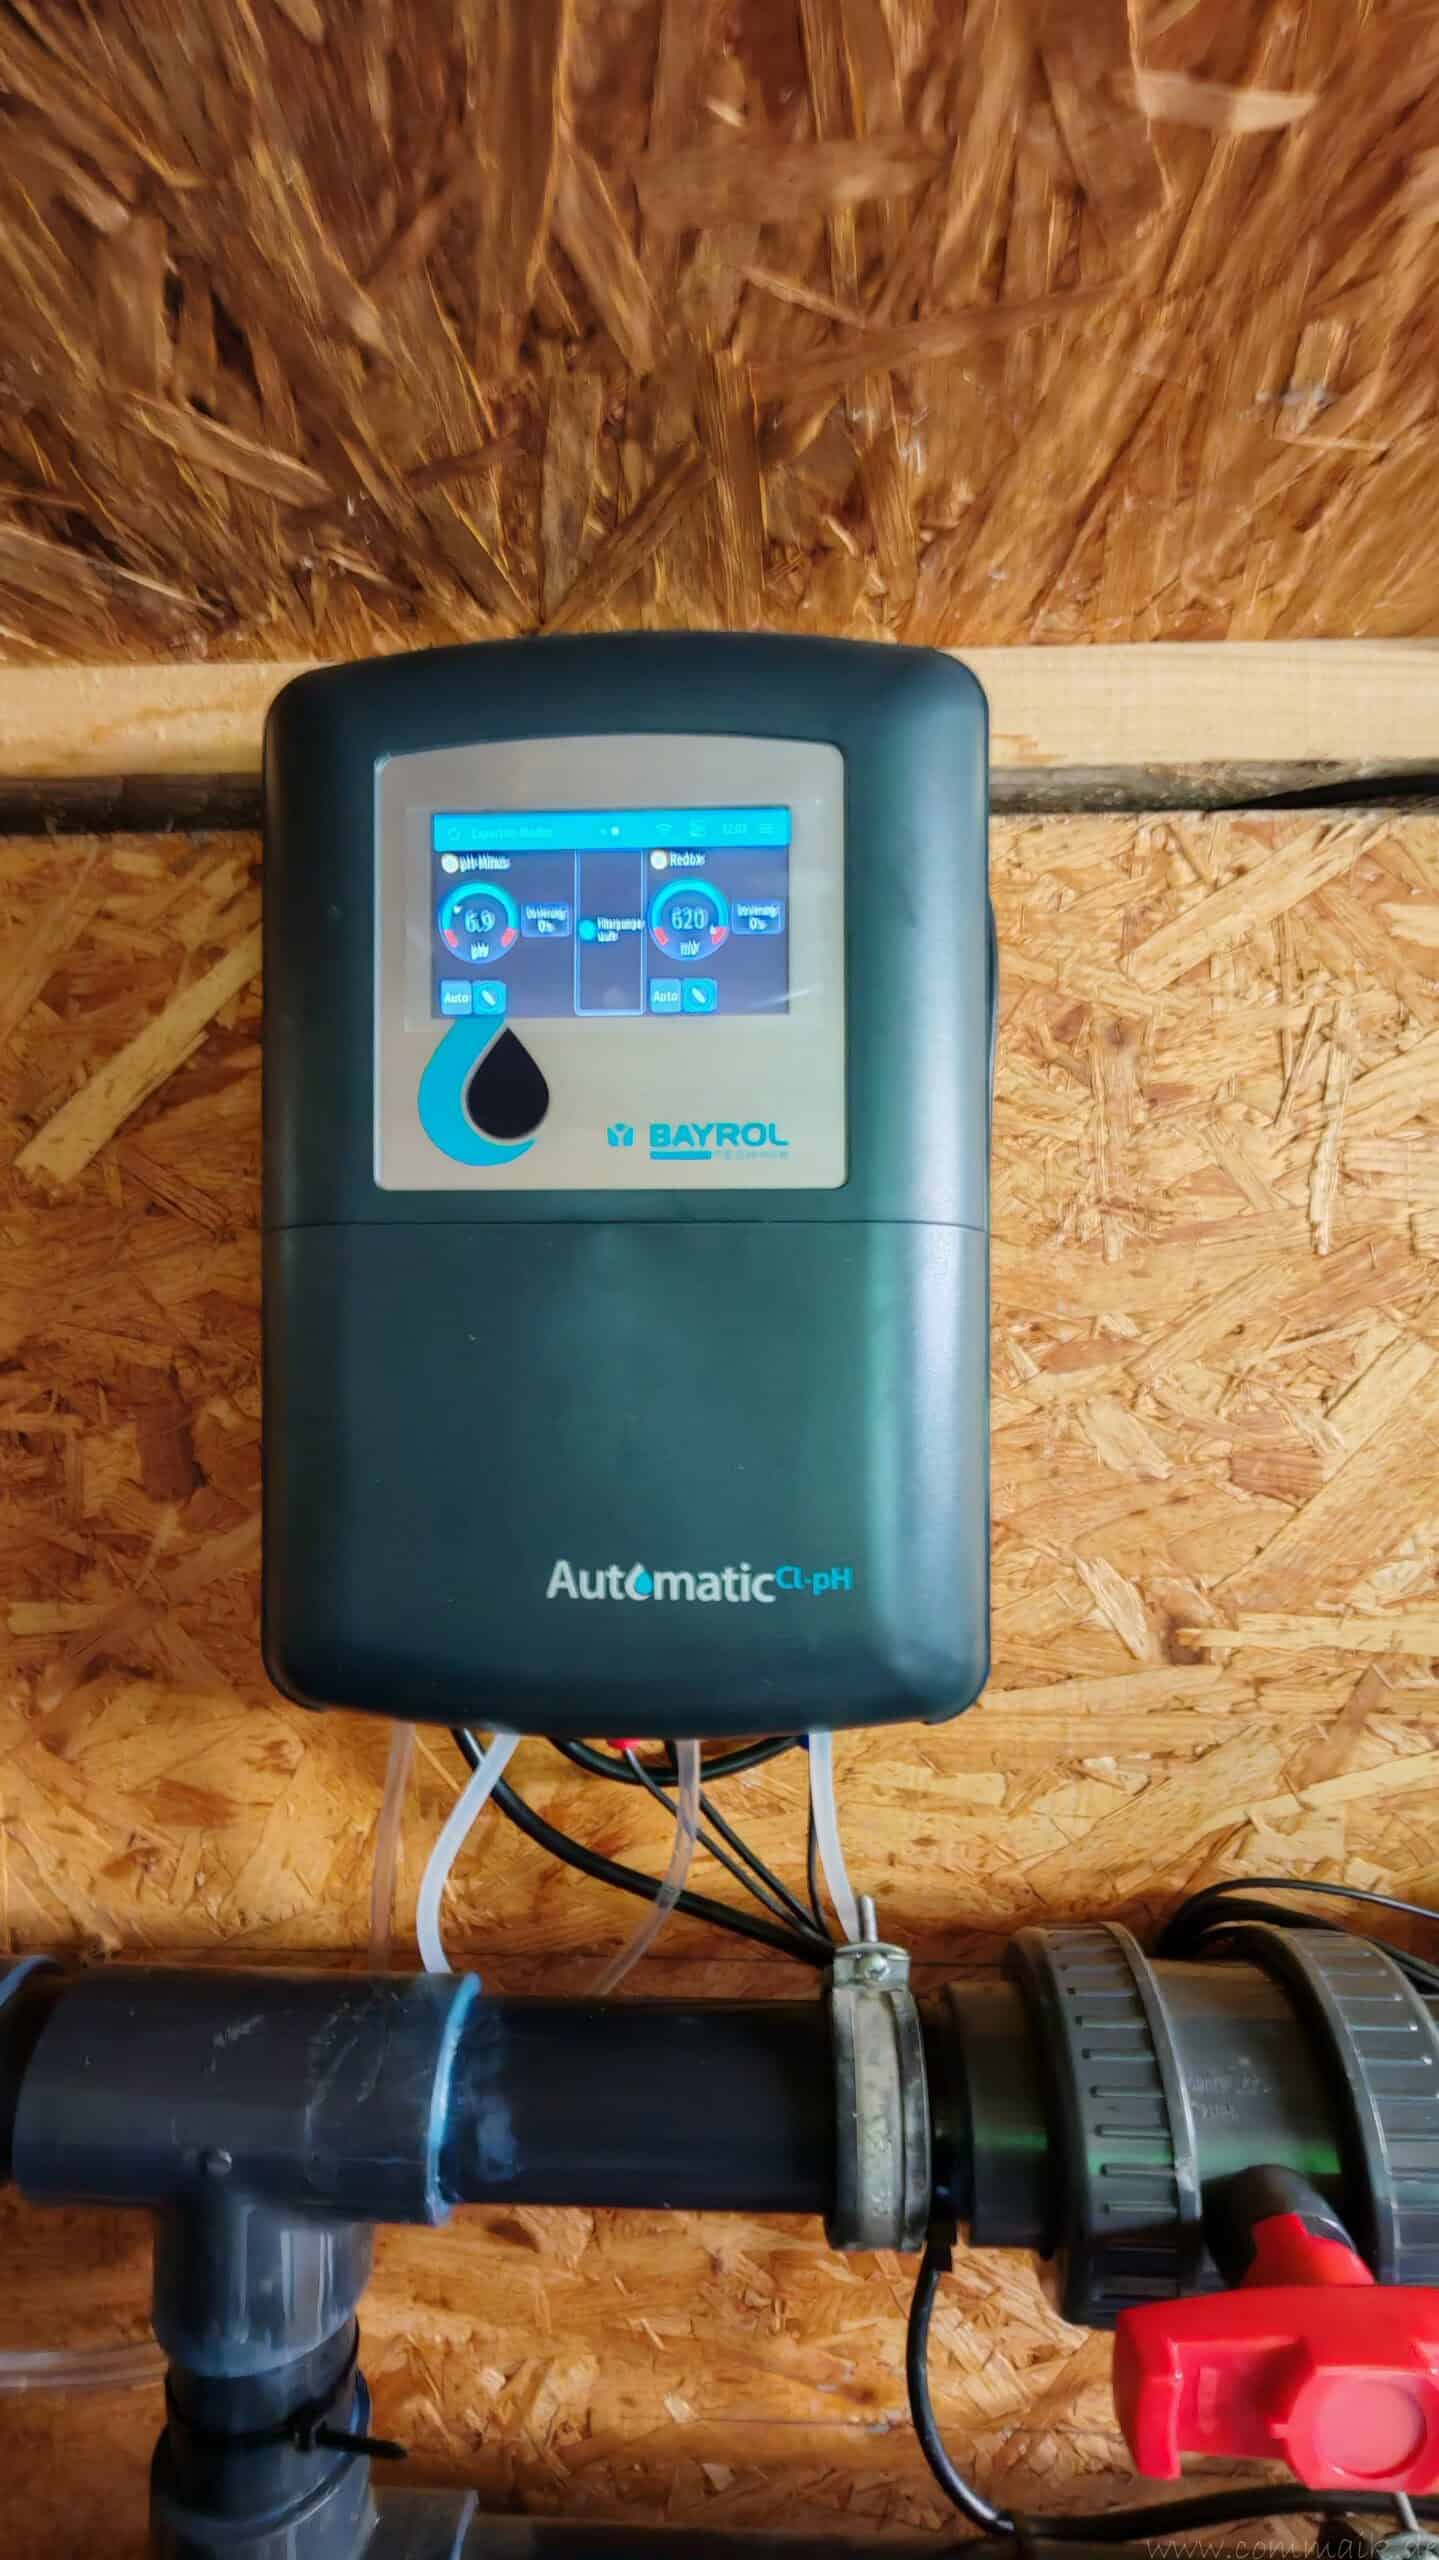
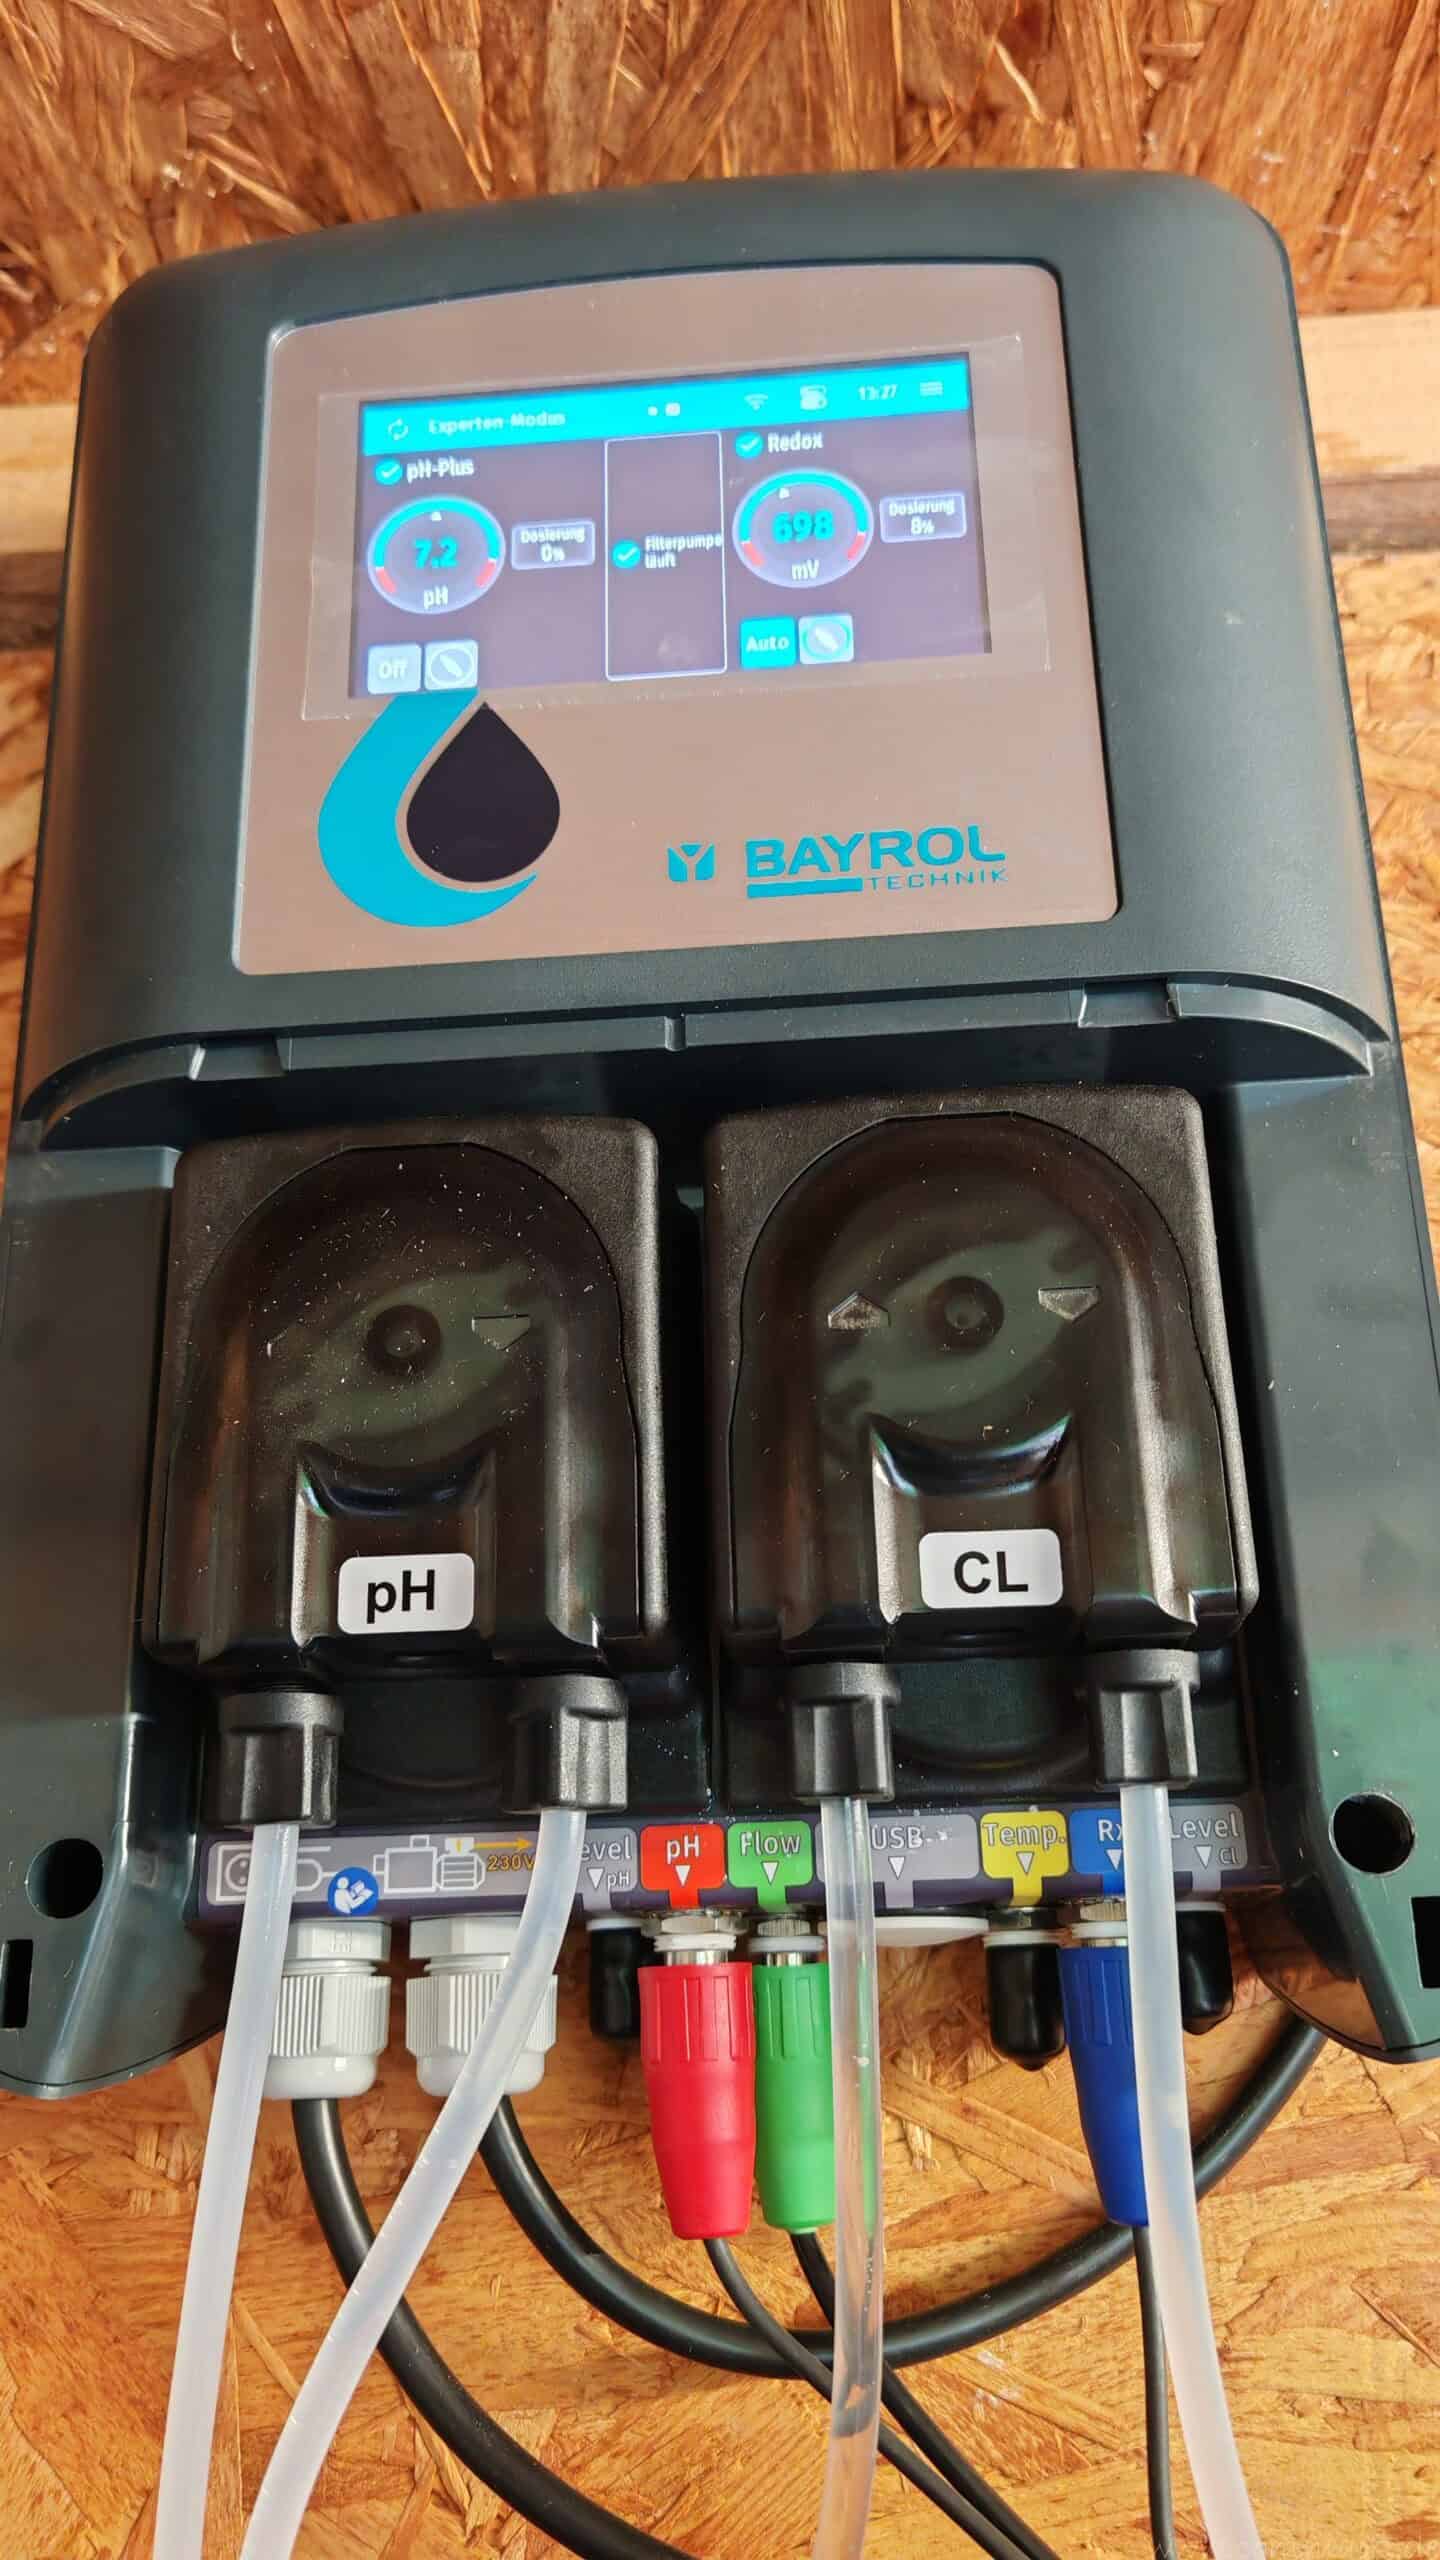
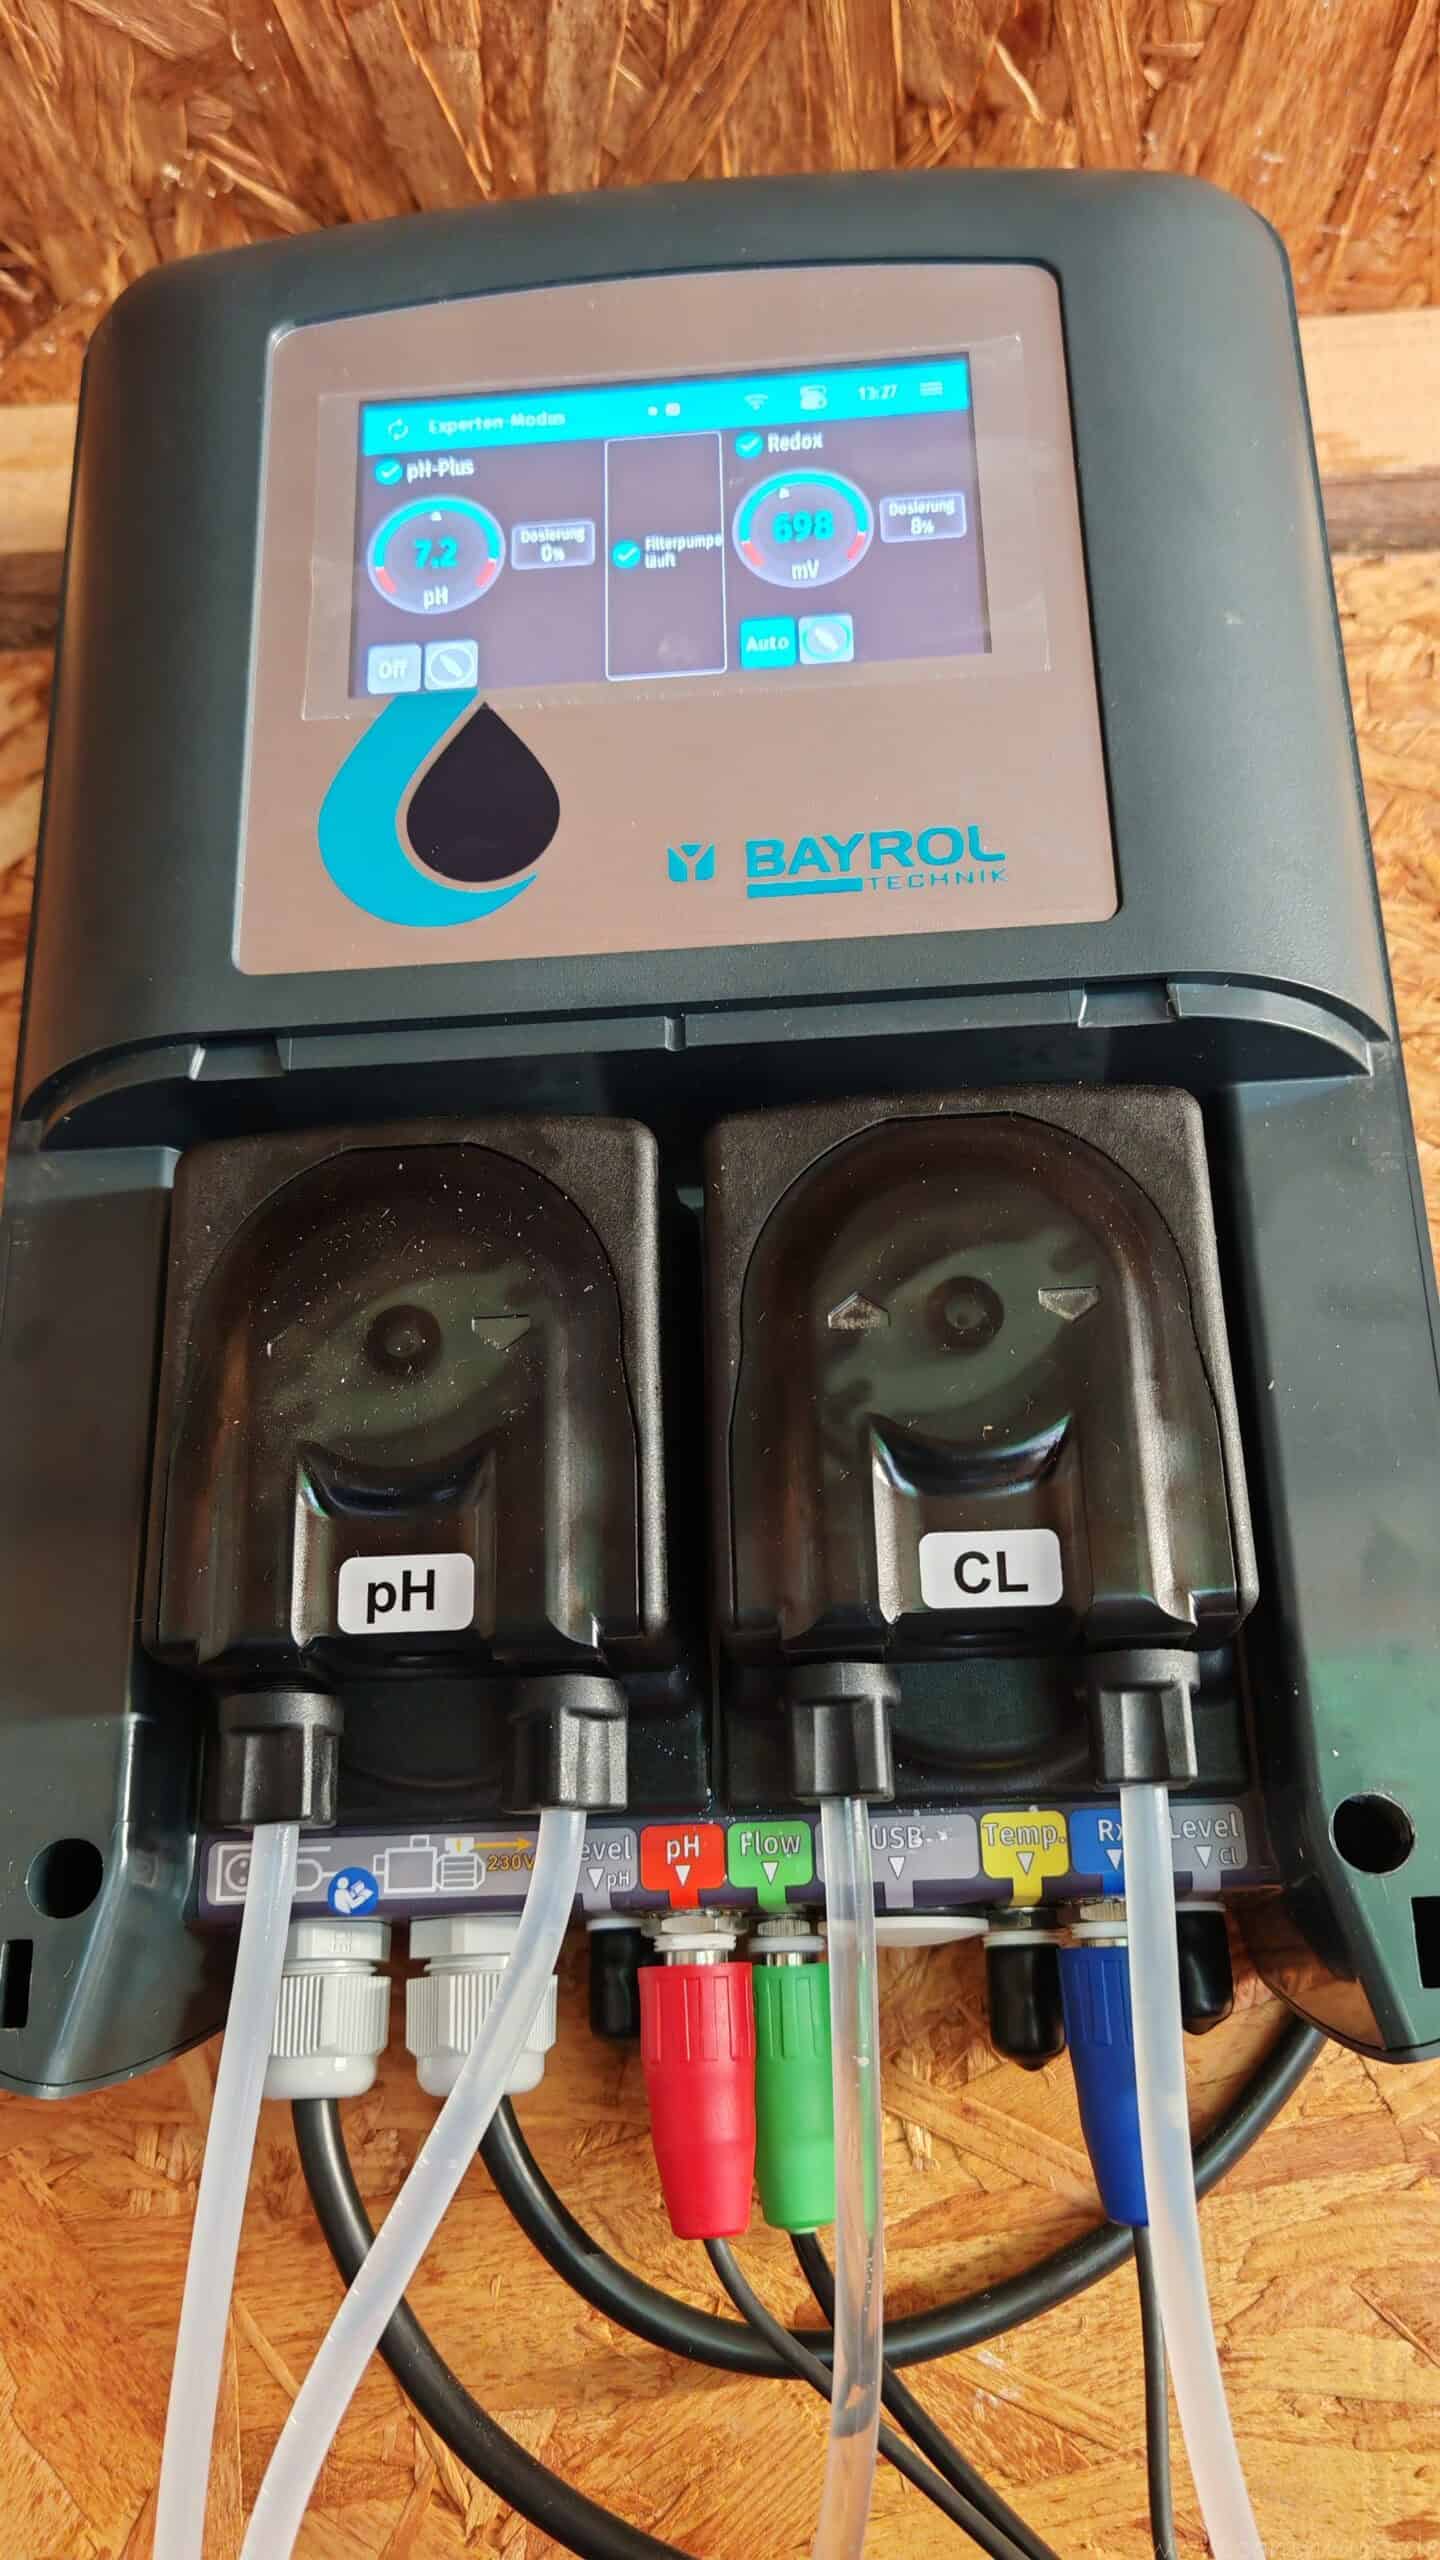
I mounted the control unit directly onto an OSB panel in the utility shed. Next, the suction and discharge hoses were connected to the two pumps.
On the suction side, the pumps draw the respective fluid from the canisters. On the discharge side, it is transported through the hoses to the injection valves.
When connecting the hoses, I paid attention to the following points:
- The hoses were cut to length neatly and as close to a right angle as possible.
- The cap nuts were loosened, and the hoses were fully inserted.
- All connections were tightened only by hand.
- I deliberately chose not to use any additional tools.
This is especially true for plastic screw connections: Once they’re tight, loosen them regularly. Tightening the connections too much can damage them and, later on, lead to leaks.

- Bayrol Wartungsset pH/Cl Automatik ab Modelljahr 2021
- LEBEN IM FREIEN
- Bayrol
Power Supply, Filter Pump, and Flow Switch
The BAYROL Automatic Cl-pH has its own power supply. In addition, there is a 230-V signal input that is linked to the filter pump control system.
This input signals to the system when the circulation pump is running. The metering pumps may not operate until they have been properly authorized.
⚠️ Important Safety Notice
Work on electrical systems may only be performed by a qualified electrician. In the field of pool technology, mains voltage, water, and moisture come into direct contact with one another. In addition, the required safety measures—including the use of a ground-fault circuit interrupter—must be observed.
Why the Pump Signal and Paddle Switch Work Together
The optional paddle switch detects whether water is actually moving in the circulation system. Its purpose makes sense: Concentrated pool chemicals must not be injected into a pipe containing stagnant water unless water is flowing through it.
At first, I had assumed that the paddle switch alone would be sufficient to trigger the dosing. But that’s exactly what I couldn’t get to work with my system. In addition, the 230-V signal input had to be connected to the filter pump’s controlled circuit.
It wasn’t until I saw a comment on my video that I fully understood the purpose of this double-check. The electrical signal first signals to the BAYROL Automatic Cl-pH that the filter pump has been turned on. The paddle switch then checks whether water is actually flowing through the pipe despite the electrical pumping signal.
This monitors two different states:
- The filter control unit indicates that the pump should be running.
- The paddle switch confirms that water is actually flowing.
This distinction can be important, for example, when the pump is electrically powered but is not pumping water due to a malfunction, a closed valve, or some other problem. In this case, the paddle switch would not give the go-ahead, and the metering pumps would remain off.
Based on this explanation, I can fully understand the need for redundant safeguards. Another thing that still puzzles me a bit: On my system, the display goes black as soon as the power supplied through the pump is cut off. According to the datasheet, the controller itself has a maximum power consumption of just 10 watts. From a purely technical standpoint, one might therefore assume that the entire system could be switched on or off together with the filter pump.
However, BAYROL has deliberately opted for a separate power supply for the controller and an additional signal input for the filter pump. Presumably, this is intended to ensure that the controls, settings, Wi-Fi connection, and monitoring functions remain operational regardless of the pump’s actual operation.

Using pH and Redox Probes Correctly
The two measurement probes are color-coded and must be clearly assigned to their designated connectors. The pH probe measures the pH level, while the redox sensor measures the oxidation-reduction potential of the pool water in millivolts.
Before inserting them, I carefully removed the protective caps from the probes. The delicate glass flask should not be touched or struck against hard objects. Even during subsequent installation, no lateral pressure must be applied to the glass.
The probes are inserted from above through the designated openings into the measuring chamber of the Smart&Easy Connector. To ensure the correct installation depth, I slid it in far enough so that the measuring piston still protrudes about two finger-widths above the mounting bracket. As a result, the sensitive measuring tip is positioned deep enough in the flowing pool water without coming into contact with the partition inside the connector or the opposite pipe wall.
The probes are then secured using the designated holders. The screw connections must fit tightly, but should not be tightened so much that they place mechanical stress on the glass or the probe housing.
After installation, connect the cables to the labeled pH and redox terminals on the BAYROL Automatic Cl-pH. Before putting the system into operation, I also checked to make sure both probes were securely in place and that no water was leaking from the insertion points.
The measuring probes must not dry out. If the equipment is taken out of service for an extended period or during the winter, it must be removed and stored in a suitable storage solution. Therefore, the protective caps should not be discarded.
With proper care, these sensors can last for several years. However, how long they actually last depends on operating conditions, water quality, storage, and regular cleaning.
Pump hoses, injection valves, and measuring probes are also wear parts. These ongoing costs should be taken into account when making a purchase decision.

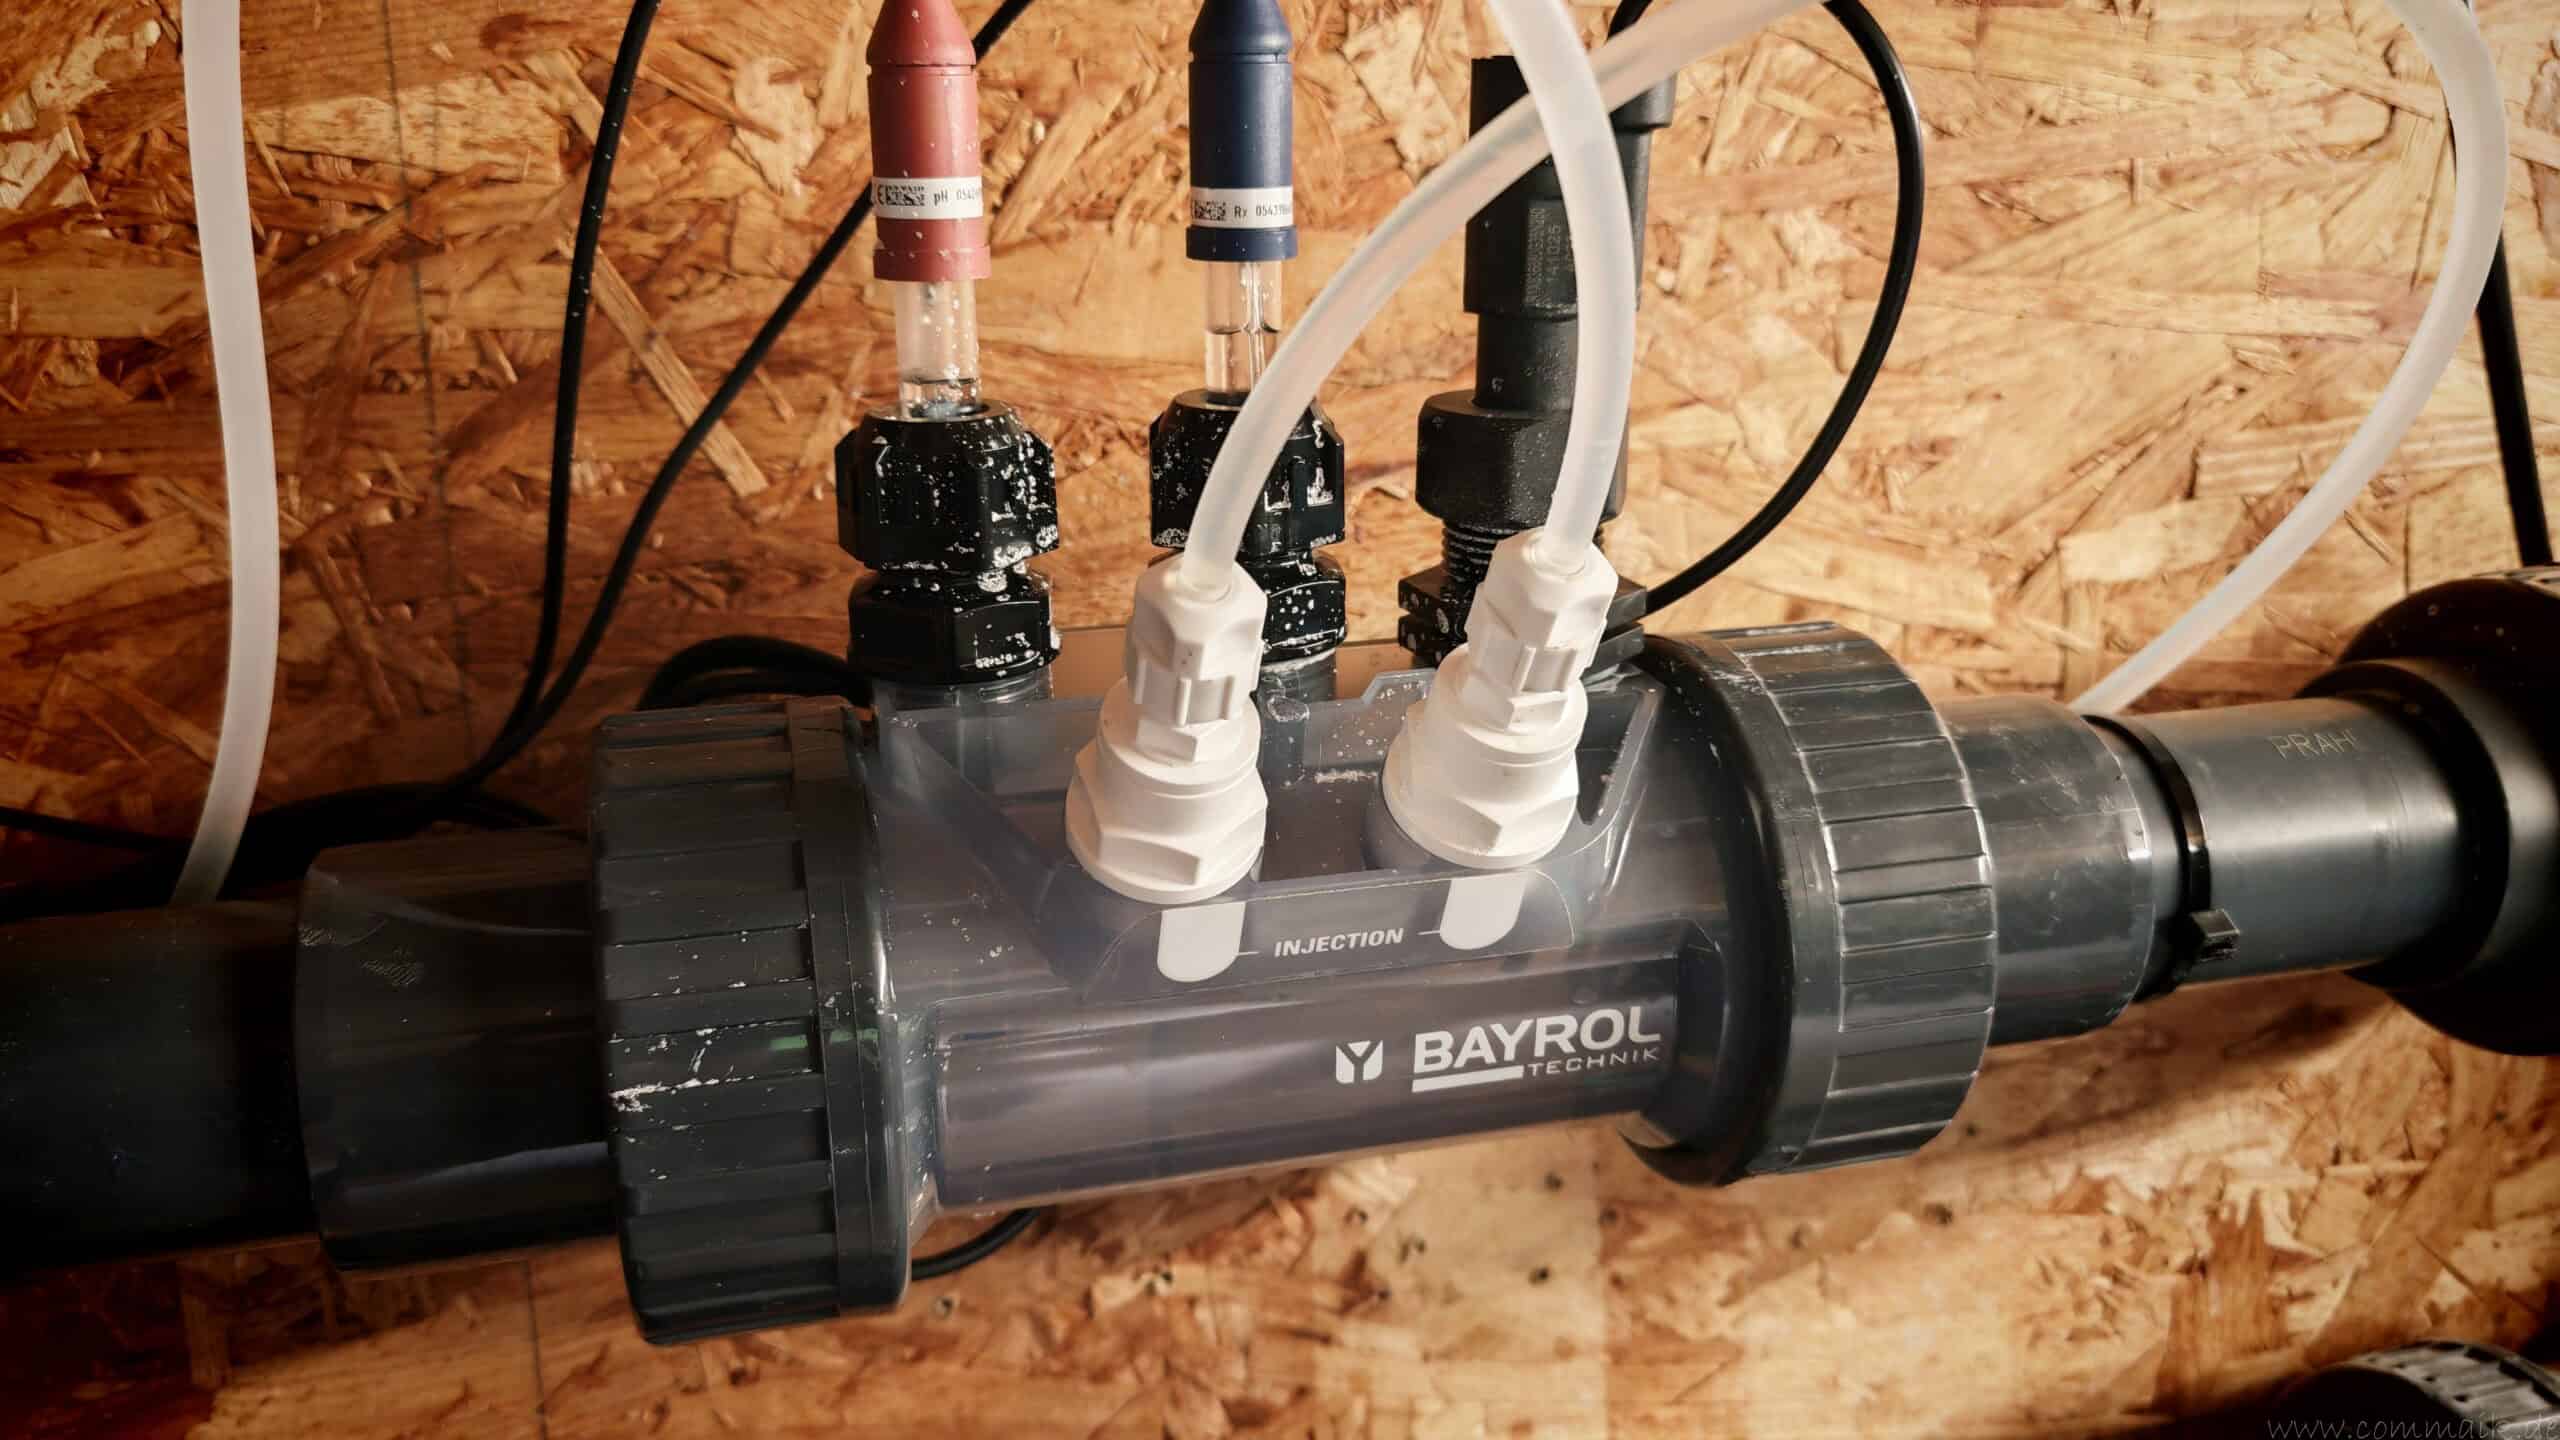
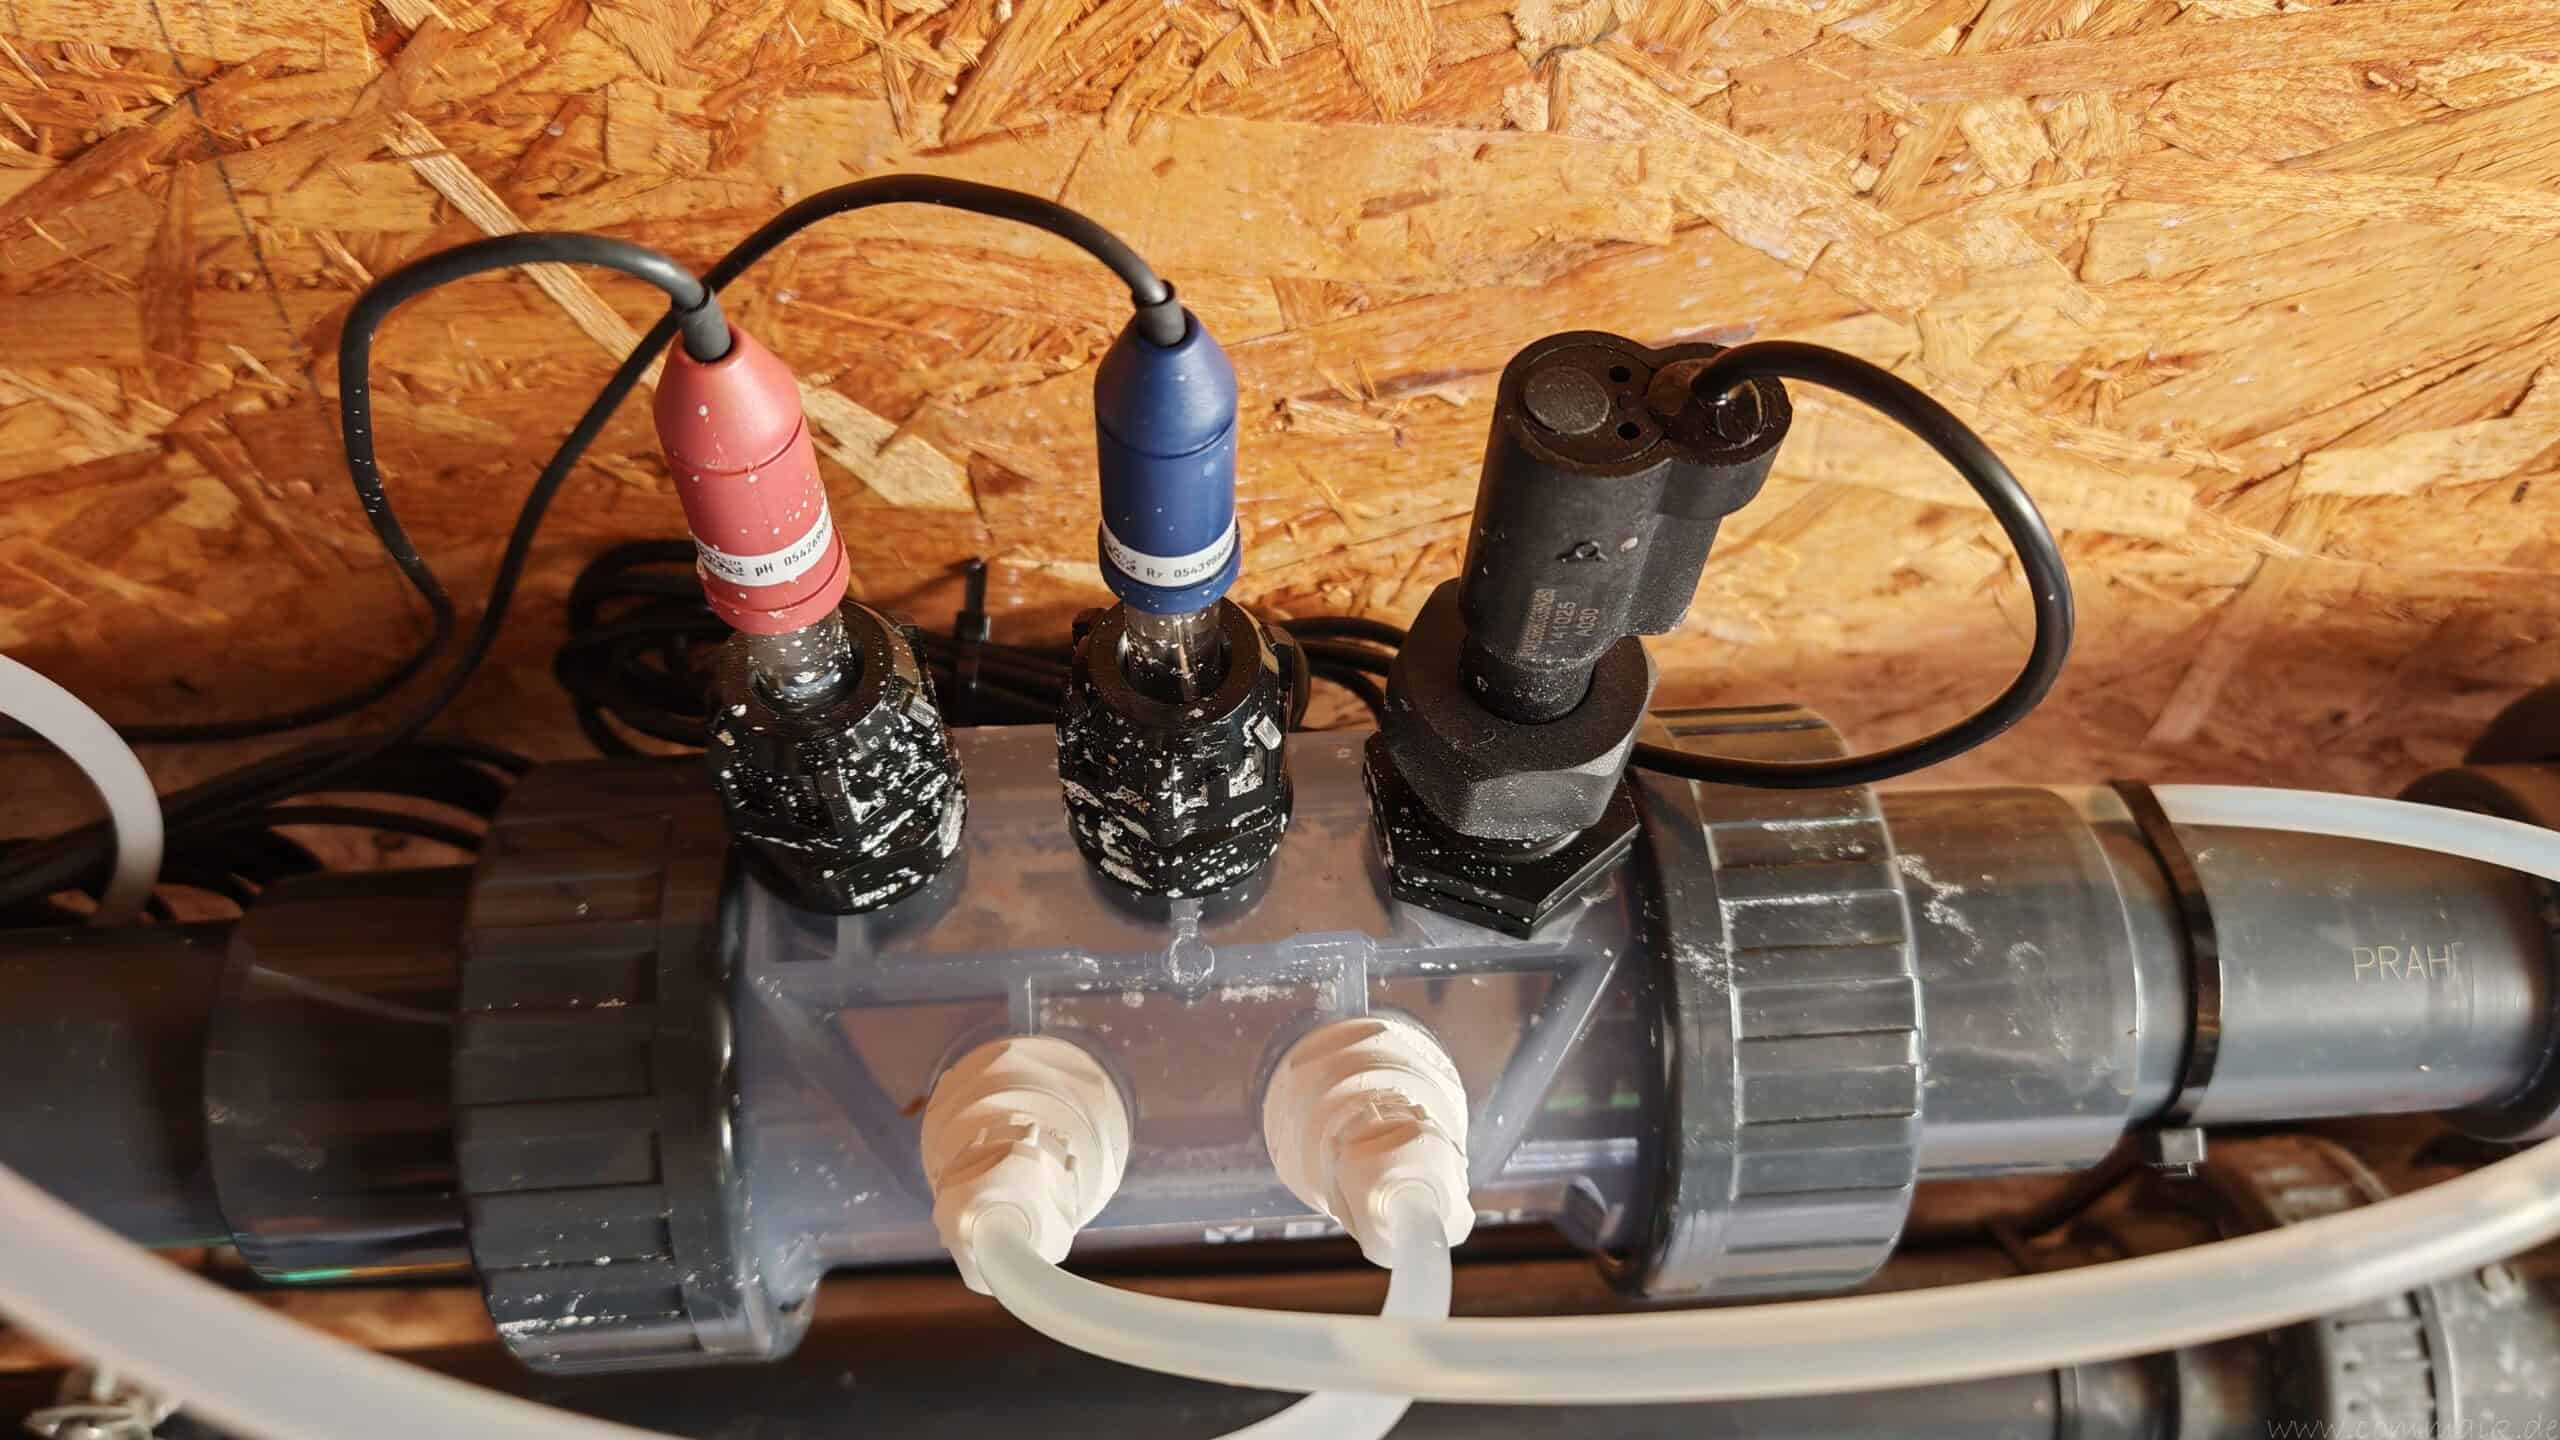
Water Parameters Before Commissioning the Automatic Cl-pH System
Before initial startup, the water parameters must be manually adjusted to a suitable initial range.
BAYROL specifies the following values in the user manual:
| Water quality | Recommended value | Tolerance Range |
|---|---|---|
| Alkalinity | at least 80 mg/L | at least 80 mg/L |
| pH value | 7,2 | 7.0 to 7.4 |
| Free Chlorine | 0.6 to 1.0 mg/L | 0.5 to 1.5 mg/L |
For me, the pH was around 7.1 and the alkalinity was 100 mg/l before I started. Both values were therefore generally suitable.
Set Water Parameters Manually
If the pH level is too high, it can be lowered with pH-Minus. If the pH level is too low, it can be raised using pH-Plus. If the alkalinity level is too low, it can be increased using a designated alkalinity booster. If it is too high, it is advisable to make several small adjustments and, if necessary, perform a partial water change.
If the chlorine level is too low, it is manually raised using a suitable chlorine product before the system is put into operation. If the level is too high, do not add any more chlorine for the time being. The filtration system can continue to operate until the chlorine level has dropped due to consumption and UV radiation. If the levels are significantly elevated, a partial water change can help lower them more quickly.
In the case of chlorine, however, my meter showed an unexpectedly high reading, even though no fresh chlorine had been added for several days. Such unusual measurements should be repeated and should not be used as the basis for control decisions without further verification.
Corrective agents should always be dosed according to the manufacturer’s instructions. I add them gradually, then let the pool water circulate sufficiently and check the levels again. It is better to make several small adjustments than one large one, as this allows you to reach the target range more precisely and avoid overdosing. Never mix different water treatment products in their concentrated form.
After the preparation is complete, an assistant will guide you through the installation and setup. The setpoints can be adjusted later in the menu.

- & : Elektronischer Wassertester (Photometer) PolLab 2.0 (Nachfolger Pooltester Poollab 1.0) inkl. 70 Tabletten Starterset + 70 Ersatztabletten "Made in Germany"
- : Digitaler Pooltester (wasserdicht IP68) fr Wasseranalyse von 24 Parametern mit Bluetooth, WLAN, 4 Wellenlngen und groem 24-Zoll-Farbdisplay
- : Der Poolwassertester spart wertvolle Zeit bei der Poolmessung durch das Messen von bis zu 3 Parameter gleichzeitig
- -: 40x DPD Nr. 1 Freies Chlor / Brom, 20x DPD Nr. 3 Gesamtchlor, 40x Phenol Red pH Wert, 20x Alkalinitt M Alkalinittskapazitt/Surekapazitt, 20x CYA-Test Cyanursure
- Unsere Produkte bieten, durch strenge Kontrollen, herausragende Qualitt fr alle Poolbesitzer. AlphFa ist eine deutsche Hndlermarke und weder Hersteller noch Exklusivvertreiber dieses Artikels.
My Mistake with Liquid Chlorine and pH-Plus
My biggest mistake had nothing to do with the piping, the hoses, or the electrical system. It arose during the selection of the pH regulator.
In the past, my pool water was often too acidic. The pH level was usually only between 6.5 and 6.7. After heavier rainfall, it continued to drop steadily. That’s why, up until now, I’ve had to keep adding pH-Plus to bring the water back to the recommended range.
Based on this experience, I had initially planned to use pH-Plus for the new dosing system as well. At the same time, however, I switched from the chlorine tablets I had been using to liquid chlorine based on sodium hypochlorite.
This combination didn’t make sense for my business. Liquid chlorine is highly alkaline and raises the pH level even during normal chlorine dosing. The acid input from rain and other external factors up to that point was no longer sufficient to offset this effect. With the additional pH-Plus, the control system was therefore working in the wrong direction.
Why I Switched to pH-Minus Liquid
Sodium hypochlorite is dosed as an alkaline solution and may initially raise the pH when added. If the system can only dispense pH-Plus at a time, there is no way to automatically lower a rising pH level.
A pH level that is too high reduces the concentration of hypochlorous acid, which is particularly effective. This does not completely “block” the chlorine, but its disinfecting effect is significantly reduced.
Adding more chlorine does not effectively solve this underlying problem. The key is to bring the pH level back to the desired range.
So I ordered a can of liquid pH-Minus and adjusted the control settings accordingly. Since then, the system has been able to counteract a rising pH level.
💡 My experience
Before commissioning, it should be carefully determined whether the system needs to raise or lower the pH level. When using liquid chlorine with an alkaline solution, the “pH-Minus” operating mode is the appropriate choice for many private pools. However, the actual water chemistry and the observed changes in your own tank remain the decisive factors.


Store chlorine and pH-Minus separately
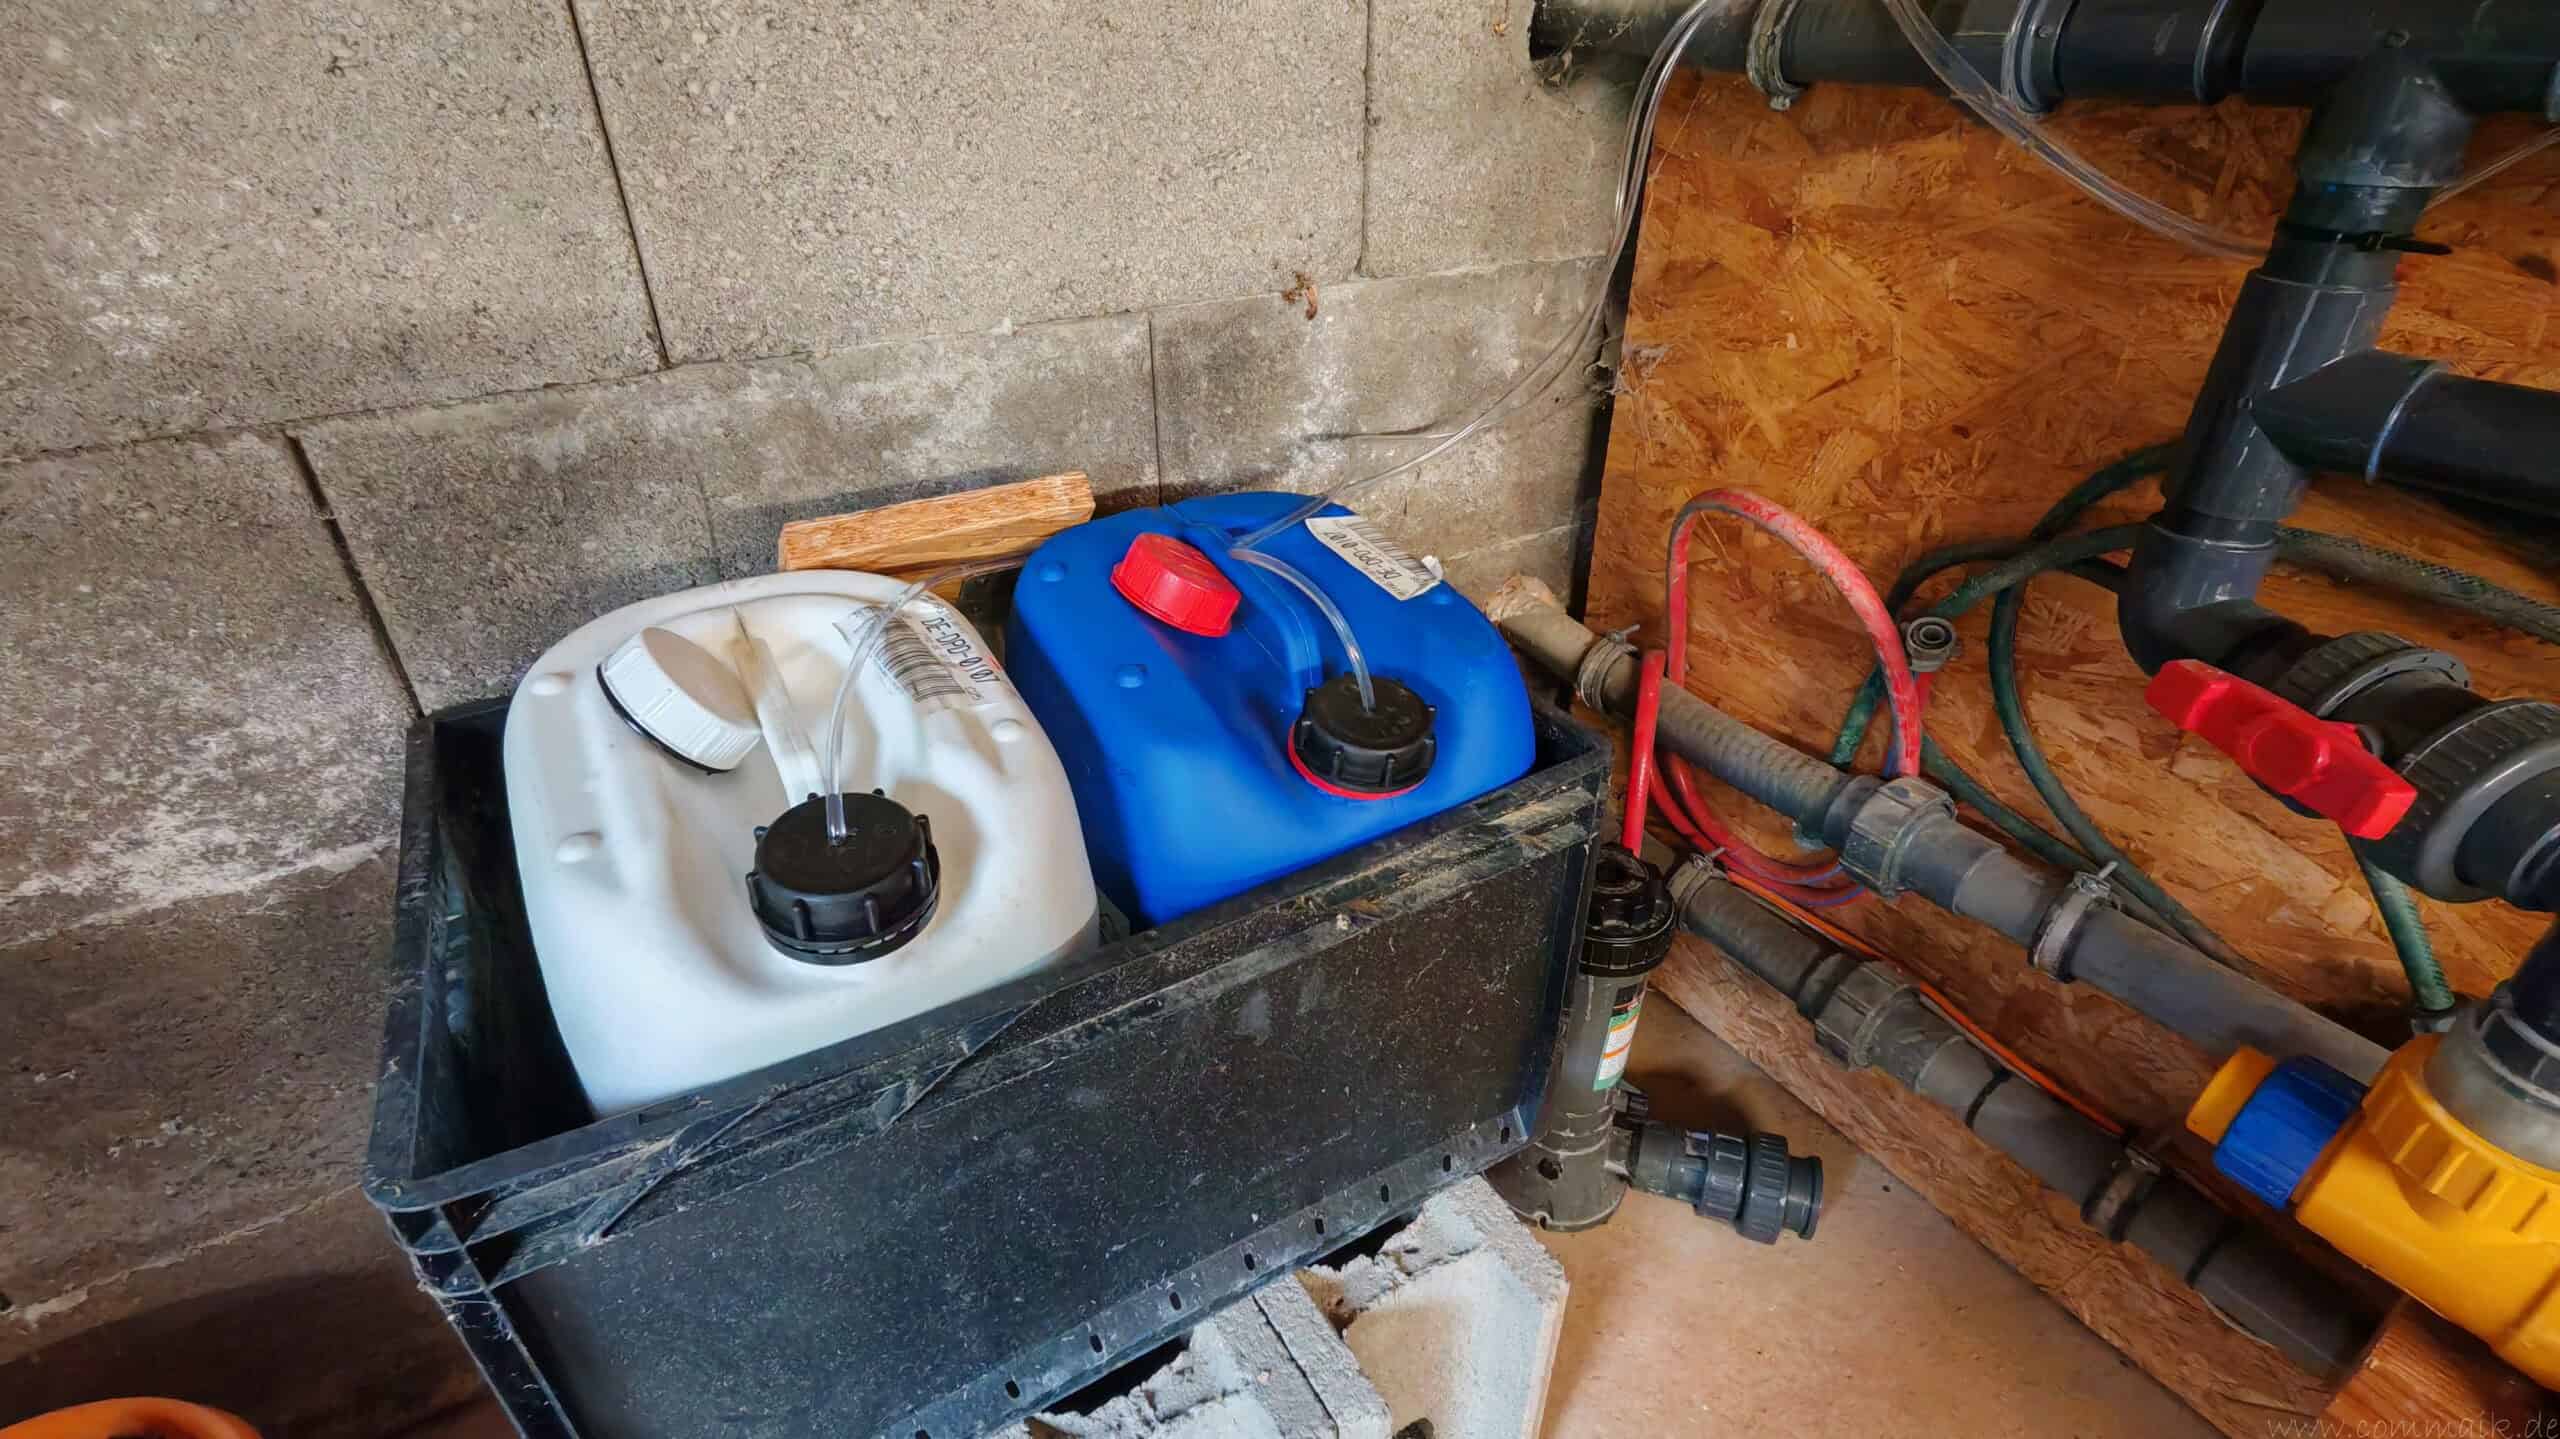
During my first setup, both canisters were placed together in a drip tray. Following a valid suggestion from the community, I’ve now made this change as well and am storing the two canisters in separate boxes.
Chlorine solution and acidic pH-Minus must not be mixed together (chlorine gas). Both products should therefore be stored separately and each in its own suitable spill tray. It is essential to follow the manufacturer’s safety and product information.
Video: Install BAYROL Automatic Cl-pH and Automate Pool Maintenance
I’ve documented the entire installation process for the BAYROL Automatic Cl-pH in a detailed video. In this video, I show the initial setup in my utility room, the modification of the existing chlorine dosing system, and the integration of the Smart&Easy Connector into my existing pool plumbing.
I will also cover the installation of the control unit, the connection of the dosing hoses, and the installation of the pH probe, redox sensor, and paddle switch. Another key point is the electrical pump enable signal and my experience that the flow switch does not operate independently of the filter pump signal.
The video also shows the mistake I made when choosing the pH regulator. I had originally planned to use pH-Plus, even though the liquid chlorine I’m using can already raise the pH level. I also explain in detail there why I subsequently switched to pH-Minus.
You can find more videos about my pool-related projects in my YouTube playlist about the pool. I also regularly post new projects, installations, and experiences on my YouTube channel, COMMAIK.
Zuletzt aktualisiert am 24. October 2026 um 21:45 . Ich weise darauf hin, dass sich hier angezeigte Preise inzwischen geändert haben können. Alle Angaben ohne Gewähr. (*) Bei den verwendeten Produktlinks handelt es sich um Affiliate Links. Ich bin nicht der Verkäufer des Produktes. Als Amazon-Partner verdiene ich an qualifizierten Verkäufen. Dein Preis ändert sich jedoch nicht.


Connect the BAYROL Automatic Cl-pH with Wi-Fi, the web portal, and the app
Setting up remote access involves several steps. First, the BAYROL Automatic Cl-pH is registered on the web portal, then connected to your home Wi-Fi network, and finally activated for access via the web portal. The connection to the smartphone comes last.
Take a photo of the serial number before installation
The serial number of the BAYROL Automatic Cl-pH is required for registration. It is located on the nameplate on the left side of the housing.
Once mounted on the wall, this spot is difficult to see, depending on the lateral distance. I therefore recommend taking a photo of the nameplate, including the serial number, before installation. This saves you the hassle of having to check the reading between the device and the wall later on.
Register the device on the BAYROL web portal
The first step is to create a user account on the BAYROL web portal. There, you can then register the BAYROL Automatic Cl-pH using its serial number.
After successful registration, the portal displays a six-digit web portal PIN. You should write down this PIN or save it as a screenshot. It is entered once later on the control unit and should not be confused with the App-Link code.
Connect the Automatic Cl-pH to Wi-Fi
It wasn’t until after I registered the device that I tapped the Wi-Fi icon on the BAYROL Automatic Cl-pH display. In the “Wi-Fi Connection” menu, select your home Wi-Fi network and enter the corresponding Wi-Fi password.
Therefore, a sufficiently strong 2.4-GHz Wi-Fi signal must be available at the installation site. If the pool equipment is located farther away from the house or in an enclosed utility room, an additional access point or Wi-Fi repeater may be necessary.
Enter the Web Portal PIN on the control unit
Once the BAYROL Automatic Cl-pH is connected to Wi-Fi, open the “App & Web Portal Connection” menu on the device. There, I entered the six-digit web portal PIN that had been displayed on the web portal.
This assigns the physical dispensing system to the user account that was previously created. The device will then appear in the web portal, and you can access the measurement data and settings remotely.
Pair the app with the device
The device will not connect to the app until it has been set up in the web portal. The App Link feature is available in the portal’s device list. It generates a QR code, a URL, and a separate app link code.
The URL can be opened on a smartphone by scanning the QR code or directly in the browser. When you launch the app for the first time, enter the App Link code that was previously displayed. Only then will the app connect to the BAYROL Automatic Cl-pH that has already been registered.
Therefore, different information is required for the setup:
- Serial number from the nameplate for registering the device
- Wi-Fi password for connecting to the home network
- Six-digit web portal PIN for linking the device to the user account
- App Link code for the final connection to the smartphone
👉 BAYOL Web Portal 🔗 https://mypoolexpert.bayrol.com
👉 You can find the Bayrol app here:
🔗 Google Play Store (Android): https://play.google.com/store/apps/details?id=eu.bayrol.mypoolexpert
🔗 Apple App Store (iOS): https://apps.apple.com/fr/app/my-pool-expert-by-bayrol/id1617234973
In addition, the control menu uses access codes. The manual lists the user code 1234 and the service code 5678 by default. These codes are used to access protected device settings and are not the same as the web portal PIN or the App Link code.
Retrofitting a BAYROL Temperature Sensor
After installing the dosing system, I was able to monitor the pH and redox levels remotely. I still had to check the water temperature using a thermometer placed directly in the pool.
It wasn’t a big problem, but it wasn’t particularly convenient either. Especially on days when the weather was changeable, I didn’t want to run out to the garden every time just to see if it was worth going for a swim.
The Automatic Cl-pH has a connection for the optional temperature kit. That’s why I retrofitted the appropriate sensor and integrated it into my existing pool plumbing.
The Benefits of Automatic Temperature Measurement
The temperature sensor does not add another dosing function to the automatic water care system. Rather, it provides an additional data point for the display, the app, and the web portal.
This has the following advantages for me:
- Water temperature can be checked at any time via smartphone
- Combined display of pH and redox values
- no extra trip to the pool thermometer
- a fixed measuring point in the circulation system
- Option for temperature compensation
- Future integration into other automation systems (Home Assistant) is conceivable

- nur kompatibel mit BAYROL Dosieranlage Automatic Cl/pH
The Correct Position for the Temperature Sensor
My pool system already included an additional temperature sensor for the solar control system of my solar pool heater. This sensor turns the solar pump on and off based on the measured temperatures.
However, I wanted to use a separate sensor to display the actual pool water temperature. The new sensor should detect the water before it is further heated by the solar heating system.
That’s why I installed it in my setup right after the pump, at a suitable point in the filter circuit. If the sensor were located behind the solar heating system’s return line, the water that has already been heated could affect the reading.
The exact installation location depends on the specific pool plumbing configuration. It is important to have a point in the circulation system where water continuously flows past from the tank during filter operation. BAYROL recommends installing the sensor for the temperature kit using the included drill-through clamp. The connection cable for the PT1000 temperature sensor is 2.50 meters long.
When selecting the installation location, therefore, both the direction of water flow and the distance to the BAYROL Automatic Cl-pH must be taken into account. The sensor should remain easily accessible without having to extend the connection cable or run it under tension.
Components for retrofitting the sensor
For my installation, I only needed a few components:
- BAYROL Temperature Sensor
- A suitable tapping clamp for the existing pipe
- O-ring or sealing ring
- appropriate drill bit for the plastic pipe
- Tool for tightening clamps
- Cable ties for cable routing
A complete overhaul of the pool piping was not necessary. The clamp is placed around the existing pipe and serves as a mount for the sensor.
Install the temperature sensor in the pool piping
The mechanical installation was completed in less than ten minutes. Nevertheless, careful preparation is important. If a pressurized pipe is drilled into without proper control, a significant jet of water can quickly form.
Turn off the filter pump and relieve the pressure in the line
Before drilling, I followed these steps:
- Filter pump completely turned off
- Supply and return lines shut off at the installation site
- Pressure was relieved through the valve on the sand filter system
- Installation position checked and marked
I didn’t start drilling until there was no longer any pressure in the line. That way, the work could be done without making a mess.
Position the drilling clamp and mark the hole
First, I aligned the drilling clamp on the pipe and marked the spot where I would drill. Next, I pre-drilled the plastic pipe with a 6-mm metal drill bit. I then carefully enlarged the final hole to the diameter required for the temperature sensor using a step drill.
It was important not to drill the hole too large. The sensor’s O-ring must completely cover the bore and rest on a sufficiently wide, flat surface all around it. This is the only way to reliably seal the installation site. That’s why I gradually increased the diameter and checked the fit several times along the way. Drilling chips should be completely removed so that they do not remain in the pipe or damage the seal.
Next, I placed the two halves of the pipe-clamp around the pipe. The O-ring sits between the clamp and the pipe and seals the hole. The screws were tightened evenly to prevent the sleeve from warping.
Insert the sensor and check for leaks
The sensor was then screwed into the designated mounting hole. The same applies here: The connection must be secure and tight, but plastic components should not be over-tightened unnecessarily.
After opening the valves and starting the circulation pump, I carefully inspected the installation site. The cuff sealed immediately. Nothing was dripping or leaking.
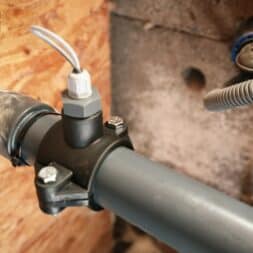
Connect the sensor to the BAYROL Automatic
After the mechanical installation, all that remained was to route the cable to the control unit. The plug goes into the designated yellow temperature connector.
I ran the cable along the existing installation and secured it with cable ties. This prevents it from hanging loosely in the utility room and being accidentally pulled out.
Enable the temperature sensor in the menu
The connected sensor is not automatically used as an active temperature source. First, I had to select it from the menu. You may need to enter an access code to access the relevant settings. The user manual lists the default user code as 1234 and the service code as 5678.
I was then able to select the temperature sensor from the menu and set it as the active temperature source:
- Open the Main Menu
- Select Settings
- Open Temperature Settings
- Activate the BAYROL sensor as a temperature source
- Confirm Setting
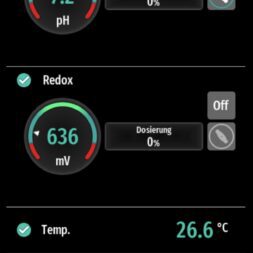
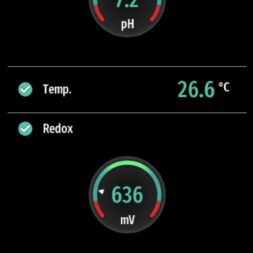
Immediately after activation, the system displayed a temperature of 26.6 °C. The sensor was thus detected correctly, and the reading subsequently appeared in the app.
Temperature Compensation for Measurement Deviations
If the displayed value differs significantly from a manual reference measurement, you can perform a temperature calibration in the menu.
In this process, a reliable reference value is provided to the control system. The system then adjusts the displayed temperature accordingly.
For a meaningful comparison, both measurements should be taken under similar conditions. A thermometer placed on the warm water surface or a sensor located directly behind the solar heater may show a different reading than the mixed water in the pool.
Video: Installing the BAYROL Temperature Sensor in the Pool Piping
I also documented the retrofit installation of the BAYROL temperature sensor in a separate video. In it, I begin by explaining why I no longer wanted to monitor the water temperature exclusively with a thermometer placed directly in the tank.
I will then document the entire mechanical installation process. This includes shutting off the filter pump, shutting off the relevant lines, relieving pressure at the sand filter system, and installing the tapping clamp. The video also shows how to drill the hole, install the O-ring, and then check for leaks.
After installation, I connect the sensor to the BAYROL Automatic Cl-pH, activate it in the temperature settings, and check the display on the unit. Finally, I will explain how to perform a temperature calibration when the measured values differ.
You can find more videos about my projects related to pools, pool maintenance, and pool technology in my pool playlist on YouTube. On my YouTube channel, COMMAIK, I also document further work on our pool, the automated control system, and the entire home automation system.
Zuletzt aktualisiert am 25. October 2026 um 02:30 . Ich weise darauf hin, dass sich hier angezeigte Preise inzwischen geändert haben können. Alle Angaben ohne Gewähr. (*) Bei den verwendeten Produktlinks handelt es sich um Affiliate Links. Ich bin nicht der Verkäufer des Produktes. Als Amazon-Partner verdiene ich an qualifizierten Verkäufen. Dein Preis ändert sich jedoch nicht.
My Experience with the BAYROL Automatic Cl-pH
It took about half a day to install the entire dosing system. With careful planning, easily accessible piping, and skilled craftsmanship, the mechanical installation was no big deal.
In contrast, the temperature sensor was easily installed and the process was completed in just a few minutes. The included tap-in clamp was immediately airtight, and the measurement appeared on the display right away.
What I really like
- Continuous measurement of pH and redox
- Automatic dispensing of the two cleaning products
- Compact design with Smart&Easy
- Easy-to-understand display on the touchscreen
- Remote access to key measurement data
- Retrofitable temperature display
- Neat and organized installation in a removable pipe section
- BAYROL Technology: Made in Germany
What I don’t like as much
- high acquisition costs
- Accessories for flow and temperature (subject to a fee)
- The app and web portal are relatively cumbersome to set up
- Additional electrical enable despite the paddle switch
- Wear parts and ongoing maintenance costs
- Level monitoring is available only with optional accessories
- Proper chemical balance and regular checks remain necessary
Is an automatic pool dosing system worth it?
For small pools that aren’t used very often, the investment would probably be too high for me. If you only swim occasionally and have no trouble checking the water parameters manually, you don’t necessarily need an automatic dosing system.
For larger pools or those used regularly, however, automation can save a lot of work. This system is particularly useful when extensive pool equipment is already in place and the pH level and disinfection levels need to be kept as constant as possible.
While the system promises optimal water quality, it is also designed to reduce the risk of overdosing. In practice, however, perfect water quality isn’t achieved simply by purchasing a control unit. The following remain crucial:
- appropriate setpoints
- properly calibrated probes
- appropriate water treatment products
- regular benchmark measurements
- Clean dosing hoses and inoculation valves
- Safe storage of chemicals
- a properly functioning circulation system
For my specific use case, the retrofit made sense. Whether the investment will pay off in the long run depends on how stable the values remain over several seasons and how often the probes and pump hoses need to be replaced.
Components and Consumables Used
For this project, I used the following components, among others:
- BAYROL Automatic Cl-pH*
- BAYROL KIT Smart&Easy*
- BAYROL Temperature Sensor*
- BAYROL Redox Sensor*
- BAYROL pH Sensor*
- BAYROL Maintenance Kit*
- Liquid chlorine*
- pH Minus*
- pH-Plus*
- PVC Cleaner*
- PVC Adhesive*
- PVC pipe*
* The links marked as such are affiliate links. If you make a purchase through one of these links, I’ll receive a small commission. This does not change the price.
Summary
With the BAYROL Automatic Cl-pH, I’ve expanded my previous manual pool maintenance routine to include automatic pH and chlorine control. The system monitors pH and redox, controls two dosing pumps, and can dispense the required chemicals based on the setpoint values.
Installation into the existing pool piping was easy to carry out using the Smart&Easy Connector. The electrical pump authorization, the paddle switch, and the proper selection of the pH regulator required more planning.
My initial use of pH-Plus in combination with alkaline liquid chlorine was a mistake. After switching to pH-Minus, the system can effectively counteract a rising pH level.
The retrofitted temperature sensor was much easier to install. After turning off the pump, relieving pressure from the line, and installing the tapping clamp, the measurement was available on the display and in the app within a few minutes.
All in all, the facility isn’t exactly cheap. For pool owners who want to continuously monitor their water parameters and automate some of their routine pool maintenance, it can still be an interesting solution.
FAQs About the BAYROL Automatic Cl-pH and the Temperature Sensor
Is the BAYROL Automatic Cl-pH worth it for a private pool?
This purchase is especially worthwhile for pools that are used regularly or are larger in size, where water parameters should be kept as constant as possible. The system reduces the need for manual refilling and responds to changes even when I’m not checking the pool. For a small, rarely used pool, the investment would probably be too high for me. In addition to the purchase price, you must also factor in the cost of water treatment products, probes, pump hoses, and other accessories.
Does the BAYROL Automatic Cl-pH measure the chlorine level directly?
No. The system measures the pH and the redox potential of the pool water. The redox value is expressed in millivolts and indicates the current oxidation or disinfection capacity. It is not possible to determine an exact chlorine concentration in mg/l from this. That’s why I continue to check the free chlorine level occasionally using a separate pool tester. BAYROL describes the system as a continuous regulation of pH and chlorine levels via redox measurement.
What water parameters should be set before starting up the system?
Before the first automatic operation, the pool water must be prepared manually. BAYROL recommends a pH of 7.2 and a free chlorine level between 0.6 and 1.0 mg/l. The alkalinity should be at least 80 mg/l. I initially corrected any deviating values step by step using appropriate water treatment products, ensured adequate water circulation, and then measured the levels again. Only then did I start the automatic control system.
What role does cyanuric acid play in the transition to liquid chlorine?
Anyone who has previously used organic chlorine tablets should also take the cyanuric acid level into account. The cyanuric acid it contains stabilizes the chlorine against UV radiation, but initially remains in the pool water after switching to unstabilized liquid chlorine. A follow-up test may therefore still be advisable. A value that is too high can affect the effectiveness of the available chlorine and, in practice, can be reduced primarily by adding fresh water or performing a partial water change. The Federal Environment Agency also points out that cyanuric acid should be dosed precisely and that excessive concentrations should be avoided.
Does the dosing system require pH-Plus or pH-Minus?
That depends on how the pH level actually changes in each pool. For me, the value used to be mostly between 6.5 and 6.7, and it would drop even further after heavy rain. That’s why I had initially planned to use pH-Plus. However, the switch to alkaline liquid chlorine changed the situation, because sodium hypochlorite can initially raise the pH level when dosed. That’s why I switched the system to pH-Minus. Before filling the canister, you should take several measurements to determine in which direction the pH level in your pool actually needs to be adjusted.
Why don’t the vaccination points in the Smart&Easy Connector directly affect the probes?
Inside the Smart&Easy Connector, a partition runs lengthwise through the tube. It divides the connector into two chambers through which fluid flows in parallel. On one side are the pH and redox probes and the paddle switch; on the other side are the two inoculation ports. As a result, the freshly dispensed water treatment products—which are still concentrated in that area—do not reach the measuring probes immediately. Measurement and dosing take place simultaneously, but in separate areas.
Why do liquid chlorine and pH-Minus have to be stored separately?
Concentrated chlorine solution and acidic pH-Minus must never come into contact with each other, as this can produce toxic chlorine gas. That’s why I store both canisters in separate collection boxes and use completely separate suction hoses, pumps, and priming valves. In addition, during operation, the two metering pumps do not run at the same time. The substances are added to the flowing pool water at intervals. It is essential to follow the safety data sheets and storage instructions for the products used.
Why are both the pump signal and the paddle switch needed?
Both approvals monitor different statuses. The 230-V control signal informs the BAYROL Automatic Cl-pH that the filter pump has been turned on. The paddle switch also checks whether water is actually flowing through the Smart&Easy Connector. A pump may be powered on but may not deliver enough water due to a closed valve, a blockage, or some other malfunction. Only the combination of an electrical pump signal and actual flow control prevents dosing into a stagnant pipe. BAYROL also stipulates that the dosing pumps may only be powered while the circulation system is running. The electrical connection must be made by a qualified electrician.
How often do the probes need to be calibrated and serviced?
I wouldn’t set a fixed time frame for every pool. I regularly verify the displayed values using an independent measurement and calibrate the probes if any noticeable deviations occur. It’s also a good idea to have your pool inspected at the start of the swimming season and after a long period of storage. The probes must be kept clean and must not be allowed to dry out. During the winter, they are removed and stored in a suitable storage solution. Pump hoses and injection valves are also wear parts and should be checked regularly for deposits, embrittlement, and leaks.
Can the BAYROL temperature sensor be retrofitted?
Yes. I retrofitted the PT1000 temperature sensor into my existing pool piping using the provided tapping clamp. During filter operation, representative pool water should continuously flow through the installation site, which must be within the range of the 2.50-meter-long connection cable. Before drilling, the filter pump must be shut off, the line must be shut off, and the circulation system must be depressurized. After connecting it to the yellow temperature input, I still had to enable the sensor in the device menu. After that, the water temperature appeared on the display and via remote access. If there are any deviations, a temperature calibration can be performed in the menu.

- ✅ 2 KG pour 40 M234
- ✅ Épandage facile
- ✅ Formule complète pour toutes les cultures
Dieser Beitrag ist auch verfügbar auf:
 English
  Deutsch


Ähnliche Beiträge
Draining and waterproofing basements: Effective measures against moisture and flooding

5 diesel parking heaters compared: which one is right for you?