Installing lawn irrigation: Valve box, Hunter solenoid valves and Rain Bird water distribution in detail
Efficient lawn irrigation starts with a well-planned valve box, which forms the heart of the entire garden irrigation system. In this article, I will show you how I set up my valve box, selected the right components and optimized the water distribution. This involves installing the manifold, connecting the Hunter solenoid valves and laying the pipes safely.
I also explain why I rely on a modular design so that the system can be flexibly expanded at any time. All the details on material selection, pressure resistance and optimum connection technology can be found here.
At a glance: What you can expect in this blog post
- Lawn irrigation with valve box – Why the valve box is the central control element of my garden irrigation system
- Material selection and planning – Which components I have used and what to look out for in terms of compressive strength, tightness and expandability
- Installing the valve box – step by step: excavate the pit, prepare the drainage, place and secure the box
- DIY irrigation manifold – assembly with Rain Bird manifold, Hunter solenoid valves and matching fittings
- Automatic irrigation with solenoid valves – How I connected the valves and integrated them into my system
- Flexibility and expansion – options for future connections such as drip irrigation, water sockets or additional sprinklers
- Practical tips – what mistakes should be avoided and what is important when connecting the water pipes
All the details on installation, cabling and water distribution can be found in the article!
Valve box for garden irrigation: structure, installation and optimum choice of material
I built a customized valve box for my irrigation system. I opted for a 14-inch valve box in which I installed a Rain Bird distributor and Hunter solenoid valves. The valve box also serves as a distribution station for the power supply in the garden, allowing me to easily integrate additional electrical components such as a smart irrigation controller or garden lighting at a later date.
What I paid attention to when selecting the material
Choosing the right materials is crucial for long-lasting and low-maintenance garden irrigation. My system works with a water pressure of over 4 bar, which is why all components must be correspondingly pressure-resistant and robust.
1. corrosion resistance and UV protection
As the valve box is installed underground, all components must be corrosion-free. I therefore only use high-quality plastic components, as these do not rust and are more durable. UV resistance is also important, as some parts, such as the connections for water sockets or control units, are located above ground.
2. tightness and secure connections
With a water supply of over 4 bar, every connection must be absolutely tight to prevent water loss and pressure loss. I use two different systems:
- Gardena Quick Connect System for quick and secure connections without threads. Here, the pipes are simply inserted and fixed in place with a locking mechanism.
- Threaded connections with zero rings for all connections with internal and external threads. These zero rings ensure a reliable seal without the need for additional Teflon tape or sealing thread.
This combination not only enables simple installation, but also easy maintenance and expansion of the system.
3. compressive strength and correct choice of components
Water pressure plays a decisive role when planning an irrigation system. Too low a pressure is often not enough to supply all sprinklers with sufficient water, while too high a pressure can stress the components. I calculated the water volume, water flow and water pressure precisely in order to determine the right number of sprinkler circuits and sprinklers.
Detailed information on this can be found in my blog post on calculating water flow and water pressure: Planning and installing lawn irrigation – Is my water connection sufficient?
Why I use Hunter, Rain Bird and Gardena
Each manufacturer has its strengths, so I deliberately choose a combination of Hunter, Rain Bird and Gardena.
- Hunter: The solenoid valves and MP rotators are particularly precise and water-saving. The MP rotators produce an even distribution of water with low water consumption.
- Rain Bird: The distributor ensures structured and reliable water distribution in my irrigation circuits.
- Gardena Quick Connect System: Enables tool-free installation and easy expansion of the system, especially for connections within the valve box.
This combination allows my irrigation system to be flexibly expanded and optimized for various irrigation scenarios such as lawn, bed or hedge irrigation.
The role of the valve box in my irrigation system
My garden irrigation system consists of several important components:
- Water source: The water is supplied via an existing pipe with a pressure of over 4 bar.
- Main line: The water is transported to the valve box via a 25 mm PE pipe.
- Valve box with solenoid valves: This is where the individual irrigation circuits are controlled.
- Pipes: The underground pipes transport the water to the sprinklers and drip irrigation systems.
- Sprinklers and spray nozzles: These provide targeted plant watering and lawn irrigation.
The valve box is the central control element of my system. Thanks to the modular design, I can add extensions at any time, e.g:
- Insert additional sprinkler circuits
- Connecting a water filling station or water sockets
- Supplement a bed or hedge irrigation system
- Lay additional control lines via the empty conduits
This future-proof planning ensures that I can adapt the system flexibly at any time.
Choose the right size of valve box
I deliberately opted for a 14-inch valve box as it offers enough space for my Hunter solenoid valves, the Rain Bird manifold and the Gardena Quick Connect connections.
- Space for extensions: If more solenoid valves are needed later, there is enough space available.
- Flexible connection of control cables: Additional control cables can be added at any time thanks to the empty conduits that have already been laid.
- Secure cable routing for power supply: As the box also serves as a power distributor, all cables are protected.
This planning means that my irrigation system is not only efficient, but also prepared for future expansions.
Components for valve box installation
I used the following components to install the valve box:
- 14-inch valve box for protecting the solenoid valves and connections
- Hunter solenoid valves for automated control of the water circuits
- Rain Bird distributor to distribute the water precisely to the circles
- Fittings and compression connectors to connect the pipe connections securely
- 1″ ball valve to control the water supply manually
- Gardena Quick Connect System to enable tool-free connections
- 25 mm PE pipe as the main line for an even water supply
With this well thought-out choice of materials and planning, I have built an efficient, low-maintenance and expandable irrigation system that is ideal for my requirements.
Valve box for garden irrigation: my installed components in detail
Selecting the right components for the valve box is crucial for reliable and expandable garden irrigation. I put my valve box together individually and used high-quality components that enable efficient water distribution, easy maintenance and flexible extensions.
In this section, I will introduce the individual components of my valve box and explain why I chose exactly these components. From the valve box itself to the Rain Bird distributor with sliding sleeve to the fittings and PE pipes – every component is coordinated to ensure a durable and efficient irrigation system.
Valve box – protection and expandability
Model: UZMAN 14″ Jumbo valve box
The UZMAN 14″ jumbo valve box offers sufficient space for the solenoid valves, the manifold and the required connections. It is made of robust plastic that is weatherproof, UV-resistant and durable. The removable cover makes it particularly easy to access the components for maintenance or upgrades. The ventilation slits ensure that heat doesn’t build up, which is important as the box also serves as a power distribution station for my garden irrigation system.
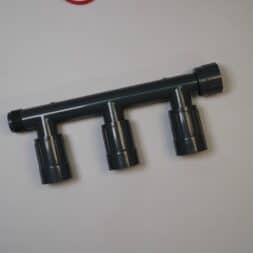
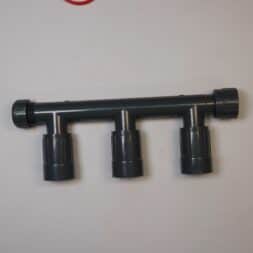
PVC distributor Rain Bird 3-way – Efficient water distribution with sliding sleeve
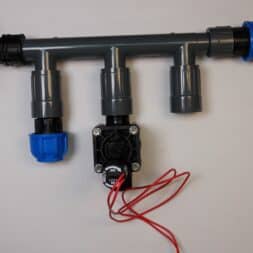
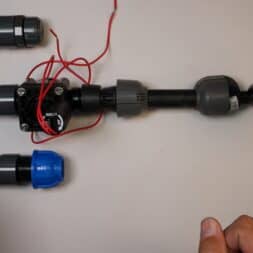
The PVC distributor Rain Bird 3-fold is the central element of my valve box. It ensures that the water from the main line is distributed to the various irrigation circuits of the irrigation system.
- 3 connections with 1-inch female thread for flexible connection to solenoid valves and other components
- High-quality plastic that is particularly pressure-resistant and durable
- Sliding sleeve that allows connections to be loosened without having to remove the entire manifold
Thanks to the sliding sleeve, I can easily detach and replace a solenoid valve or a connected pipe without having to dismantle the entire manifold. This makes maintenance work much easier.
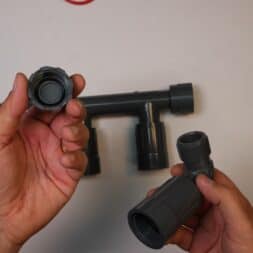
PVC distributor Rain Bird elbow – space-saving installation with flexible sleeve
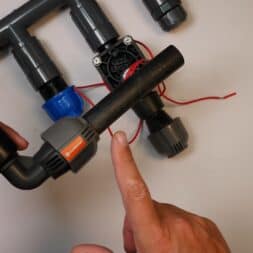
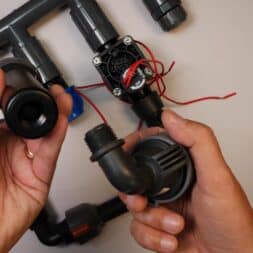
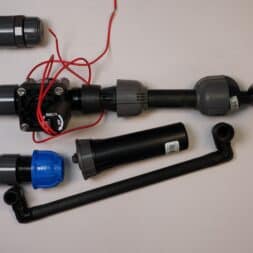
To lead the PE pipes out of the valve box in a space-saving manner, I use the PVC distributor Rain Bird elbow: 1″ external thread x 1″ internal thread. This makes it possible to divert the pipes by 90° without impairing the water flow.
- 1-inch male thread to 1-inch female thread for flexible installation
- Pressure-resistant and durable, ideal for use in the valve box
- Sliding sleeve to release the connection without dismantling the entire system
This space-saving solution helps me to lay the pipes neatly in the valve box without putting unnecessary tension on the connections.
PP ball valve 25mm x 3/4″ – shut-off for downstream circuits
The PP ball valve 25mm x 3/4″ is a central component of my modular irrigation system. It enables the inlet to the next valve box in the next circuit to be shut off.
- Pressure-resistant up to 10 bar – ideal for my irrigation system with over 4 bar operating pressure
- Precise control to activate or cut off specific areas
- Robust plastic construction that is resistant to corrosion and weathering
This feature is particularly practical, as I am expanding my system in stages and can therefore operate already installed areas independently of future expansions.
PVC distributor Rain Bird cap 1″ internal thread – Secure closure of unused connections
To ensure that unused outlets on the distributor remain securely closed, I use the PVC distributor Rain Bird cap 1″ internal thread with integrated sealing ring.
- 1-inch thread for direct mounting
- Integrated sealing ring for maximum tightness
- Tool-free installation by simply screwing on
This end cap is particularly suitable for temporary or permanent closures of unused pipes to prevent water from escaping.
Gardena Quick Connect Fittings – tool-free and flexible connections
I use the Gardena Quick Connect system for my irrigation system, as it enables the PE pipes to be connected easily and securely.
- Plug-in mechanism instead of thread – no additional sealing necessary
- Pressure-resistant up to 6 bar – for safe operation in my irrigation system
- Quick assembly and disassembly – ideal for flexible extensions
These fittings ensure high pressure resistance and enable subsequent conversions and extensions without having to damage pipes or connections.
1″ AG/AG & 1″ IG/IG connector – Flexible adaptation of the connections
- VARIOSAN double nipple 1″ AG/AG
- Male thread on both sides for direct screw connections
- Enables the connection of two female thread connections
- REKUBIK double socket 1″ IG/IG
- Female thread on both sides as an adapter for various components
- Enables flexible combinations with other components
These connectors are essential for customizing and expanding my irrigation system.


PE pipe 25 x 2.3 mm PN12.5 DVGW – Main pipe for a stable water supply
I use PE pipe 25 x 2.3 mm PN12.5 DVGW to transport the water, as it has a high pressure resistance of 12.5 bar and is easy to lay.
- UV-resistant and frost-proof – ideal for year-round use
- 25mm inner diameter for optimum water flow
- DVGW-certified, which guarantees high quality and safety
Thanks to this pipe diameter, I can guarantee an even distribution of water while maintaining a high degree of flexibility in the installation.
Hunter PGV-101MM Solenoid Valve – Automatic Irrigation Control
The Hunter PGV-101MM solenoid valve is one of the most important components in my system. It enables automatic control of the individual irrigation circuits.
- 1-inch female thread for easy installation of the pipes in the garden
- Manual opening function for tests or maintenance
- Flow control to adjust the water volume for each circuit individually
- Pressure range from 1.5 to 10 bar – perfect for my water supply with over 4 bar
I chose this solenoid valve because it is reliable, durable and compatible with many irrigation computers.
Conclusion – Perfectly matched components for a long-lasting irrigation system
All the components I use are optimally matched to each other, so that my irrigation system is not only efficient and low-maintenance, but can also be flexibly expanded. It was particularly important to me:
- Easy maintenance thanks to sliding sockets on manifolds and elbows
- Modular design thanks to stopcock for future extensions
- High-quality materials for maximum durability and tightness
With these components, my garden irrigation system is reliable in the long term and can be adapted to new requirements at any time.
Video: Setting up the distribution station for my lawn irrigation system
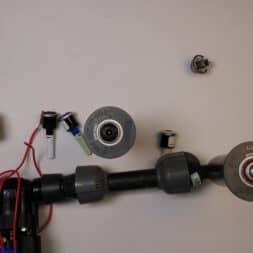
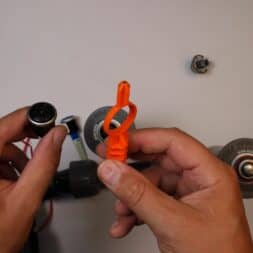
In my video, I show how I set up the distribution station of my lawn irrigation system with Hunter solenoid valves in the valve box. Step by step, I explain the individual components, their function and the correct connection to the Rain Bird manifold.
I will discuss the piping, the choice of fittings and the installation of Hunter’s MP Rotator nozzles. You will find out which components I have installed, what advantages they offer and what you need to pay attention to when assembling a distribution station.
More videos on automatic garden irrigation can be found in my garden irrigation playlist on YouTube.
to find. If you would like to find out more about my projects, you can also take a look at my YouTube channel COMMAIK.
Zuletzt aktualisiert am 6. January 2026 um 10:26 . Ich weise darauf hin, dass sich hier angezeigte Preise inzwischen geändert haben können. Alle Angaben ohne Gewähr. (*) Bei den verwendeten Produktlinks handelt es sich um Affiliate Links. Ich bin nicht der Verkäufer des Produktes. Als Amazon-Partner verdiene ich an qualifizierten Verkäufen. Dein Preis ändert sich jedoch nicht.
Place the valve box underground and install the manifold
1. choose the right location for the valve box and dig it out
The correct positioning of the valve box is crucial for a maintenance-friendly and efficient irrigation system. I have placed the box at the edge of the lawn so that I can carry out maintenance work or extend the system at any time.
I paid attention to the following factors:
- Supply lines for water and electricity: The valve box must be positioned so that the supply lines can be routed to the box without any problems. This applies to both the main water line and the control lines for the solenoid valves.
- Consideration of walkways and obstacles: Walkways, paved areas or existing installations can make it difficult to lay additional pipes or cables. I have therefore ensured that the valve box is positioned in such a way that later extensions remain possible.
- Control cables and empty conduits: In order to safely control the solenoid valves, I planned empty conduits for the control cables of the irrigation control system. This means I can easily retrofit additional valves or sensors at a later date without having to lay new cables in the ground.
- Accessibility for maintenance: The valve box should not be in the middle of a path or under a plant bed, but in an area that I can easily reach.
As soon as the optimal location was determined, I started digging the pit. The pit was dug slightly larger than the box itself to create a stable and water-permeable base.
2. installation of the valve box in the ground
I carried out the following steps to ensure that the valve box is firmly seated and protected against waterlogging:
- Mark the floor: The exact position of the box was measured and fixed with markings.
- Excavate the hole: The pit was dug about 10 cm deeper than the height of the valve box to create space for the drainage layer.
- Prepare the substrate: A layer of drainage gravel was filled in to prevent waterlogging and create a stable support surface.
- Making holes for pipes: A hole drill was used to create precise openings in the valve box for the water pipes and cables.
- Position and align the box: The valve box was placed in the center of the pit and aligned using a spirit level to ensure that the manifold was mounted straight.
- Lay drainage and weed fleece: To prevent roots and soil from penetrating the box, a fleece was laid around the valve box. This ensures a clean environment and reduces maintenance costs.
- Fix the box with gravel: The pit was filled with drainage gravel up to the lower edge of the pipe penetrations and slightly compacted so that the valve box sits securely and does not slip.
This procedure not only ensures that the valve box is firmly embedded in the ground, but also protects it from water damage and dirt.
3. install the distributor with the solenoid valves
Once the valve box was prepared, I assembled the distributor and mounted it in the box.
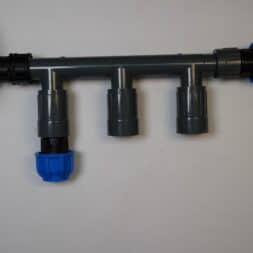
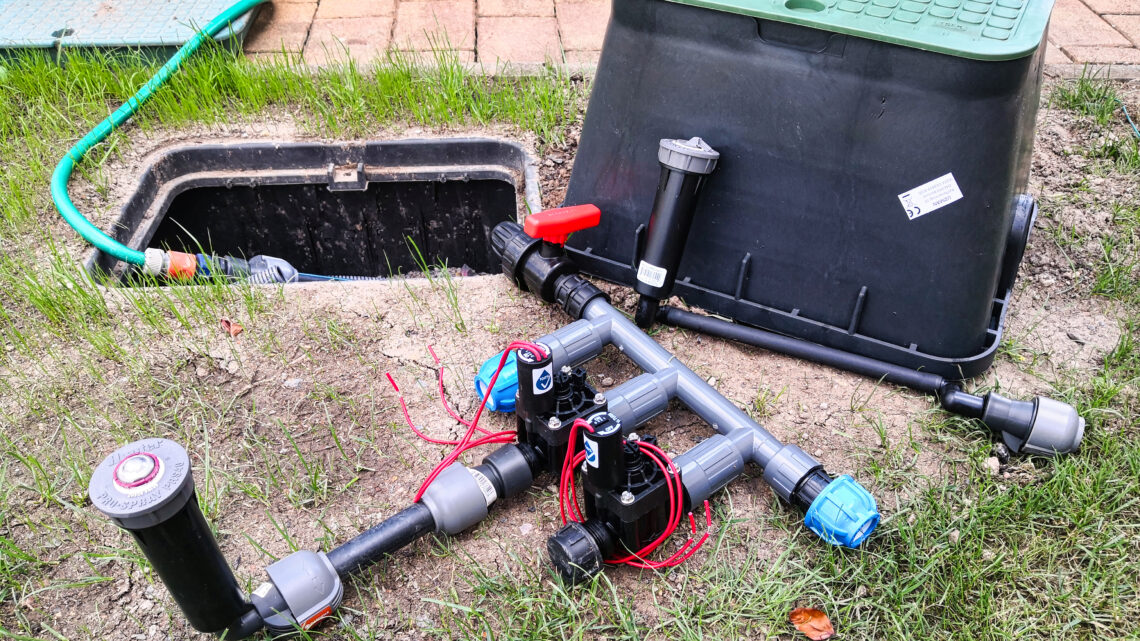
- Assembling the manifold: The Rain Bird 3-way PVC manifold was connected with the appropriate brackets and sleeves. This allowed me to optimally position the solenoid valves and leave space for additional connections.
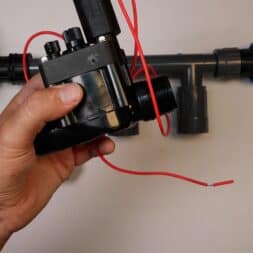
- Connect solenoid valves: The Hunter PGV-101MM solenoid valves have been attached to the manifold. Thanks to the sliding sleeves on the manifold and elbow, I was able to easily loosen or adjust the connection without removing the entire manifold.
- Install the inlet and shut-off: The main line was connected to the manifold via a double socket (REKUBIK 1″ IG/IG). In addition, a ball valve (PP ball valve 25mm x 3/4″) was integrated to manually interrupt the water supply to the next circuit if required.
- Installing the fittings for the pipe connection: I used Gardena Quick Connect fittings so that the PE pipes could be connected securely. These enable a quick and tight connection without the need for additional tools or sealing materials.
Thanks to this careful design, the distributor is optimally aligned, the water distribution is precisely regulated and future maintenance work or extensions are possible without any problems.

- ✔ Hochwertiges Geotextilvlies/Drainage- u. Filtervlies 150g/m² - Profi Qualität - MADE IN GERMANY
- ✔ MATERIAL: Qualitätsvlies aus 100% Polyester, SPEZIELL FÜR DEN AUSSENBEREICH - äußerst strapazierfähig
- ✔ EIGENSCHAFTEN: sofort wasserdurchlässig, UV-Stabil, reißfest, verrottungsfest, beständig gegen Bitumen + Folien, atmungsaktiv, metallfrei (detektorgeprüft)
- ✔ EINSATZBEREICH: Drainage- und Filtervlies im GaLa-Bau: für Wege-, Pflaster- u. Terrassenbau, Dachbegrünung, Wärmespeicher für Beete und Gewächshäuser, Steingärten, Schutz unter Teichfolien, WINTERVLIES: Schutz vor Frost und niedrigen Temperaturen
- ✔ ANGEBOT: 300g (bohrbar), 300g, 500g, 1000g / 2m-Breite/ Groß-Mengen
Next steps: Dig trenches, lay pipes and prepare sprinklers
Once the valve box had been placed and the distributor installed, the next crucial step followed: digging the trenches for the water pipes and control cables.
To optimize the laying of the pipes and cables, I first defined the routes for the trenches. Several areas in the garden had to be taken into account:
- Main lines for water and electricity: The pipes and cables were routed from the valve box to the individual irrigation zones.
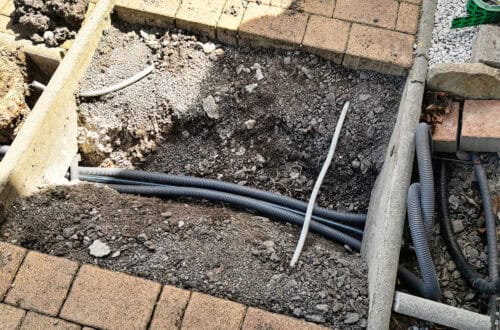
- Crossing the sidewalk: Since I had to lay the water pipe and the control cables under the sidewalk, it was necessary to open it carefully.
- Preparation for the sprinklers: The trenches for the pop-up sprinklers were positioned in such a way that they enabled the lawn to be watered evenly.
- Additional water pipes for beds and other garden areas: In addition to watering the lawn, I had also planned connections for future bed and hedge irrigation.
In order to present the individual work steps clearly, there will be separate detailed articles on this. In these I show how I laid the pipes and cables, how the sprinklers were installed and what special features had to be taken into account when crossing the sidewalk.

- BREITES ANWENDUNGSFELD: Der ROTHENBERGER Industrial Rohrabschneider ist für verschiedene Kunststoff-Rundrohre bis 42 cm geeignet: PVC, CPVC, PP, PEX, PE, Gummischläuche und Mehrschichtrohre.
- EINFACHE BEDIENUNG: Mit Ratschenmechanismus für optimale Kraftübertragung. Lange Hebelarme für optimale Kraftübertragung. Transportsicherung im Griff integriert.
- HOHE ROTHENBERGER Industrial Qualität: Mit rostfreier Stahlklinge und Sicherheitsbügel. Griffflächen für optimalen Grip, ergonomisch geformt.
- GERINGER KRAFTAUFWAND: Mit Ratschenmechanismus und langen Hebelarmen für optimale Kraftübertragung.
- ZEITSPAREND IN DER ANWENDUNG : Öffnung des Messers per Knopfdruck. Rohrauflage optimal ausgeformt, gute Fixierung des Rohres durch breite Auflage für eine hohe Maßhaltigkeit mit einer 90° Schnittführung.
Summary: Valve box for lawn irrigation – structure, installation and choice of material
The valve box for garden irrigation is the central control element of my automatic irrigation system. I installed a custom valve box with a Rain Bird manifold and Hunter solenoid valves to ensure efficient water distribution in the garden irrigation system. The box also serves as a power distributor, making it easy to add extensions such as a smart irrigation control system at a later date.
Material selection and system structure
When selecting the components, I paid attention to corrosion resistance, tightness and pressure resistance, as my irrigation system works with over 4 bar water pressure.
- Tightness: The Gardena Quick Connect system enables tool-free connections, while zero rings ensure a secure seal for threaded connections.
- Pressure resistance: All components are designed for the high pressure load to prevent leaks and pressure losses.
- Flexibility: The irrigation manifold has been fitted with sliding sockets so that I can connect or replace the irrigation valve without having to remove the entire manifold.
I use Hunter solenoid valves for control, which work precisely and reliably. Wiring the Hunter solenoid valve was straightforward thanks to the existing empty conduits, which means I can retrofit additional valves if necessary.
Installing the valve box and manifold
The valve box irrigation installation began with the excavation of a stable pit, which was filled with a layer of drainage gravel. The valve box was then aligned, protected with weed fleece and fixed in place with gravel to create a stable and durable structure.
The DIY irrigation manifold included installing the Rain Bird manifold, connecting the Hunter solenoid valves and installing the main inlet with a ball valve to allow flexible control of the water distribution.
Expandability and future possibilities
The valve box has a modular design and enables easy expansion of automatic irrigation with solenoid valves. I can connect additional sprinklers, drip irrigation systems or water sockets through the existing empty pipes.
Further details on the laying of the pipes, the lawn sprinkler installation and the sidewalk crossing will follow in separate blog posts.

- Einzigartig mit Rückflussverhinderung (CV)! – Hunter PROS-04 PRS40-CV Gehäuse verfügt über ein integriertes Rückflussverhinderungsventil, das Wasserrückfluss verhindert und Druckstabilität gewährleistet. Perfekt für unebenes Gelände, da Wasserverluste und Staunässe vermieden werden - besser als Modell PRS40 ohne Ventil!
- Optimale Druckregulierung (2,8 bar) – Entwickelt für maximale Effizienz mit Hunter MP Rotator Düsen. Der gleichmäßige Druck sorgt für eine exakte und wassersparende Bewässerung.
- MP Rotator – Präzise Mehrstrahl-Technologie – Erzeugt rotierende Wasserstrahlen, die langsam und gleichmäßig eindringen. Spart bis zu 30 % Wasser im Vergleich zu herkömmlichen Düsen! Perfekte Wahl für geplante Rasenbewässerung.
- Robustes PRO-Spray Gehäuse mit 10 cm Aufsteiger – Teil des exklusiven Verdone Sets, kombiniert bewährte Hunter-Technologie mit einer optimalen Zusammenstellung für maximale Leistung. Anschluss mit ½" Innengewinde, widerstandsfähig, wetterfest und ideal für private sowie gewerbliche Anwendungen.
- Düse nach Wahl für Ihre individuellen Bedürfnisse! Dieses Verdone Set enthält eine Hunter MP Rotator Düse Ihrer Wahl.
- GEWÄHLTE VARIANTE: MP-2000-210: MP Rotator-Düse, 10 mm/h Niederschlagsrate, 4 m bis 6,4 m Wurfweite, Sektor 210° bis 270°, Wasserverbrauch ca. 5,68 l/min bei 2,8 bar, grün. Perfekt für mittlere, unregelmäßige Rasenflächen.
Further links on lawn irrigation and valve box installation
For further details on installing the valve box and water distribution, the following videos are helpful:
Building a lawn irrigation system: Installing a valve box with Hunter, Rain Bird and Gardena
In this video, I show you how I assembled and installed the valve box for my lawn irrigation system. The water pipes were laid and an additional pipe for drip irrigation was routed to the raised bed. I also buried the empty electrical conduits for the control cables of the solenoid valves in the ground in order to be able to flexibly extend the irrigation control system.
Building a lawn irrigation system – Install valve box, components & tools with Hunter MP rotator
Here I show the installation of the water distributor with the Hunter solenoid valves in the valve box. I go into the components and tools used and explain the advantages and disadvantages of the distribution station, fittings and lawn sprinklers.
These videos provide a detailed supplement to this article and show the most important steps in building an automatic garden irrigation system.

- vormontierter Verteiler für Ventilbox ( Box inklusiv) im Lieferumfang enthalten: PP Verschraubung Magnetventil 100-HV-MM von Rain Bird, Kugelschieber, Nippe,l Plug, Verteiler Rain Bird 1 x Rain Bird Bogen mit 2 x Innengewinde, 1 x Pressluftanschluss, Ventilbox VBA02675 ( 4 fach Verteiler) VBA02674 (2 und 3 fach Verteiler)
- passendes Steuergerät RZX 4 Zonen ,6 Zonen,8 Zonen für den Innenraum oder 4 Zonen,6 Zonen ,8 Zonen Außenbereich finden Sie in unserem Shop
FAQ on installing a valve box for garden irrigation
1 Why is a valve box important for garden irrigation?
The valve box is the central control element of an irrigation system. It contains the solenoid valves that control the individual irrigation zones and enables a clean and protected installation of the water pipes.
2. which components belong in a valve box?
Typical components include a robust valve box, a manifold (e.g. Rain Bird), Hunter solenoid valves, fittings, ball valves for manual shut-offs and waterproof electrical connections for the control system.
3. how big should a valve box be?
The size depends on the number of solenoid valves. A 14-inch valve box provides space for multiple valves and expansion options without cramping the installation.
4 Which materials are suitable for the valve box?
Corrosion-free, UV-resistant plastics and pressure-resistant connections ensure a durable and low-maintenance irrigation solution.
5 How is the valve box installed correctly?
The box is placed in a pit, placed on a drainage layer of gravel and protected with weed fleece to prevent soiling and waterlogging.
6. which connections are useful for the water pipes?
The Gardena Quick Connect system offers tool-free connections, while zero rings on threaded connections ensure a secure seal.
7. how is the distributor connected to the solenoid valves?
The manifold is fitted with sliding sockets so that individual valves can be easily replaced. The solenoid valves control the water supply for the respective irrigation circuits.
8. how is the control of the solenoid valves integrated?
The valves are connected to a control cable that leads to an irrigation computer (e.g. Hunter X-Core). Alternatively, smart control can be implemented via Hydrawise.
9. can the valve box be used for future extensions?
Yes, thanks to the modular design, additional irrigation circuits, water sockets or drip irrigation systems can be retrofitted without any problems.
10. which common mistakes should be avoided?
The most common mistakes include incorrect placement of the box (difficult to access), insufficient sealing of the connections, lack of drainage for the winter and installation of the components too close together.

- Ventilbox mit 4 Magnetventilen anschlussfertig vormontiert
- Plug&Rain: Baugruppen statt viele Einzelteile, so gelingt die Planung und Installation einer Bewässerungsanlage sicher!
- Dimensionen für Eingang: 25mm PE-Rohr (3/4")
- Dimension der Abgänge aus der Ventilbox zu Tropfrohr und Regnern: 25mm PE-Rohr (3/4")
- Hohe Qualität und Komponenten von Hunter, Dura, etc - weltweit führenden Bewässerungsherstellern
Dieser Beitrag ist auch verfügbar auf:
English
Deutsch


