Installing a mobile diesel parking heater in the garden shed
In my search for an efficient and self-sufficient heating solution for my garden shed, I decided to build a mobile heating box with a diesel parking heater. My aim was to create a compact, weatherproof and flexible heating box that not only reliably heats my animal house, but can also be used in the camper, motorhome or for other projects.
With the 8kW diesel parking heater, I was able to implement a powerful yet economical solution that provides constant heat even at temperatures of -10°C. In this article, I describe how I planned, built and installed the heating box and share my practical experience from the first tests
At a glance: What you can expect in this article
- Building and installing a mobile heating box: Step-by-step installation instructions for constructing and installing a flexible heating box with an 8kW diesel parking heater.
- Secure fastening: Stable and vibration-free installation of the heating box on the house at the rear of the garden shed using heavy-duty brackets and mounting rails.
- Optimized air circulation: Drilling of wall openings, installation of hot air and circulation pipes and sealing with heat-resistant sealing tape.
- Laying the power connection: Installation of a switchable outdoor socket with secure cable routing using empty conduits and watertight cable glands.
- Installing the remote control: Laying the control cables and installing the control panel in the garden shed for easy operation of the heating.
- Lay the flue gas hose safely: Installation of a heat-resistant flue gas pipe with condensate drainage and fixing with metal clamps.
- Initial test results: Efficient heat output, quiet operation and low diesel consumption – ideal for cold winter months.
Why install a diesel parking heater?
The animal house: What should be heated?
The building to be heated is a wooden plank garden shed that I have converted especially for my animals. The house has been extended with an outdoor aviary, which offers additional space and freedom of movement. Inside, budgies, guinea pigs and rabbits live in separate areas.
Especially in the cold winter months, it is important to maintain a constant temperature inside the house to ensure the well-being of the animals. While the outdoor aviary does not need to be heated, I need a reliable and energy-efficient heat source for the garden shed.
You can find out more about the construction of the animal house and the outdoor aviary in my detailed blog post:
Build your own bird aviary and small animal aviary in the garden – outdoor enclosures for rabbits, birds and guinea pigs.
The problem with the previous solution
My original approach was to heat the animal house with an electric fan heater. Although this was powerful, it turned out to be far too power-intensive. With my photovoltaic system, I couldn’t run the fan heater continuously during the cold winter months. Especially the long nights with temperatures of up to -10°C showed the limits of my previous system.
My power requirement for the fan heater was around 8 kWh per night, but the capacity of my batteries was nowhere near enough. Even on sunny winter days, the PV system only generated around 1.92 kWh, which was not even enough for half of the electricity required.
The solution: Install a diesel parking heater
The China heater solves this problem effectively: with an output of 8 KW and a consumption of 0.2 to 0.3 liters of diesel per hour, operation remains affordable even with continuous heating over several days. It also works completely independently of the solar power from my off-grid PV system and provides constant heat. An ideal mobile solution for cold regions and long nights.
If you want to find out more about why I chose the VEVOR diesel heater and how it performed in my initial tests, you can find all the details in my blog post:
Diesel parking heater for animal house, workshop and camper – My test of the VEVOR 8kW heater.

- Einfache Lösung ohne Installation: Genießen Sie eine effiziente Heizung mit unserem All-in-One-Dieselheizgerät, das keine Installation erfordert und perfekt für Outdoor-Aktivitäten wie Camping geeignet ist. Heizleistung: 8 kW; Nennspannung: 12 V. Einsatzbereich: 215-269 Fu߲ (20-25 m²). In nur 10 Minuten sorgt unser innovativer Wärmetauscher aus sandgestrahltem Aluminium für eine schnelle und effiziente Wärmeübertragung und damit für eine angenehme Temperatur im Fahrzeug, Boot oder Kabine.
- Niedriger Energieverbrauch & hohe Leistung: Sparen Sie Kraftstoffkosten mit der präzisen, geräuscharmen Kraftstoffpumpe der VEVOR-Dieselheizung, die weniger als 1 Gallone pro Nacht verbraucht und den Kraftstoffverbrauch auf einen Bereich von 0,16 L bis 0,62 L/h senkt. Mit einem großen 5-Liter-Kraftstofftank kann der Diesel-Lufterhitzer bis zu 8 Stunden ununterbrochen Wärme liefern, wodurch die Kraftstoffeffizienz maximiert und Energieverschwendung minimiert wird.
- Intelligente Doppelsteuerung: Übernehmen Sie die Kontrolle über Ihr Heizerlebnis mit unserer 32-Fuß-Fernbedienung (10 m) und dem LCD-Display. Heizen Sie Ihr Fahrzeug von außen vor, halten Sie den Innenraum warm, wärmen Sie den Motor vor und verhindern Sie, dass die Scheiben vereisen. Das große LCD-Display gibt Ihnen einen klaren Überblick über den Status Ihrer Heizung. Die Temperatur kann von 46 bis 96,8 ºF (8 bis 36 ºC) eingestellt werden, um Ihren spezifischen Bedürfnissen zu entsprechen.
- Bleiben Sie überall warm: Unsere Dieselheizung mit 8 kW ist für Höhen bis 9843 Fuß (3000 m) geeignet und funktioniert problemlos bei Umgebungstemperaturen von -104 bis 104 ºF (-40 bis 40 °C). Ob in großer Höhe oder in Gebieten mit niedrigen Temperaturen, diese tragbare Dieselheizung sorgt überall für konstante Wärme.
- Sicher & zuverlässig: Unser Diesel-Lufterhitzer ist mit einem Hochsicherheitssystem ausgestattet, das einen sorgenfreien Einsatz in verschiedenen Umgebungen wie Autos, Wohnmobilen und Booten ermöglicht. Es bietet konstante Temperaturregelung, Timerfunktion, Sprachübertragung, Vorwärmung und Überhitzungsschutz bei über 518 °F (270 °C) für ein sicheres und komfortables Erlebnis die ganze Nacht hindurch.
Installing the mobile heating box on the animal house: The steps at a glance
I had already built the heating box and described it in detail in my blog post:
Build your own mobile heating box – The best DIY solution with an 8kW diesel parking heater.
Now I had to mount the heating box safely and functionally on the outside of the garden shed, which serves as an animal house. The following steps were necessary for this:
Secure attachment of the heating box
The heating box had to be mounted stably at the back of the garden shed to permanently support the weight of the box and the vibrations of the diesel heater. As the crate is installed outdoors, a weatherproof and theft-proof attachment is crucial. In addition, care had to be taken to ensure that the box remained easily accessible for maintenance work. Nevertheless, the installation was to be implemented in such a way that I could use the mobile heating system elsewhere at any time.
Drill openings for air circulation
Effective air circulation is necessary for the heating system to perform its function. This requires:
- A hole for the warm air hose to guide the heated air into the animal house.
- Another hole for the return air hose, which feeds the room air back into the heating box to heat it up again.
Without these ducts, the heating system would not be able to efficiently transfer its heat output into the interior of the house.
Route the power supply to the outside
The diesel heater requires a reliable power source to ensure operation. As the power supply was previously only provided inside the building, the cables had to be routed outside. At the same time, the power supply should be switchable from the inside so that I can conveniently control the heating.
The cables had to be laid in such a way that they could be securely connected to the contact plugs on the heating box. I have already fitted the mating connectors to the box so that I can connect or disconnect the cables at any time. This makes the power supply flexible and allows the heating box to be used in other locations if required.
As the garden shed could be frequented by wild animals such as martens, the cables also had to be protected against damage. Proper installation in conduits or with a protective sheath ensures that the cables are safe from animals.
Laying the remote control cable
The diesel heater has a remote control that allows me to precisely regulate the temperature in the house. To be able to use the remote control inside the garden shed, the control cables had to be laid through the wall. Here too, the cables had to be installed in such a way that they could be easily and safely connected to the heating box using contact plugs.
This modular connection makes it easy to operate the heating without having to leave the house – particularly important on cold winter nights.
Laying the exhaust hose safely
The exhaust hose of the diesel heater discharges the combustion gases to the outside and can reach temperatures of over 100°C. Improper installation could:
- Cause a fire hazard if the hose comes into contact with flammable materials.
- Dangerous exhaust fumes into the house if the hose is not securely sealed or the wind is unfavorable.
It was therefore important to lay the hose in such a way that the exhaust gases could escape safely and the house remained protected from risks.

- Power_Source_typ; Handbetrieben
- Farbe: Silber
- Material: Plastik
- Packungagegewicht: 4.999 Kilograms
- Packungage die Größe: 30.0 L X 80.0 H X 50.0 W (Centimeters)
Installing a mobile heating box on the animal house: This is how I did it
Once the planning was complete, I was able to start installing the heating box on the outside of the garden shed. Here I describe the exact steps that I implemented in practice:
Attach the heater box securely to the garden shed
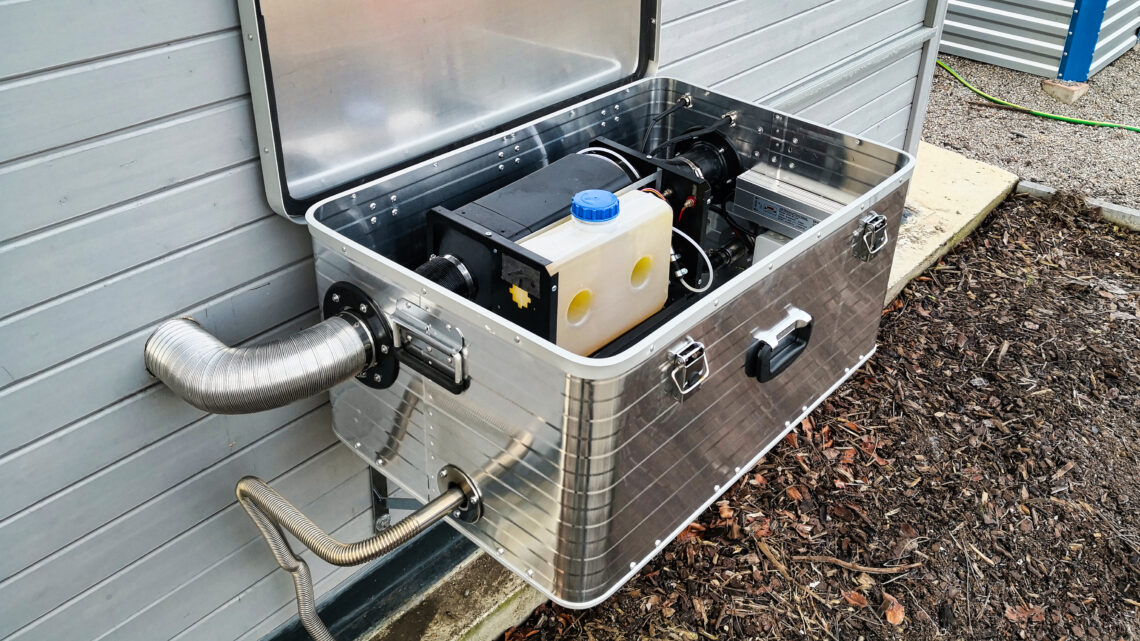
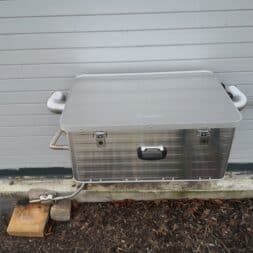
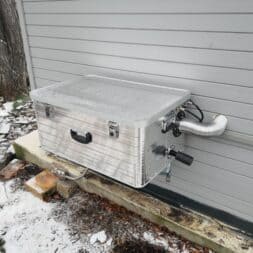
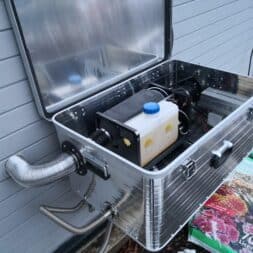
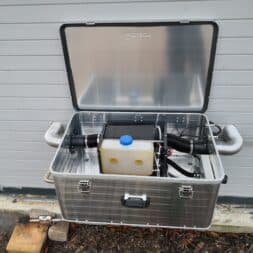
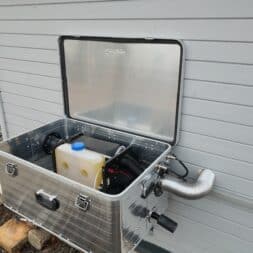
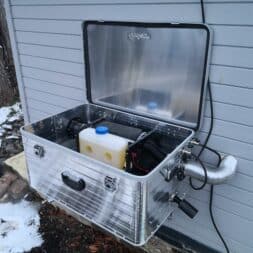
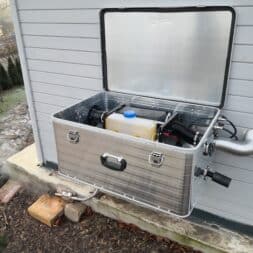
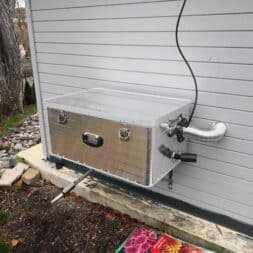
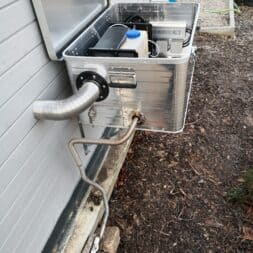
The heating box was installed at the rear of the garden shed. First of all, I chose a location where the box is easy to reach but not in the way. It was important to attach the heating box securely and stably in order to be able to permanently support the weight and vibrations of the diesel heater.
Here are the steps I took to attach the heating box:
Installing heavy-duty brackets: I put 10 mm threaded bolts through the wall of the garden shed. The previously marked points were drilled precisely so that the threaded bolts could be guided from the inside to the outside. The heavy-duty brackets were securely bolted on the outside, while I counter-locked the bolts on the inside with nuts to create a stable connection.
Mounting rails attached: I screwed two mounting rails over the two heavy-duty brackets. These rails serve as a support for the heating box. Screwing the box onto the mounting rails makes it possible to quickly remove the heating box from the inside without having to dismantle the entire mounting. This keeps the heating box theft-proof and at the same time flexible if it is to be used at a different location.
Decoupling with rubber buffers: The mounting rails were decoupled from the heavy-duty brackets using rubber buffers. This effectively dampens vibrations from the diesel heater and minimizes noise development.
- Hochwertiges Material: Reinaluminium in hchster Qualitt, Innendurchmesser 75 mm
- Flexibel und ausziehbar: Anwendungslnge bis 3,0 m, gestaucht auf 0,6 m, kleinster Biegeradius entspricht 1 x Nennweite
- Temperaturbestndig: Hlt dauerhaft Temperaturen bis 250C stand
- Sicherheitszertifiziert: Nicht brennbar gem DIN 4102 Klasse A1
- Vielseitiger Einsatz: Optimal geeignet fr Luftfhrung, Standheizung & Dieselheizung
Drill openings for the heating hoses and install air circulation
To circulate the air, I drilled two holes through the wall of the garden shed to channel the warm air from the heating box into the interior and return the return air to the heating box. The positions of the openings have been carefully planned to ensure optimum air circulation:
Hot air outlet fitted
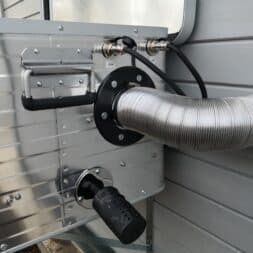
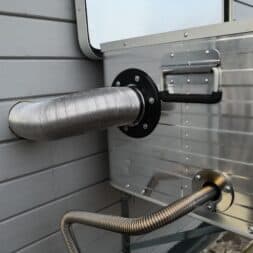
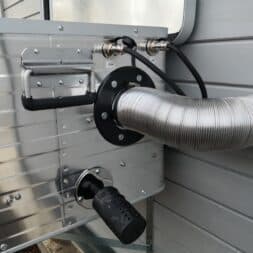
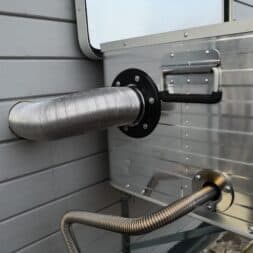
The warm air is blown out on the left-hand side of the heating box through a 75 mm flange. I inserted a 75 mm flexible pipe into the flange, which was fed through the wall into the garden shed in a tight bend right next to the box. I cut out the hole in the wall with a jigsaw. In retrospect, the work would probably have been easier with a reciprocating saw, and inside the house the flexible hose was attached to the air vent with a clamp. The air outlet was then screwed to the inside of the wall so that the warm air is distributed evenly throughout the room.
Circulation pipe laid
I drilled another hole to the right of the heating box for the circulation pipe, which feeds the air from inside the garden shed back into the heating box. Here too, a 75 mm hose was fed through the wall. The hose ensures that the air that has already been heated is fed back into the heating system, thereby saving heating energy.
Sealing work and animal welfare
Both openings were then sealed with heat-resistant sealing tape to create an airtight connection and prevent heat loss. It was also particularly important that the animals inside the garden shed had no opportunity to nibble on the hoses or wall ducts.

Laying the power connection for the heating box
I used the existing 220V power supply from the garden shed to power the heating box. The house is supplied either via my stand-alone PV system or, depending on the charge status of the PV storage system, automatically via the grid connection. This switchover is carried out automatically by my system. Here are the individual steps on how I implemented the power connection to the heating box:
Power distribution extended inside
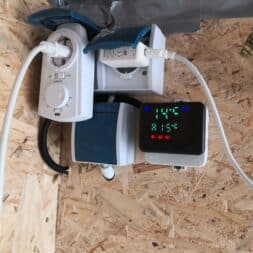
I laid a new 3×1.5 mm² NYM cable from the existing power distribution in the garden shed in the top left-hand corner of the rear wall. I have installed a light switch there, which I can use to conveniently switch the power supply to the heater box on and off from inside.
Cable entry and external socket outlet
I ran the cable from the light switch through the back wall of the garden shed. The drill hole was fitted with a watertight cable gland to make the cable entry weatherproof. I have fitted a weatherproof double socket outside, which can be controlled via the switch inside. This ensures safe and simple operation of the power supply.
Cable duct laid to the heating box
From the double socket, I laid a color-matching cable duct to behind the heating box. The cable duct protects the power supply line from external influences such as the weather and wild animals such as martens.
Plug-in connection on the heating box
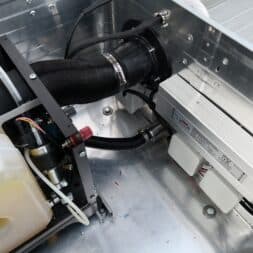
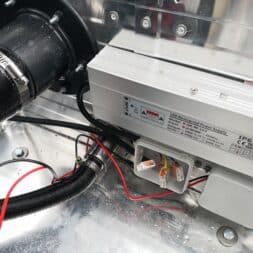
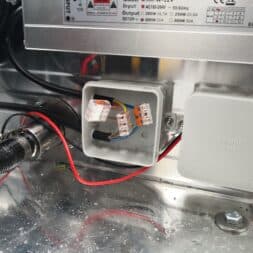
On the heating box, I connected the cable to the counterpart, which is permanently installed on the box and connected to the transformer, via an already fitted waterproof plug. The transformer converts the 220V alternating current into 12V direct current. The other end of the cable is simply plugged into the double socket. This solution allows me to disconnect the power supply at any time and use the heating box at another location if necessary.
Flexibility and security
By installing the switchable socket, I can conveniently control the power supply to the heating box from inside and thus also protect it from misuse. At the same time, the installation remains flexible and mobile, as I can simply remove the power cable from the socket and use it at a different location.

- Hochstrom Einbaustecker mit Massiven Kupfer Steckverbindungen zum Geräteeinbau.
- Wenn Sie Suchscheinwerfer, Pumpen, Kühlaggregate anschließen möchten, verwenden Sie zu Ihrer Sicherheit NUR Hochstrom Steckverbindungen. Diese Geräte haben eine hohe Stromaufnahme, kleine Steckverbindungen können diese Belastung nicht bewältigen (Brandgefahr).
- Bei Hochstromverlängerungen ist auch die Kabellänge, Material des Kabels und der Kabelquerschnitt wichtig ist. Entsprechende Formeln sind im Internet zu finden.
- Technische Daten: Anschlußleistung: Siehe Tabelle | Pinzahl: Siehe Auswahl | Einbaumaß: Ø25mm | Außendurchmesser: 42mm | Steckerlänge: 52mm | Material: Messing verchromt
- Lieferumfang: 1x Einbaustecker | 1x Steckbuchse | 1x Spritzwasser Schutzkappe
Laying the remote control cable for the heating box
The control cables for the remote control have been carefully routed through a separate feed-through in the wall to enable safe and practical operation of the heating box. The installation is similar in many respects to the laying of power cables, but differs in a few details.
Connection to the heating box
On the outside, I connected the control cable with a waterproof plug to the matching counterpart on the heater box. This plug-in connection makes the control unit flexible and allows the cable to be easily disconnected if required.
Cable routing in the cable duct
The control cable was laid in the same cable duct as the power cable. The control cable comes out of the duct next to the double socket and is fed through a hole in the wall into the inside of the garden shed. I carefully drilled this hole and provided it with a cable gland to ensure a weatherproof and secure connection.
Cabling inside the house
Inside the garden shed, I installed a small distribution box right next to the light switch. In this box, I was able to securely connect the control cable with the WAGO terminals to the remote control cables. The use of WAGO clamps allows me to easily disconnect the cable connection if necessary and remove or replace the remote control.
Mounting the control panel
The control panel of the remote control was screwed directly to the cover of the distributor box. Fortunately, the panel has suitable screw mounts on the back, which made installation uncomplicated. The panel is now easily accessible next to the light switch and the cables are neatly stowed away in the distribution box.
Safety for the cables
By mounting them in the distribution box, the cables are safely protected from possible damage – especially from budgerigars, which could otherwise nibble on them.
Future expansion
To increase the flexibility of the heating box, I’m thinking about buying a second remote control that I can permanently install in the heating box. This would allow me to switch to this second remote control when I’m out and about with the heater box and I wouldn’t have to remove the original remote control every time.
With this installation, the remote control of the heating box is not only easy to operate, but also securely and flexibly integrated into the existing infrastructure of the garden shed.

- Leichte Schlauchleitung H 03 VV-F 3 x 0,75 mm², 3-adrig, schwarz
- 5 m
- Kopp
- 152305846
Exhaust hose safely laid and fitted
The flue gas hose had to be laid in such a way that the combustion gases are safely discharged, there is no risk of fire and condensation can drain away reliably. I have implemented the following steps for this:
Connecting the flue gas pipe to the heating box
The 25 mm exhaust pipe was connected directly to the adapter that I had previously installed in the heating box. The adapter is an on-board feedthrough from the shipbuilding industry, which is characterized by its heat resistance and stability. It fits the exhaust pipe perfectly and ensures a secure, tight connection.
Laying the flue gas pipe
The flue pipe has a total length of 2 meters and was laid in such a way that it has no contact with the wooden house or other combustible materials:
- From the adapter, I first led the pipe downwards.
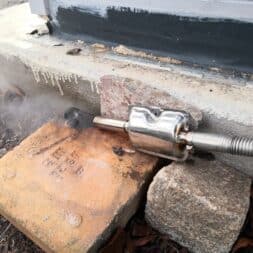
- It was then laid at an angle to the left and finally ends at the level of the house foundation at the corner of the house.
This routing ensures that the flue gases can escape freely and that there is no risk of them entering the garden shed. At the same time, condensation can drain from the pipe unhindered, preventing corrosion of the flue gas pipe.
Fixation and safety
I used metal clamps to securely fasten the exhaust pipe. These were mounted to the overhang of the foundation using hanger bolts. The fixation ensures that the pipe remains stable and cannot slip or be damaged.
- The chosen construction method significantly reduces the risk of exhaust fumes entering the house and reaching the animals. The position of the pipe end on the foundation ensures that the exhaust gases can escape to the outside at a safe distance.

- Hochwertige Materialien: Abgasschlauch für stromerzeuger besteht aus edelstahl, der sicher und gesund ist, die vorteile korrosionsbeständigkeit, verschleißfestigkeit usw. Aufweist, wirtschaftlich und langlebig ist.
- Geräuschreduzierung und Luftdichtheit: Abgasschlauch hat einen guten geräuschreduzierungseffekt, der lärm für sie effektiv reduzieren kann. Es gibt auch zwei klemmen, mit denen die standheizung auspuff besser befestigt werden kann, um eine perfekte abdichtung zu gewährleisten. Die klemmen bestehen aus edelstahl und haben eine lange lebensdauer.
- Einfache Installation: Entfernen sie direkt den alten oder beschädigten edelstahl auspuff schalldämpfer, schließen sie das neue auto edelstahl auspuffrohr an und befestigen sie beide enden des auspuffrohrs mit clips.
- Breites Anwendungsspektrum: Edelstahl abgasschlauch eignet sich zum parken von lufterhitzern, luftrohölheizungen zum parken, kfz-lufthilfsheizungen und generatorabgasen.
- Verpackung und Service: Sie erhalten eine 200 cm standheizung abgasschlauch und zwei edelstahlklammern. Wenn sie fragen haben, können sie sich gerne an uns wenden. Wir werden das problem innerhalb von 24 stunden für sie lösen!
The heating box in the test – practical experience
After installation, I tested the heating box under real conditions to check its performance and efficiency. Here are the most important results:
Constant heat
Even when it was -10°C outside, I was able to keep the inside temperature in the garden shed at a pleasant +10°C. The air inside heats up quickly and I have set the warm air diffuser so that it does not blow directly at the animals. Instead, the warm air flows from below against the board of the clipboard, distributing it evenly throughout the house, and the approx. 30 cm long air ducts that lead from the heating box into the garden shed are currently still uninsulated. The heat loss through these pipes is acceptable from my point of view, but I plan to insulate the pipes with additional insulation foil in the future to further increase efficiency.
Improved air circulation through filters
The pipe for the circulation line, which returns the air from the house to the heating box, also sucked in dust and feathers from the animals during the tests. To prevent this, I uninstalled the air vent on the circulation pipe and fitted an air filter instead. The filter used comes from the computer sector and is a large, fine-mesh filter that effectively retains dust and does not impair the function of the heater.
Perfect control
Controlling the heating from inside the house works perfectly. I switch the heating on in the evening, set the desired temperature and it is reliably reached and maintained. It is even possible to use a programmable timer.
Efficient consumption
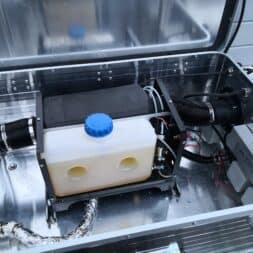
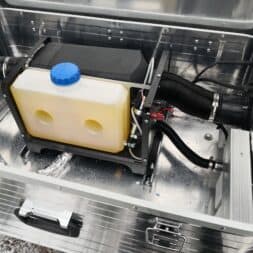
With the current 5 liter fuel tank, the heater could run continuously for about 2 to a maximum of 3 nights (from approx. 17:00 to 07:00). The fuel consumption (diesel or heating oil) is therefore within limits, but I am planning to replace the tank with a larger one. The box was dimensioned in advance so that I can easily retrofit a larger tank.
Quiet operation
The heating box works pleasantly quietly. The fan noise can be heard at the air inlets in the wall, especially when starting or at higher power levels. At level 2, however, only a slight noise is perceptible.
The clacking of the diesel pump is also barely audible. It is only noticed with great difficulty via the ventilation ducts. This shows that the decoupling of the box works excellently and that vibrations and noise are effectively dampened.
Initial tests have shown that the heating box works reliably under real conditions and meets the desired requirements. The heat output is constant, consumption is moderate and noise levels remain within reasonable limits.
Minor optimizations such as insulating the air ducts and replacing the tank will further increase the efficiency and user-friendliness of the heating box.

- BITTE BEACHTEN SIE, DASS DAS XP0A-SR NICHT MIT SBS50 BASISSTATIONEN KOMPATIBEL IST. Nur die deutsche Sprache wird unterstützt. Eine App-Unterstützung ist nicht verfügbar. Wenn Sie App-Funktionen benötigen, wählen Sie bitte das XP0A-MR11 (mit Basisstation) oder das XP0A-iR (WLAN-Verbindung).
- Alarm per Sprachausgabe: Zusätzlich zu der Alarmsirene erklingt eine Sprachausgabe, um Bewohner unmittelbar auf die vorhandene Gefahr hinzuweisen. So gibt der eingebaute Lautsprecher je nach Art der erkannten Gefahr spezifische Warnmeldungen aus, wie etwa: „Warnung! Rauch entdeckt. Evakuieren Sie.“ oder „Warnung! Kohlenmonoxid erkannt. Begeben Sie sich an die frische Luft.“ (Nur Deutsch)
- Einfacher bedeutet sicherer: Praktische Sprachwarnungen informieren Sie schnell und einfach über wichtige Ereignisse wie Notfälle, Batteriestatus, Fehler und Lebensdauer. Auf dem LCD-Display werden Kohlenmonoxid-Messwerte, Batteriestatus und andere Informationen in Echtzeit angezeigt. So können Sie die Situation rasch einschätzen, ohne das Handbuch herauskramen zu müssen – und schnell handeln, um Ihre Familie zu schützen
- Barrierefrei: Dank der Sprachwarnungen ist dieser Melder auch für Kinder geeignet. Zudem können Kinder dank des LCD-Displays und der LED-Statusleuchte problemlos informiert werden
- 2-in-1-Schutz: Umfassender Schutz durch einen einzigen Rauchmelder: der photoelektrische und der elektrochemische CO-Sensor funktionieren unabhängig voneinander und warnen Sie unverzüglich im Falle von gefährlichen Rauch- oder CO-Werten. So ist Ihre Familie mit minimalem Aufwand vor zwei tödlichen Bedrohungen geschützt
Video: Installing a diesel heater: DIY mobile heating box for animal house and garden shed
I have recorded the installation of the heating box and the installation of the connections in a detailed and informative video.
I filmed the unboxing and test of the China heater in the video and published it in my playlist Product tests, experiences & conclusion on my YouTube channel. Another overview of my videos on building the animal house with outdoor aviary can be found in the Garden blog category.
If you want to see more of me and my projects, feel free to check out my YouTube channel.
Zuletzt aktualisiert am 13. February 2026 um 19:45 . Ich weise darauf hin, dass sich hier angezeigte Preise inzwischen geändert haben können. Alle Angaben ohne Gewähr. (*) Bei den verwendeten Produktlinks handelt es sich um Affiliate Links. Ich bin nicht der Verkäufer des Produktes. Als Amazon-Partner verdiene ich an qualifizierten Verkäufen. Dein Preis ändert sich jedoch nicht.
Summary: Building and installing a mobile heating box with diesel parking heater
The search for a reliable heating solution for my garden shed led me to the decision to build a mobile heating box with an 8kW diesel parking heater. The aim was to create a compact, weatherproof and powerful heater that could not only heat a garden shed, but also a camper, motorhome or animal house.
Why a diesel parking heater?
My previous electric fan heater was too power-intensive and could not be operated continuously by my photovoltaic system during the cold winter months. The diesel parking heater solved this problem effectively, as it works independently of the power grid, is efficient with a low diesel consumption of 0.2 to 0.3 liters per hour and provides constant heat – even at outside temperatures of -10°C.
The heating box – compact design and installation
The heating box has been designed to be robust, mobile and flexible. After construction, the heating box was installed at the back of the garden shed. The following steps were implemented:
- Secure fastening: The heating box is secured with heavy-duty brackets, mounting rails and rubber buffers to prevent vibration and theft.
- Air circulation: Two air ducts were routed through the wall of the house – one for the warm air and one for the circulation duct in order to use the heat efficiently.
- Power connection: A double socket has been installed that can be switched from the inside to conduct the power flexibly and safely to the heating box.
- Remote control: The control cables have been neatly laid and connected to a distribution box inside the house so that the temperature can be conveniently set.
- Exhaust gas hose: The exhaust gas pipe with the silencer has been laid in a safe and heat-resistant manner in order to safely discharge the combustion gases and allow condensation to drain off.
Test results: Efficient, quiet and reliable
The tests of the heating box showed excellent results:
- Constant heat: Even at -10°C, the garden shed was warmed from 6 to a pleasant +10°C at level 2.
- Efficient consumption: The supplied tank with a capacity of 5 liters was sufficient for up to 3 nights (approx. 14 hours per night).
- Quiet operation: Thanks to the decoupling and sound insulation, the noise level of the diesel parking heater is barely audible, and the clicking of the pump is also minimal.
- Optimized air circulation: The installation of an air filter prevents dust or animal feathers from entering the circulation line.
- Flexibility: The modular design makes it easy to use the heater box in other locations such as a camper or motorhome.
Conclusion
The combination of the VEVOR 8kW diesel parking heater and the mobile heating box offers a perfect solution for energy-efficient and self-sufficient heating. It is ideal for animal houses, garden sheds or camping and impresses with its simple operation, flexible use and efficient performance.
I therefore draw a thoroughly positive conclusion from the installation of the parking heater in the garden shed.

- -Kompatibel mit Espar/für Eberspacher oder für Webasto 75 mm Kanalverbinder/-verbinder oder anderen Systemen mit 75 mm Durchmesser.
- -Geeignet für den Anschluss aller 75-mm- bis 75-mm-Kanäle.
- -Zum Verlängern von Leitungen mit einem Innendurchmesser von 75 mm.
- Außendurchmesser: 75 mm
- Innendurchmesser: 70 mm
FAQ: Mobile heating box with diesel parking heater – construction and installation
1. why are diesel parking heaters a good choice for garden and animal houses?
- Efficiency: Low diesel consumption (0.2-0.3 liters/hour) ensures low operating costs.
- Independence: Works independently of power grids or solar systems, even with batteries.
- High heat output: Provides constant heat even at outside temperatures of -10°C.
- Flexibility: The heating box is mobile and can be used in different locations, e.g. in campers or mobile homes.
2 What are the advantages of the mobile heating box?
- Compact design: Everything, including the diesel heater and tank, is integrated in a weatherproof box.
- Easy installation: simple connection of electricity, flue pipe and air hoses.
- Modularity: Thanks to plug-in connections, the box can be quickly dismantled and used at other locations.
- Maintenance-friendly: Easily accessible for repairs or tank changes.
3. how is the heating box attached to the garden shed?
- Heavy-duty brackets and mounting rails: Ensure stable and vibration-free installation on the house wall.
- Rubber buffer decoupling: Reduces vibrations and minimizes noise.
- Theft-proof: The heating box is firmly bolted on the inside, but can be easily dismantled if necessary.
4. how is the warm air conducted into the house?
- Warm air hose: Conducts the heated air through a wall opening into the garden shed.
- Circulation pipe: Returns the indoor air to the heating box, making efficient use of the heat.
- Sealing work: All feed-throughs are sealed with heat-resistant sealing tape to prevent heat loss and draughts.
5. how is the power supply to the heating box realized?
- Switchable double socket: Mounted outdoors and controllable from inside.
- Empty conduits and cable ducts: Protect the cables from damage caused by the weather or animals such as martens.
- Modular connection: Plug-in connection allows the heating box to be operated flexibly at other locations.
6. is diesel heating safe?
- Flue gas hose: Heat-resistant and securely fitted to direct combustion gases away from the house.
- Condensate drainage: Prevents corrosion in the flue gas hose.
- CO protection: A carbon monoxide detector is strongly recommended for indoor use.
7. how loud is the heater box in operation?
- Quiet at low levels: The fan noise is minimal and barely perceptible at levels 1-2.
- Effective noise insulation: the decoupling of the heater box reduces vibrations and the clattering of the diesel pump.
- Volume adjustment: The fan noise is audible at higher levels (5-6), but remains acceptable.
8. how is the diesel heater controlled?
- Remote control: The temperature can be conveniently controlled from the garden shed – it would also be possible to operate the parking heater in the camper.
- Control cable: Securely laid and routed through a weatherproof wall duct.
- Additional extension: A second remote control is planned for mobile use of the heating box.
9. how long does the diesel heater run on a 5-liter tank?
- 2-3 nights in continuous operation: At temperatures of -10°C, the tank lasts for around 14 hours of operation per night.
- Option for larger tank: The heater box is dimensioned so that a larger tank can be integrated to extend the running time.
10. what improvements are planned?
- Insulation of the air ducts: To minimize heat loss, the tubes should be insulated with insulating foil.
- Larger diesel tank: For longer running times without refueling.
- Additional remote control: For flexible use of the heating box in various applications.
11. can the heater box also be used in campers or mobile homes?
- Yes, the heating box is mobile and can be used flexibly. With the modular connections, it can be easily removed and installed in other locations, e.g. in mobile homes, tents or workshops.
12. what were the results of the first tests?
- Constant heat: The animal house was heated to +10°C at -10°C outside temperature without any problems.
- Efficient consumption: Moderate costs thanks to low diesel consumption.
- Quiet operation: Noise development is minimal, especially at low power levels.
- Reliability: The heating also functioned reliably and safely under real conditions.

- ✅hervorragende hitzebeständigkeit: unsere auspuffverkleidung ist so konzipiert, dass sie hohen temperaturen standhält, eine hervorragende wärmedämmung bietet und schäden am bootsrumpf und am fahrzeug verhindert.
- ✅vielseitige Kompatibilität: unser Fitting ist kompatibel mit 22mm/24mm Innendurchmesser Schlauchleitungen und eignet sich für Webasto, Planar, Eberspacher, und chinesische Diesel Standheizungen var4, und Generator Abgasentlüftungssysteme.
- ✅einfache Installation: mühelose Installation mit mitgelieferten Schrauben und einer großen Dichtung, die Ihnen Zeit und Ärger erspart, hervorragende Leistung in Dieselheizungsauspuffanlagen, Garagenauspuffanlagen, Pickup-Auspuffanlagen, Generatorauspuffanlagen und Bootsrumpfauspuffanlagen
- ✅korrosionsbeständig und langlebig: Hergestellt aus 316er Edelstahl, ist unser Anschlussstück sehr korrosionsbeständig und kann rauen Salzwasserumgebungen standhalten.
- ✅Verbessern Sie die Auspuffanlage Ihres Bootes: Mit unserer hochwertigen Auspuffarmatur können Sie die Auspuffanlage Ihres Bootes verbessern und eine ruhigere, effizientere Fahrt genießen.
Dieser Beitrag ist auch verfügbar auf:
English
Deutsch







![Installing a mobile diesel parking heater in the garden shed 54 Pinava® Stufenbohrer [ROBUST Line] für Metall, Edelstahl, Kunststoff & Holz [Ø 4-32 MM] - Profi HSS Kegelbohrer - Schälbohrer 10mm Schaft - Blechbohrer Step Drill Bit](https://m.media-amazon.com/images/I/51Ny8y0OJSL._SL75_.jpg)


