Balcony power station – Set up the Solarman app optimally
With a balcony power plant it is possible to cover the basic consumption of electricity in the household. But how do you monitor power generation? How do I know if the system is actually profitable?
Quite clearly: with a program for analyzing, evaluating and monitoring PV power generation.
Balcony power plant – PV modules and inverters
In my blog entry 800W balcony power station – easy to install and optimize yourself, I described the installation and connection of an 800W balcony power station in detail. The matching video can also be seen there.
While the PV modules merely convert the sunlight into direct current, the inverter performs other tasks in addition to transforming it to 220V alternating current. The inverter writes the data, by means of data logger, to the power generation internally.
With this data it is possible to adjust the power consumption to the generation and thus increase the efficiency of the balcony power plant.
To access this data with the Solarman App or the Deye Cloud App, the inverter must first be added to the home WLAN.
Since both apps work similarly and even share the same credentials, I decided to install the Solarman app.
Connecting balcony power plant with WLAN – requirements
To install the Solarman App on the phone and initialize the data logger, the PV power plant and the inverter must be in operation. This can be recognized by the flashing status LED.
The power supply of my Deye SUN800-G3-EU micro inverter is exclusively from the sun. Installation during the night is therefore not possible.
The installation works in two steps:
- In the first step, I have to integrate the inverter into my home WLAN network since it uses its own WLAN network. So I have to pair the inverter’s WLAN with my WLAN first.
- The second step is to install the software, which I can then use later to query my yields, my feed-in and savings.
What you still need, besides your smartphone and good Wi-Fi reception, is the data printed on the back of the inverter. These are on the one hand the serial number of the inverter and on the other hand the serial number for the WLAN.
Depending on where and in which position the inverter is installed, you should note or photograph the data beforehand.
Default password AP_ WLAN “12345678”
URL inverter in the AP network 10.10.100.254
Inverter access data “admin” / “admin”
URL inverter from the private/local network “IP/index_cn.html”

- Energieeffizienz trifft auf Innovation: Der Hoymiles Mikro-Wechselrichter verwandelt Sonnenlicht in nutzbare Energie für Ihr Zuhause; ideal für Balkonkraftwerke zur effizienten Nutzung erneuerbarer Energien.
- 【Integriertes WLAN für Smart Control】 Mit dem integrierten WLAN von Hoymiles UPS können Sie die Energieproduktion in Echtzeit überwachen; eine praktische Funktion für technologieaffine Benutzer, die alles im Auge behalten möchten.
- Einfach zu installieren und zu verwenden: Der Hoymiles-Wechselrichter bietet eine einfache Installation, perfekt für den Eigenbau; ein hervorragendes Gerät zur Maximierung der Energieproduktion auf Ihrem Balkon und zum Schutz der Umwelt.
- ⚡ 2-in-1-Design für maximale Leistung: Der Hoymiles Mikro-Wechselrichter kombiniert zwei Geräte in einem, um die Energieeffizienz zu erhöhen, ideal für Familien, die ihre Energiequellen optimieren und den ökologischen Fußabdruck reduzieren möchten.
- LANGLEBIGKEIT - Mit dem Hoymiles Mikro-Wechselrichter tragen Sie aktiv zum Umweltschutz bei; ein großartiges Beispiel für nachhaltige Technologie, die erneuerbare Energien fördert und die Abhängigkeit von fossilen Brennstoffen reduziert.
Integrating the inverter into the WLAN
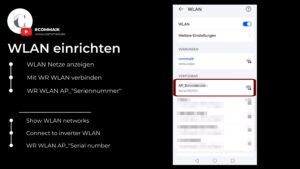
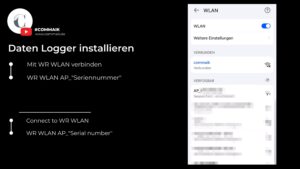
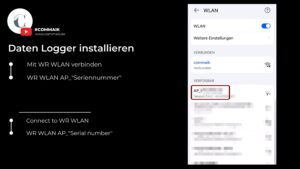
For the installation, I first open the WLAN menu in the smartphone (Android in this case) and display all available WLAN networks. The WLAN network with the letter “AP_” and the serial number from the sticker on the inverter is the correct one.
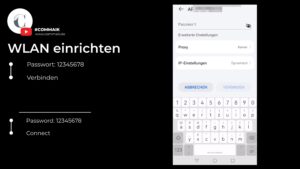
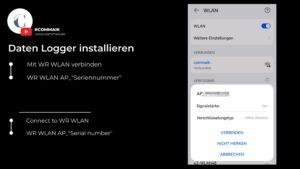
I now have to connect to this WLAN network. When asked for the access password, I enter the default password“12345678”.
As soon as I try to connect to the AP_ network, I get the error message: “This WLAN network does not have Internet access. Connect nevertheless?“. This message is confirmed with “Connect”.
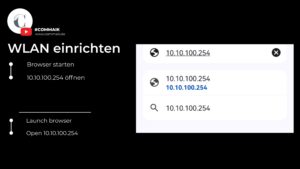
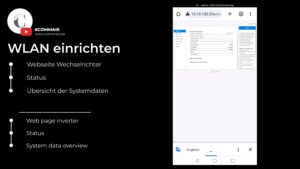
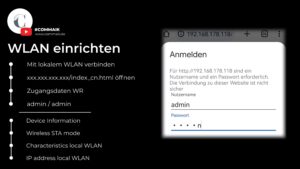
I then switch to my smartphone’s browser and open the “10.10.100.254” website. Via this IP I can connect to the inverter in the “AP_” WLAN network.
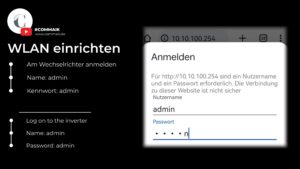
However, before I can access the user interface, I have to enter the access data for the inverter.
The login name is “admin” and the password is also “admin“. These are the factory settings.
I am now on the start page of the inverter and some data is already displayed here.
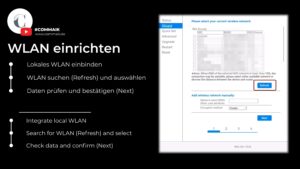
Via the wizard I can select my existing local WLAN network and connect the inverter to it. For this I automatically get an overview of the available WLAN networks. Alternatively, I can use the “Refresh” button to start a new search.
Here I now select my private WLAN network. For security reasons, it is advisable to set up a second guest WLAN network via the router and then use this to access the inverter.
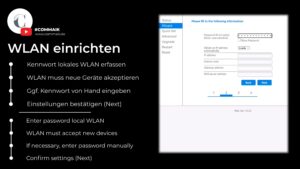
The detected network data is then automatically displayed during selection and I can enter the password for access to my private WLAN or the guest WLAN. By default, the IP address should be assigned automatically by my network, by my router.
In my case I always had to enter the password manually because a “copy and paste” was always acknowledged with an error message.
Furthermore, the own WLAN network must be opened for new end devices now at the latest, otherwise the inverter will be rejected by the router.
On the following screen I can now make various settings to further increase the security of this network connection. However, you can also do this later at your leisure.

- - Mit der Solakon-App berwachen Sie Ihre Balkonkraftwerk Daten per WLAN-Funktion in Echtzeit. Sie sind direkt informiert ber tgliche & jhrliche Solarertrge & CO-Einsparungen! Dank einfacher Einrichtung und intuitiver Bedienung direkt startklar! Hchste Server-Standards durch deutsche Eigenentwicklung!
- - Das Balkonkraftwerk kann ohne Elektriker oder Fachmann in ca. 1-2h aufgebaut werden.
- - Das 1000W Balkonkraftwerk besteht nur aus hochwertigen Bauteilen. 2x bifaziale 500W Tongwei TWMNH54HD Solarmodule, 1x Growatt NEO 800W Wechselrichter, 2x 2,0m Verlngerungskabel, 1x 5m Kabel zur Steckdose & 1x Wechselrichterhalterung.
- - Mit der WLAN Funktion knnen Sie die Leistung einfach mit der Solakon App abrufen.
- -* & * - Unsere Premium-Module liefern auch bei diffusem Licht zuverlssig Energie und sichern Ihnen langfristig hhere Ersparnisse.
- - Solarmodul bestehend aus gehrtetem Glas, monokristallinen Silizium-Solarzellen, Kunststofolie, Aluminiumrahmen, Kunststoff-Anschlssen und Kabeln mit Kupfer. Wechselrichter bestehend aus Metall, Kunststoff und elektronischen Bauteilen. Gesamtgewicht: 53 kg
- - Unser Balkonkraftwerk-Produkt wird in drei separaten Paketen versendet. Das 1. und 2. Paket enthalten die Solarpanels, whrend das 3. Paket smtliches Zubehr wie Kabel, Wechselrichter, und weiteres Installationsmaterial umfasst. Aufgrund logistischer Ablufe bei den Versanddienstleistern knnen diese drei Pakete an unterschiedlichen Tagen eintreffen.
Click on “OK” to establish the connection and restart the inverter. Once the inverter has restarted, I call the IP “10.10.100.254” again in my browser.
You may have to switch back to the inverter’s WLAN network (AP_…) on your smartphone, since your smartphone has reconnected to your private WLAN in the meantime.
On the start page I still have my overview with the current data of the inverter.
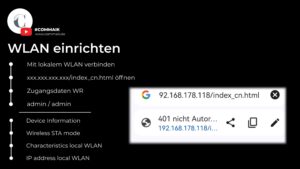
Under “Device Information” I now see under “Wireless-STA-Mode” that this is activated and my private WLAN network is connected to the inverter. The signal quality of my connection is quite acceptable at 74%.
Here I can now also see the new IP address that my router has assigned to the inverter (192.168.178.118). This can of course differ from the IP address of your inverter!
To be able to access the inverter within my local network, I enter the newly assigned IP address and replace the index_cn.html behind the IP address.
I therefore enter the IP in the browser as follows: 192.168.178.118/index_cn.html
Afterwards, the system asks for the login data for the inverter again. Since I haven’t changed this yet, the login name is “admin” and the password is also “admin”.
I now have the ability to access the inverter directly through my private network.
Video: Install and optimize 800W balcony power plant yourself
I documented the setup, the installation, the electrical connection and also the setup of the WLAN connection as well as the apps for monitoring the power output in a video. You can find more exciting videos on my YouTube channel or directly in the matching playlist.
If you want to see more of me and my projects, feel free to check out my YouTube channel.

- [Witterungsbeständig] Unsere witterungsbeständigen, aus AL6005-T5 Aluminium gefertigten verstellbaren PV-Anlagen-Halterungen sind ganz einfach an dem Solarmodul anzubringen, sodass Ihre Solaranlage im Nu einsatzbereit, ist
- [Alles Dabei] Schrauben und Muttern aus Edelstahl SUS304 befinden sich bereits im Lieferumfang. Unsere verstellbaren Halterungen eignen sich für Aufbauten auf flachen Untergründen wie z.B. Garagen, Gärten, Balkone... .
- [Einfache Montage] Bequeme Justierung des Neigungswinkels, um den maximalen Ertrag zu ernten.
- [Details] Maße lange Strebe (BxTxH): 28 x 42x 3 mm Länge lange Strebe: 1180 mm Länge Querstrebe: 525 mm Maße Querstrebe (BxTxH): 28 x 32x 3 mm Max. Solarmodul breite: 1180 mm Materialstärke: 3 mm
- [Lieferumfang] 8x lange Streben 4x kurze Streben 2x Schrauben-Set
Install Solarman App and create customer account
After setting up the WLAN connection between my network and the inverter, I can move on to installing the Solarman app and setting up the data logger.
Using the Android system I use, I will now show you how to install the data tracker on your phone or tablet.
With “Deye Cloud App” and the “Solarman App” there are two free apps that are factually identical. The credentials of one app also work in the other app.
Zuletzt aktualisiert am 17. February 2026 um 20:54 . Ich weise darauf hin, dass sich hier angezeigte Preise inzwischen geändert haben können. Alle Angaben ohne Gewähr. (*) Bei den verwendeten Produktlinks handelt es sich um Affiliate Links. Ich bin nicht der Verkäufer des Produktes. Als Amazon-Partner verdiene ich an qualifizierten Verkäufen. Dein Preis ändert sich jedoch nicht.
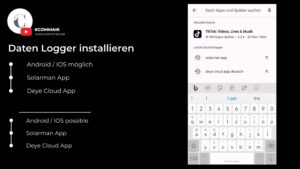
In the Playstore or Apple store, I have the option to download the “Solarman App” or the “Deye Cloud App”. After installation, the app is then launched.
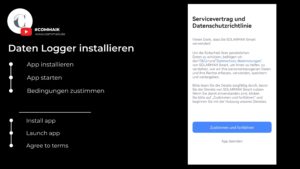
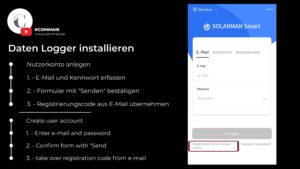
First of all, I have to agree with the terms. It does not work any other way.
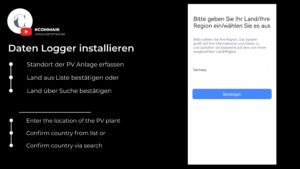
Then I have to enter my country (installation location of the PV system). You can select your country using the list function or the search function.
Even though the app itself runs in German, the country names are in English. Germany can therefore be found under Germany.
If you already have a Solarman App account or a Deye Cloud App account, you can enter your access data directly. Otherwise, a new account must be registered first. Since I don’t have an account yet, I click on “Register a new account” at the bottom left.
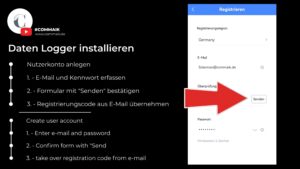
To create a new account, I first enter my email address and a password. Once I have done that, I click on “Send”. The system then sends me an email with the registration code.
This code must be entered and confirmed within the specified time, which is shown on the right as a countdown. It is therefore useful to enter the e-mail address and the password before sending.
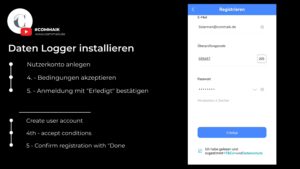
Finally, you must accept the terms and conditions and click “done”.

- Energieverbrauchsüberwachung - Analysieren Sie den Echtzeit- und den historischen Stromverbrauch des angeschlossenen Geräts.
- Einfache Einrichtung und Verwendung - Schnelle und einfache tägliche Einrichtung und Verwaltung über kostenlose App (kostenfrei für IOs und Android)
- Sprachsteuerung - Aktivieren Sie Ihre smarte Steckdose mit Sprachbefehlen über Amazon Alexa oder den Google Assistant
- Zugriff auch von unterwegs - Steuern Sie alle Geräte bequem über das Smartphone, überall und zu jeder Zeit
- Erstellen von Zeitplänen - Schalten Sie Ihre Geräte automatisch zu verschiedenen Zeiten an und aus
Register balcony power plant in the app and set up data logger
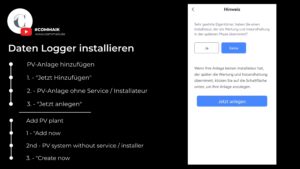
After I have created my user account, I can now add my PV system to the program.
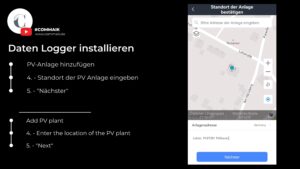
For this, I simply click on “add now” and first get the question displayed whether I have a service installer or not. The question is primarily addressed to operators of larger photovoltaic systems. Because these can also be monitored with the Solarman app.
I do not have a service contract and therefore click on “create now”.
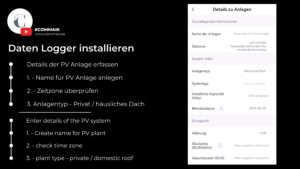
Continue with the specification of the location of the PV system. To do this, I enter the location of the plant below. Then I click on “next” and can enter the details of the plant.
Plant Name: Name of the plant
Time Zone: Time zone
Plant Type: Plant type
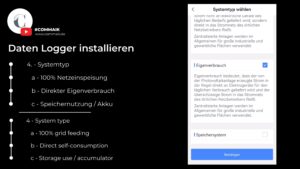
System Type: Photovolataik Plant Type
All-on-Grid: the generated power is fed directly into the public power grid
Self-consumption: the generated power is used by yourself and a surplus is fed into the public power grid
Storage System: the PV system can store the generated energy (batteries)
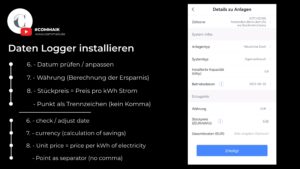
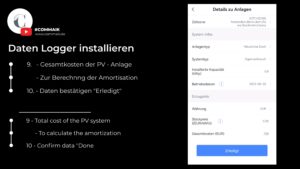
Installed Capacity (kWp): maximum total capacity (use dot instead of comma)
Operating Date: Installation Date
Currency: Currency
Unit Price (EUR/kWh): Savings = electricity price per kWh from EVU
Total Cost (EUR): Total cost of the plant for the calculation of the armotization
First, I give the PV system a name so that I can better distinguish it from other systems later. The time zone fits in my case and I can scroll down further to the system information.
My type of system is a domestic roof.
The system type differentiates between whether the electricity is fed completely into the grid, whether the electricity is primarily consumed by the system itself, or whether a storage system is present in the system. I choose the second option – and hope that my own consumption is as high as possible.
Now I can specify the installed capacity. That’s 600 watts of output power, or 800 watts – since I already have an inverter that can get an upgrade to 800 watts. The recording is done in kWp. Note that a period must always be entered here instead of a comma.
The operating date can remain.
The currency in euro can also remain.
With the unit price, I can record my current electricity price to see what the savings were. In calculate with 0,35 Euro/ kWh. Again, I have to use a period instead of a comma.
I can also give the total costs, i.e. the acquisition costs, to calculate the amortization of the system
Solarman App – Set Up and Configure Data Logger
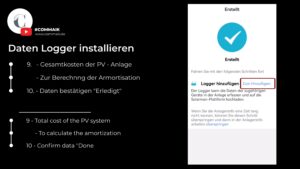
After adding my balcony power plant in the app, I can set up the data logger. I can do this directly via the “Add to” link.
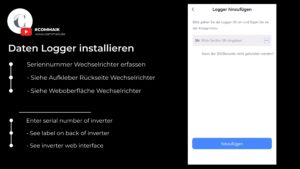
Here I now have the option of either entering the serial number of the inverter via a photo or entering the serial number manually. The serial number is printed on the inverter and can also be retrieved via the web interface (in my case 192.168.178.118/index_cn.html).
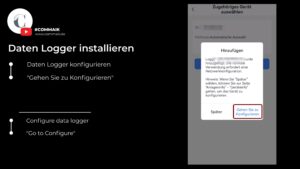
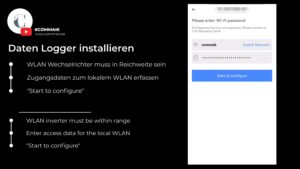
The logger is now added to the app, but not yet configured. To do this, I must be within reception range of the WLAN network of the inverter (AP_…) as well as my private WLAN and carry out the following steps:
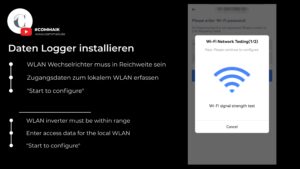
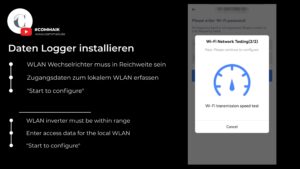
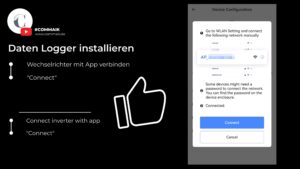
The configuration is started via the “Start to configure” button. The app will then find the inverter’s Wi-Fi signal and try to connect to it. I can confirm this with “Connect”.
After the network search, the overview of my local WLAN networks is displayed and I reconnect to the WLAN from the inverter (AP_).
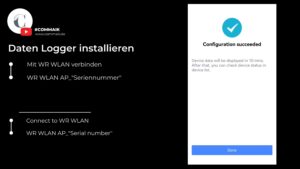
The app now independently establishes a connection to the inverter and links the data from the inverter with my just created balcony power plant in the Solarman app.
Function overview Solarman App
With the data logger, I can now track my PV yields.
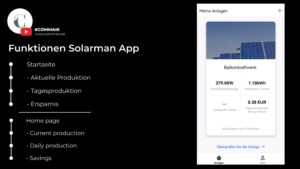
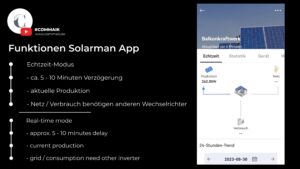
On the home page I can already see the current production, the daily production and my expected yield. When I click on the image, I enter the real-time mode. This is updated approximately every 10 minutes.
On the pictures you can see that I currently generate 262 watts of alternating current which my two photovoltaic modules produce via this inverter.
There is no data for network and consumption. The Deye SUN800-G3-EU microinverter only determines the generated current and cannot deliver any other values.
Further down, I see the 24-hour trend. In the picture you can clearly see that from about 9 o’clock the sun has shone more strongly and the yield later again breaks through the clouds.
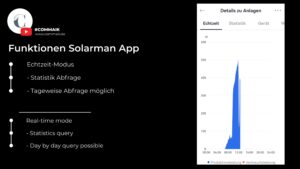
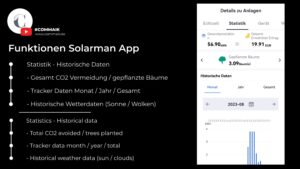
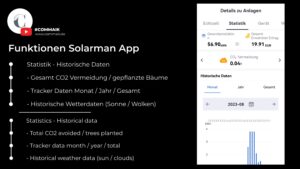
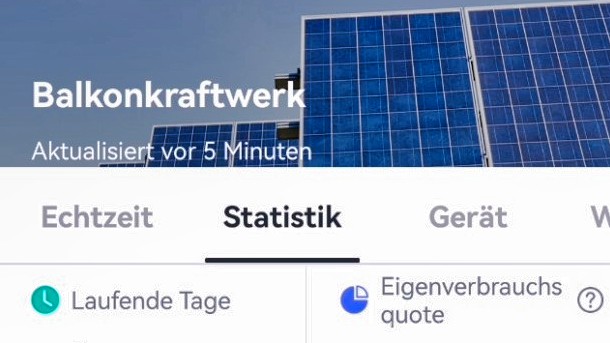
In the statistics menu I have an overview of my data, which lie a longer period back. in the following pictures you see some examples.
You can clearly see in the pictures that the app, the data logger, only runs for 9 days. However, the total production of 56.9 kWh is based on a much longer period. The inverter writes the data internally. The app has only been running for 9 days and the module has already been built for 2 weeks.
Further down I get the information how many trees I would have planted now or how muchCO2 or how much coal I have saved.
In the menu “Device” you will find the technical details of the inverter as well as the current data for power generation, such as the voltage and the current fed by the modules.

- - Mit der Solakon-App berwachen Sie Ihre Balkonkraftwerk Daten per WLAN-Funktion in Echtzeit. Sie sind direkt informiert ber tgliche & jhrliche Solarertrge & CO-Einsparungen! Dank einfacher Einrichtung und intuitiver Bedienung direkt startklar! Hchste Server-Standards durch deutsche Eigenentwicklung!
- - Das Balkonkraftwerk kann ohne Elektriker oder Fachmann in ca. 1-2h aufgebaut werden.
- - Das 900W Balkonkraftwerk besteht nur aus hochwertigen Bauteilen. 2x bifaziale 450W TWMNH-48HD Solarmodule, 1x Growatt NEO 800W Wechselrichter, 2x 2,0m Verlngerungskabel, 1x 5m Kabel zur Steckdose & 1x Wechselrichterhalterung.
- - Mit der WLAN Funktion knnen Sie die Leistung einfach mit der Solakon App abrufen.
- -* & * - Unsere Premium-Module liefern auch bei diffusem Licht zuverlssig Energie und sichern Ihnen langfristig hhere Ersparnisse.
- - Unser Balkonkraftwerk-Produkt wird in drei separaten Paketen versendet. Das 1. und 2. Paket enthalten die Solarpanels, whrend das 3. Paket smtliches Zubehr wie Kabel, Wechselrichter, und weiteres Installationsmaterial umfasst. Aufgrund logistischer Ablufe bei den Versanddienstleistern knnen diese drei Pakete an unterschiedlichen Tagen eintreffen.
- - Solarmodul bestehend aus gehrtetem Glas, monokristallinen Silizium-Solarzellen, Kunststofolie, Aluminiumrahmen, Kunststoff-Anschlssen und Kabeln mit Kupfer. Wechselrichter bestehend aus Metall, Kunststoff und elektronischen Bauteilen. Gesamtgewicht: .. kg
Reporting obligation and market master register
Once the balcony power plant is in place and the sun is shining, the power generation can finally start – unless you live in Germany! Here it needs then nevertheless still some applications, notifications and other bureaucracy.
As I write these lines, the following applies (without guarantee):
- The balcony power plant may not exceed the max. Output power of 600W per electricity meter/household connection must not be exceeded. The power of the modules can be significantly higher, the decisive factor is what power the inverter feeds into the grid. As of 01.01.2024, this limit is to be raised to 800W, as is already common in many other EU countries.
- The balcony power plant must be registered with the local energy supplier. For this purpose, the EVU (energy supply companies) usually offer their own forms. However, approval by the RU is not required. So the municipal utilities are not allowed to prohibit the operation.
- The balcony power plant must be registered in the market master register.
- Other frameworks from BMI.

- DOPPELSEITIGES PV-KABEL - Unser Kabel für Wechselrichter ist auf der einen Seite einer Betteri BC01 Female Buche & auf der anderen mit einem Wieland Steckverbinder Male RST2013 S ZR1 ausgestattet.
- HOCHWERTIG & SICHER ist das Betteri Kabel dank der Gummischlauchleitung, die für die Verwendung bei hohen Beanspruchungen, in trockenen & feuchten Räumen sowie im Freien & Nutzwasser zugelassen ist.
- KOMPATIBEL MIT APsystems, Hoymiles HM 300 / 350 / 400 / 700 / 1500 / 1800 / 1200 / HMT-2250-6T / HMT-1800-6T / Deye SUN600G3-EU-230 / SUN800G3-EU-230 / 1000G3- / TSUN M800(DE) / M800 / Tsol / Envertech, Huayu, Bosswerk & TSUN-TSOL & anderen Marken & Modellen.
- VERSCHIEDENE GRÖßEN - Neben der 5 Meter Länge ist unser robustes Avoltik Balkonkraftwerk Kabel auch in 10 m erhältlich - das ideale Zubehör für alle Ihre Photovoltaik-Projekte!
- AVOLTIK - Von der Photovoltaik Inselanlage bis hin zur Balkonkraftwerk Halterung - Wir bieten innovative & nachhaltige Lösungen in Top-Qualität sowie einen kundennahen Service.
Key points of monitoring balcony power plants
For my 800W balcony power plant project, the focus was not only on installing PV modules and inverters, but also on efficiency monitoring using the Solarman app.
The integration of the inverter into the home WLAN enabled access to production data in order to optimally adjust consumption.
Key points of installation and monitoring:
- Installation: The inverter, which is responsible for converting direct current into 220V alternating current, was equipped with a data logger that records the power generation internally.
- WLAN connection: To use the Solarman app, the inverter had to be integrated into the WLAN. This was done in two steps: first connecting the inverter WLAN to the home network and then installing the app.
- App usage: With the Solarman app, I was able to monitor and adjust power production in real time, which increased overall efficiency.
Next steps after the technical setup:
The system had to be entered in the market master register and registered with the local energy supplier in order to meet the requirements in Germany.
Despite the current limit of 600W output power per inverter, which will soon be increased to 800W, these bureaucratic steps required careful attention in order to legalize the operation.
By planning and setting up both the technical and legal aspects in detail, I ensured the performance and legal compliance of my balcony power plant, which helped to increase efficiency and optimize profitability.
Summary and conclusion
I have installed an 800W balcony power station to reduce my basic electricity consumption in the long term.
The inverter plays a central role, not only in the conversion of direct current into alternating current, but also in data acquisition for efficient use.
The integration of my inverter into the home WLAN enabled me to monitor the electricity production via the Solarman app.
First I had to connect my inverter to the WLAN. To do this, it was necessary to have the serial number of the inverter and the WLAN password to hand.
After a successful connection, I was able to pair the inverter with the Solarman app by registering the serial number in the app.
This app gave me a detailed insight into the energy production of my balcony power plant and helped me to adjust my consumption accordingly.
To operate my balcony power plant in Germany, I had to overcome a few bureaucratic hurdles, such as registering with the local energy supplier and registering in the market master register, as well as observing the maximum output power of 600W, which will soon be increased to 800W.
The installation and monitoring of my balcony power plant were a success. I was able to increase the energy efficiency of my household and meet the legal requirements at the same time.
The detailed monitoring and adjustment of electricity production via the Solarman app proved to be an indispensable tool for the efficient operation of my balcony power plant.

- - Mit der Solakon-App berwachen Sie Ihre Balkonkraftwerk Daten per WLAN-Funktion in Echtzeit. Sie sind direkt informiert ber tgliche & jhrliche Solarertrge & CO-Einsparungen! Dank einfacher Einrichtung und intuitiver Bedienung direkt startklar! Hchste Server-Standards durch deutsche Eigenentwicklung!
- - Die Power Lsung mit 4x 500W Modulen erzeugt maximale Leistung, um lange und konstant mit 800 einzuspeisen! Die Montage ist einfach, schnell und ohne Fachkenntnisse mglich.
- - Das 2000W onPower Solar Balkonkraftwerk besteht nur aus hochwertigen Bauteilen. 4x Bifaziale Tongwei TWMNH54HD 500W Solarmodule, 1x Growatt NEO 800W Wechselrichter, 6x 2,0m Verlngerungskabel, 4x Y-Verteiler, 1x 5m Kabel zur Steckdose & 2x Wechselrichterhalterung.
- - Das Balkonkraftwerk kann ohne Elektriker oder Fachmann in ca. 1-2h aufgebaut werden.
- -* & * - Unsere Premium-Module liefern auch bei diffusem Licht zuverlssig Energie und sichern Ihnen langfristig hhere Ersparnisse.
- - Solarmodule bestehend aus gehrtetem Glas, monokristallinen Silizium-Solarzellen, Kunststofolie, Aluminiumrahmen, Kunststoff-Anschlssen und Kabeln mit Kupfer. Wechselrichter bestehend aus Metall, Kunststoff und elektronischen Bauteilen. Gesamtgewicht: 104 kg
- - - Lieferung auf Palette inkl. telefonischer Terminabsprache durch die Spedition.
FAQ on balcony power plant installation and monitoring
1. what is a balcony power plant?
A balcony power plant is a small photovoltaic system that is typically installed on balconies or terraces to cover basic household consumption. It converts sunlight into electricity.
2 Which components belong to a balcony power plant?
A balcony power plant consists of PV modules that convert sunlight into direct current and an inverter that transforms the direct current into 220V alternating current.
3 Why is the inverter important?
The inverter not only converts the direct current from the PV modules into alternating current, but also records the power generation data to monitor the system.
4. how do I monitor electricity production?
Monitoring is carried out via apps such as Solarman or Deye Cloud, which display real-time data on electricity production and historical yield data.
5 What are the legal requirements for balcony power plants in Germany?
- Power limit: Maximum 600W per electricity meter (expected to be 800W from 01.01.2024).
- Registration with the energy supplier: Required, but approval is not necessary.
- Market master data register: The installation must be registered there.
6. how is the inverter connected to the WLAN?
The inverter is first connected via its own WLAN network and then integrated into the home network. The access data is printed on the inverter.
7 How can I optimize my electricity production?
Efficiency can be increased by adapting electricity consumption to production peaks, e.g. by using energy-intensive appliances when the sun is shining brightly.
8. what do I need to consider during installation?
The PV modules should be installed in a sunny location, and secure fastening and professional cabling are crucial.
9. what data does the Solarman app display?
The app shows current output, daily yield and historical yield data, as well as CO2 savings and other environmental statistics.
10. which typical errors occur during setup?
Common problems are incorrect WLAN passwords, insufficient WLAN range or installation attempts in the dark, as the inverter then has no power.

- - Mit der Solakon-App berwachen Sie Ihre Balkonkraftwerk Daten per WLAN-Funktion in Echtzeit. Sie sind direkt informiert ber tgliche & jhrliche Solarertrge & CO-Einsparungen! Dank einfacher Einrichtung und intuitiver Bedienung direkt startklar! Hchste Server-Standards durch deutsche Eigenentwicklung!
- - Das Balkonkraftwerk kann ohne Elektriker oder Fachmann in ca. 1-2h aufgebaut werden.
- - Das 1000W Balkonkraftwerk besteht nur aus hochwertigen Bauteilen. 2x bifaziale 500W Tongwei TWMNH54HD Solarmodule, 1x Growatt NEO 800W Wechselrichter, 2x 2,0m Verlngerungskabel, 1x 5m Kabel zur Steckdose & 1x Wechselrichterhalterung.
- - Mit der WLAN Funktion knnen Sie die Leistung einfach mit der Solakon App abrufen.
- -* & * - Unsere Premium-Module liefern auch bei diffusem Licht zuverlssig Energie und sichern Ihnen langfristig hhere Ersparnisse.
- - Solarmodul bestehend aus gehrtetem Glas, monokristallinen Silizium-Solarzellen, Kunststofolie, Aluminiumrahmen, Kunststoff-Anschlssen und Kabeln mit Kupfer. Wechselrichter bestehend aus Metall, Kunststoff und elektronischen Bauteilen. Gesamtgewicht: 53 kg
- - Unser Balkonkraftwerk-Produkt wird in drei separaten Paketen versendet. Das 1. und 2. Paket enthalten die Solarpanels, whrend das 3. Paket smtliches Zubehr wie Kabel, Wechselrichter, und weiteres Installationsmaterial umfasst. Aufgrund logistischer Ablufe bei den Versanddienstleistern knnen diese drei Pakete an unterschiedlichen Tagen eintreffen.
Dieser Beitrag ist auch verfügbar auf:
English
Deutsch


